Hotspots
Introduction to Powerlynx Hotspots
Powerlynx Hotspots integrate your router's hotspot with the Powerlynx system, using the RADIUS protocol to authenticate and manage client connections. This page explains how a Powerlynx hotspot fits together, what your controller must support, how to size your setup, and how to add and manage hotspots.
Powerlynx works with any device that can run an external captive portal and authenticate against a third-party RADIUS server. Step-by-step setup guides are available for MikroTik, Cambium, Teltonika, Cudy, Ruckus and TP-Link (Omada) — see Setup guides below — and other devices that support RADIUS and an external captive portal can be used as well.
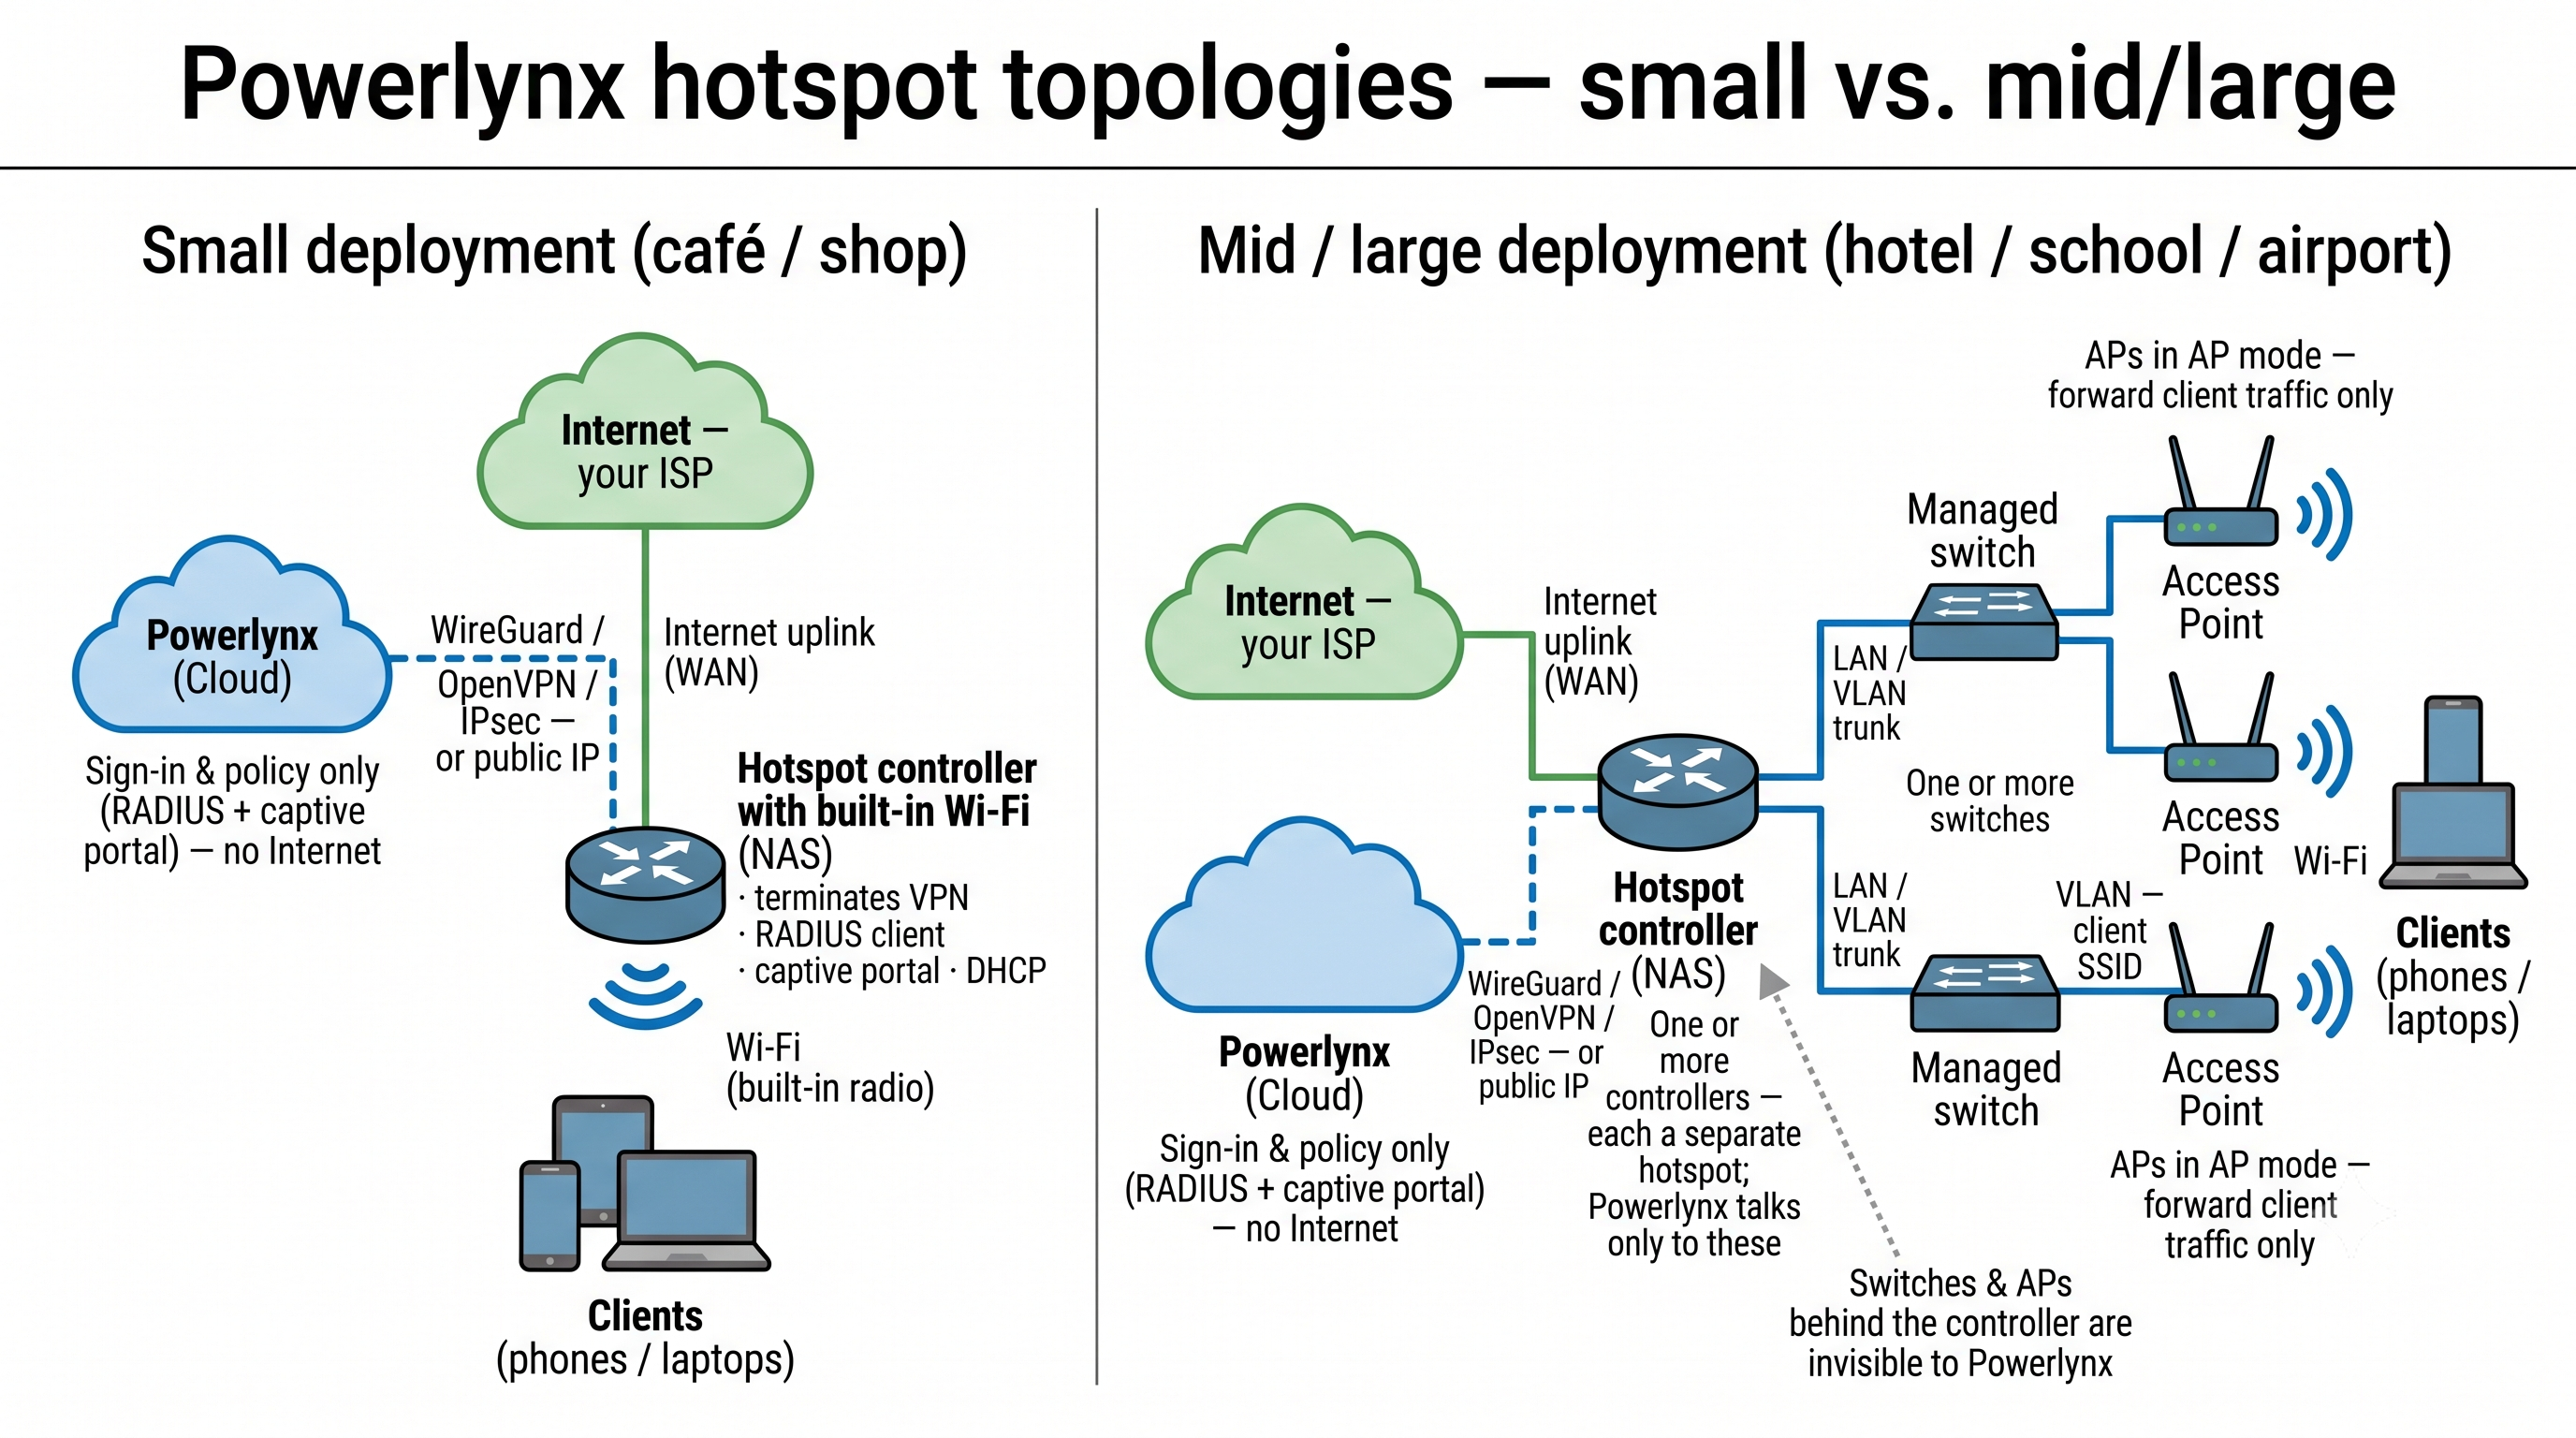
How the layers fit together
A Powerlynx hotspot is built from a few clearly separated layers:
Powerlynx (cloud) → Hotspot controller (NAS) → Switch → Access points → Clients
- Powerlynx provides AAA — authentication, authorization and accounting — and the captive-portal logic. It decides who may connect, when, and for how long, and records usage. Powerlynx does not provide Internet access: your users' Internet comes from your own ISP, through the controller's WAN. (Required layer.)
- The hotspot controller (NAS) is the only device Powerlynx communicates with. It holds the Internet uplink (WAN), terminates the connection to Powerlynx (VPN or public IP), runs the captive portal, acts as the RADIUS client, and hands out DHCP. It can also act as the access point when it has built-in Wi-Fi. (Required layer.)
- Switches carry client traffic on the LAN to the controller. (Optional — depends on your network size and topology.)
- Access points accept client Wi-Fi connections and forward that traffic to the controller. (Optional — depends on your network size and topology.)
TIP
Powerlynx only ever communicates with the hotspot controller. The switches and access points behind it are invisible to Powerlynx — so the controller is the single device that must be fully compatible with Powerlynx and correctly configured.
What your controller (NAS) must support
Any device you use as a controller must meet these requirements:
- External captive portal + third-party RADIUS — it must redirect users to Powerlynx's external splash page and authenticate them against Powerlynx's RADIUS server. Devices whose captive portal only works with the vendor's own cloud login cannot be used.
- RADIUS client (authentication + accounting) — with a shared secret that matches the one configured on your Powerlynx hotspot.
- Reachability from Powerlynx — over WireGuard, OpenVPN, IPSec, an existing VPN, or a Public IP. Behind NAT, use one of the VPN options; a Public IP connection only works with a static, routable address.
- A router, not just an access point — the VPN, RADIUS, captive portal and DHCP all run on the controller.
WARNING
Some devices — for example the Ubiquiti UniFi Dream Machine Pro and UniFi Cloud Gateway Ultra — cannot be used as controllers, because they block external captive portals and third-party RADIUS. Their access points can still be used behind a supported controller.
Small vs. mid/large deployments
- Small (café, shop, single indoor space) — one controller with built-in Wi-Fi is the whole setup: it is the controller and the access point at once.
- Mid / large (hotel, school, airport, resort) — separate the layers: one or more controllers (each a NAS), one or more managed switches, and multiple access points forwarding client traffic back to a controller. Larger sites often run several controllers — each is its own hotspot, and Powerlynx still only ever talks to the controllers.
Setting Up Powerlynx Hotspots
To set up a hotspot, navigate to "Locations," select the desired location, and open it. Under the "Hotspots" tab, click the "Add" button to create a hotspot:
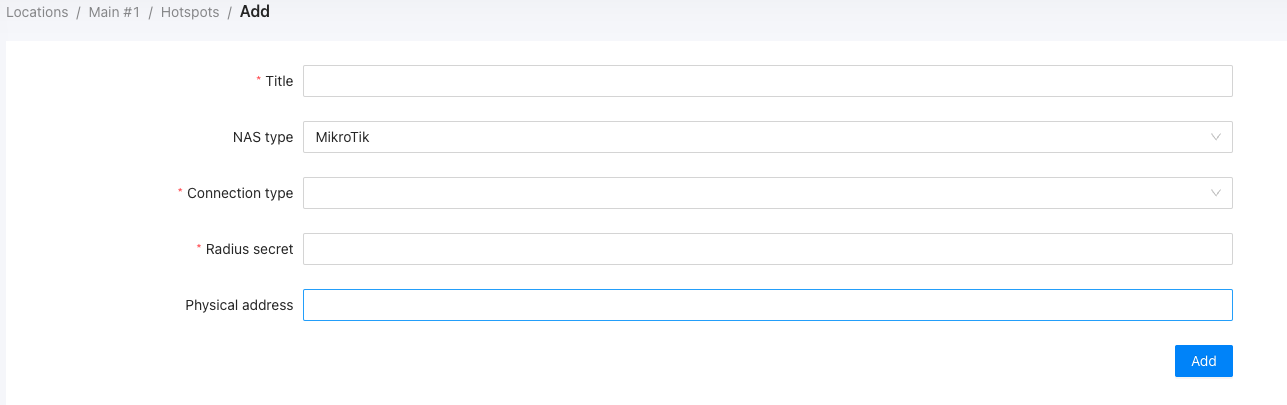
Title - title for your hotspot;
NAS type - select the correct NAS type for your device;
Connection type - choose how Powerlynx reaches your controller. WireGuard is the recommended option for most routers (MikroTik supports it from RouterOS v7 and later); OpenVPN and IPSec are also supported. For Cambium, use Public IP only, as WireGuard is not supported by Cambium;
Radius secret - enter the RADIUS secret of your router's RADIUS server;
Physical address - provide the address of your router (optional).
Updating or editing hotspots
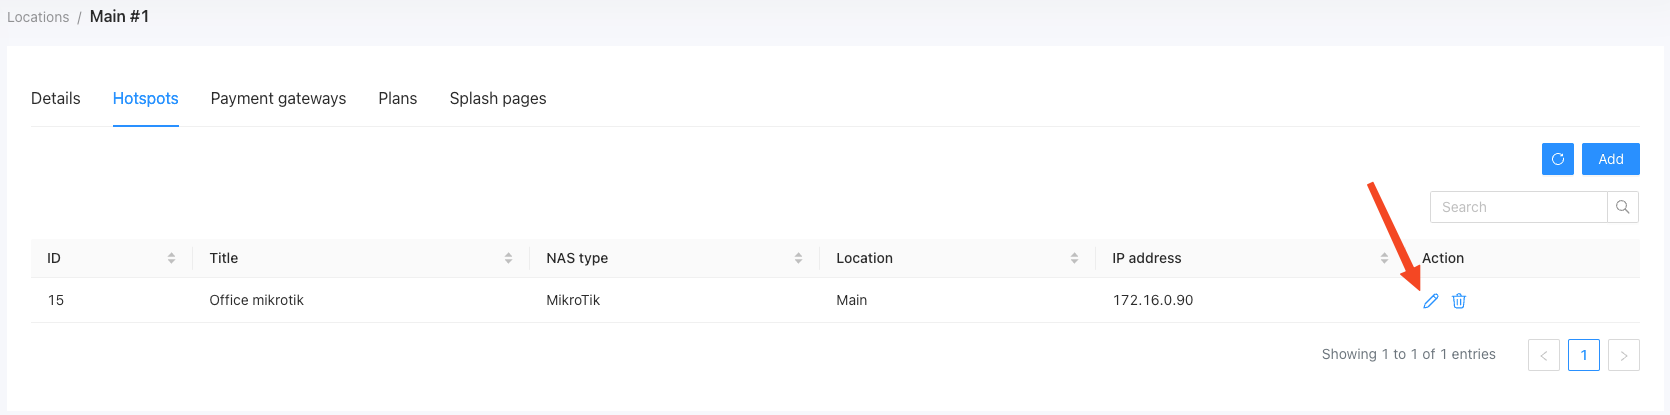
To edit a hotspot, simply find it in the list of hotspots and click the "Edit" button:
WARNING
Be careful when changing hotspot parameters, as incorrect modifications can disrupt the connection between the router and Powerlynx.
Here, you can change some parameters and view the connection status indicator:
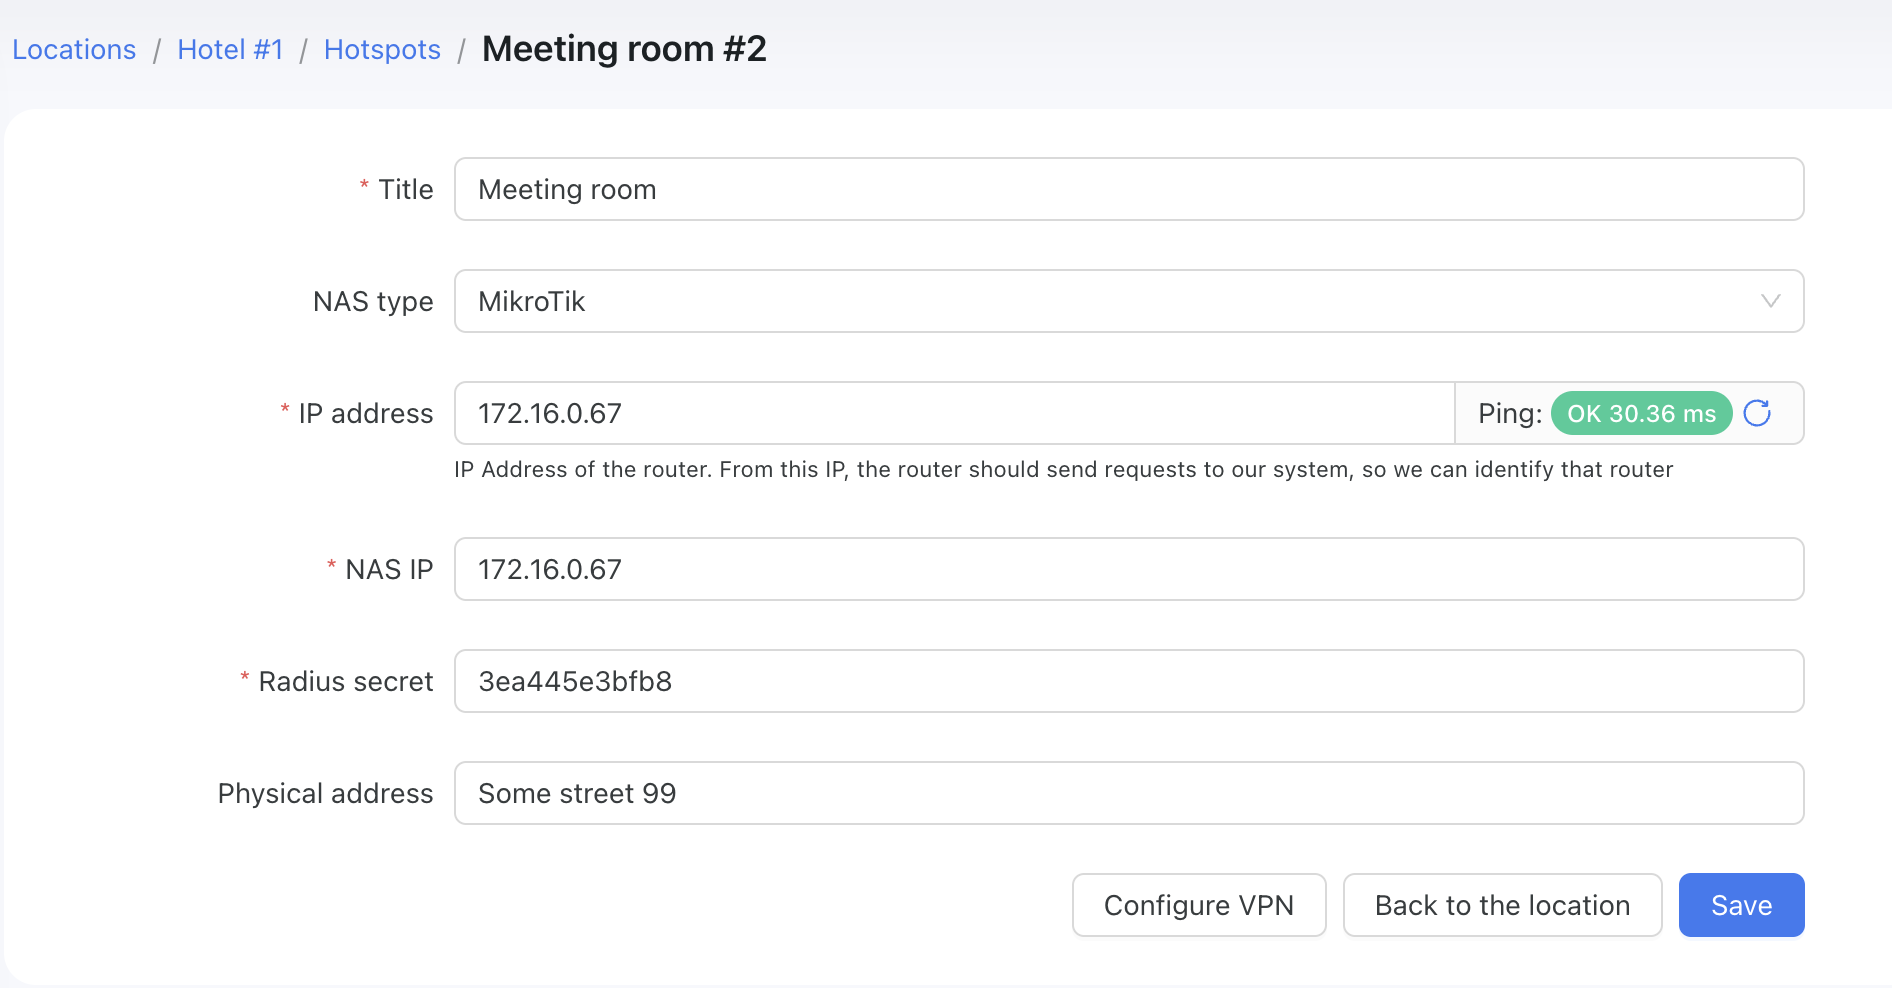
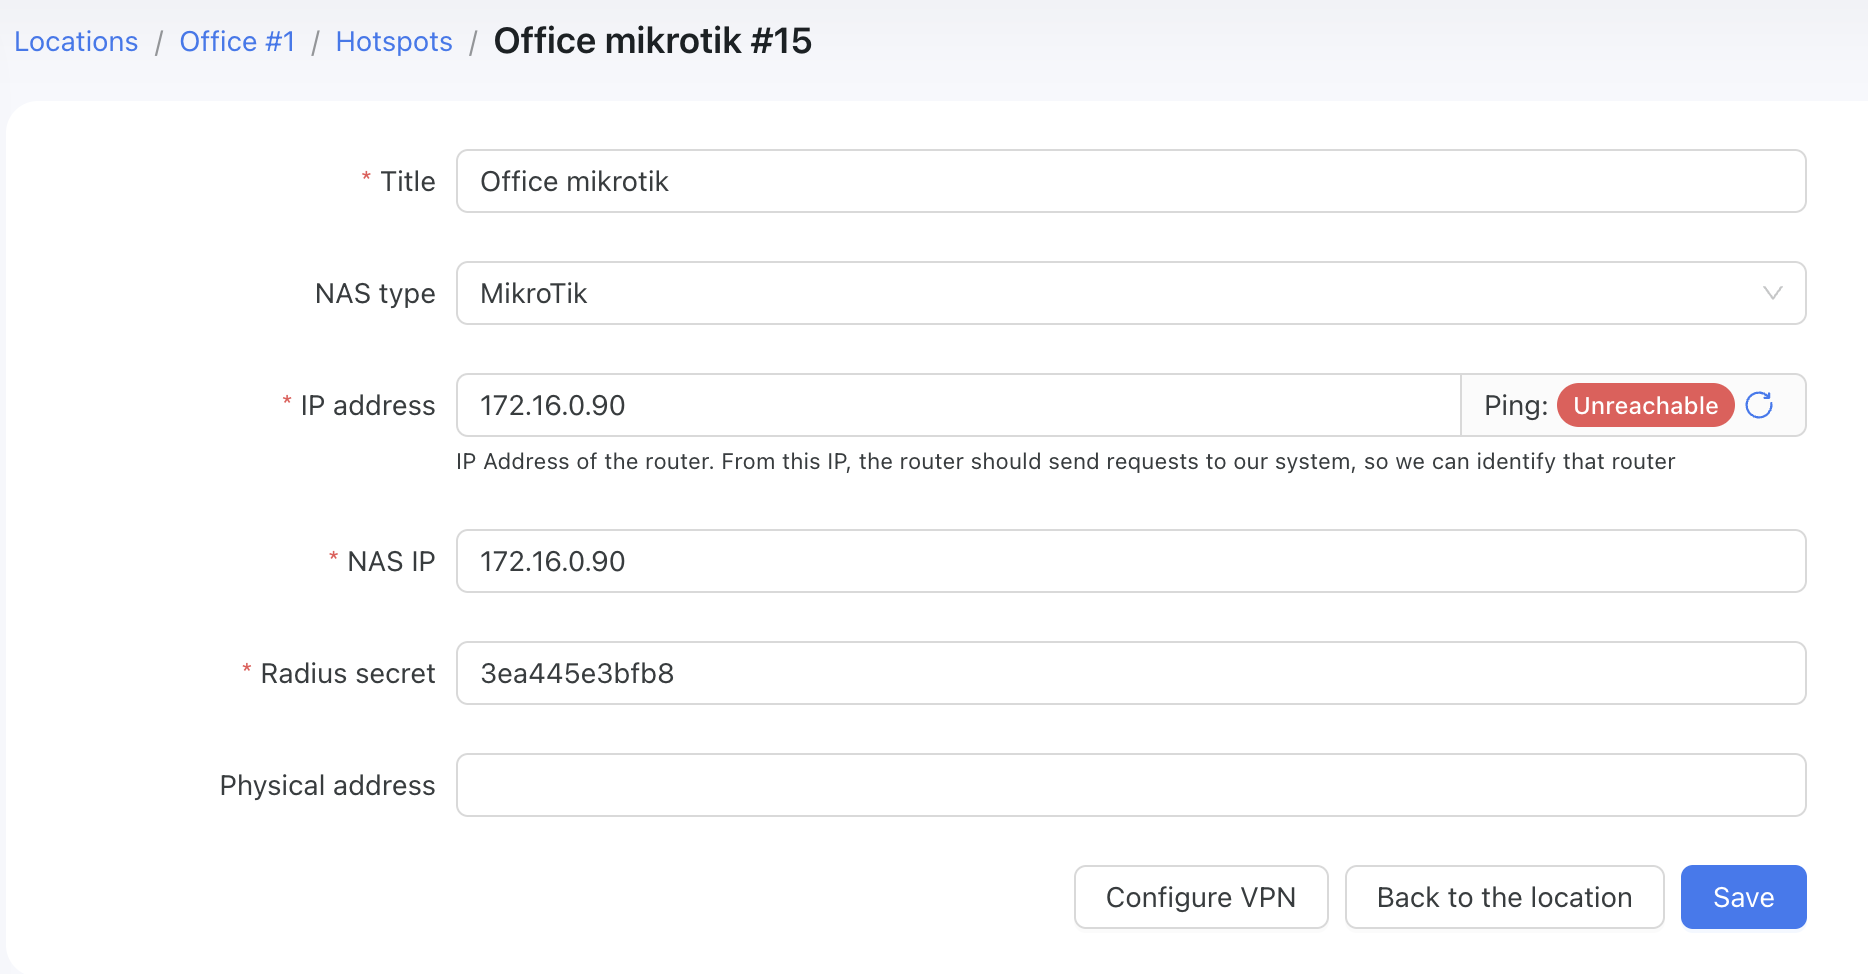
When the ping status shows "Unreachable," Powerlynx can't reach this hotspot's controller, and every customer on it will fail to connect. The usual causes are:
- Wrong VPN credentials — e.g. mismatched WireGuard keys; re-generate them and re-apply the new configuration on the router.
- ICMP is not allowed — the router's
inputchain doesn't permit ICMP from the Powerlynx network. - DNS issues — the router can't resolve the
vpn.powerlynx.appdomain. - Lost Internet connection on the router (various causes).
Work through the MikroTik troubleshooting guide to pinpoint and fix the cause.
Serving many locations from one device
If a single router or VPN tunnel needs to serve several locations at once, use a Global hotspot instead of a per-location hotspot.
Recommended devices
Powerlynx does not mandate specific hardware — the right device depends on your coverage area, the number of devices on site, the number of simultaneous connections you expect, and your client mix. For device recommendations by network size — including MikroTik model tiers, virtual (CHR) options, and examples for other supported vendors — see our forum guide: Network hardware — recommendations.
Setup guides
Step-by-step configuration guides per device:
MikroTik hotspot
Cambium hotspot
Teltonika hotspot
Cudy hotspot
Ruckus hotspot
TP-Link Omada hotspot
Connection setup and troubleshooting: OpenVPN · IPSec · MikroTik troubleshooting