IPSec VPN
IPSec VPN lets you connect hotspots whose NAS devices sit on a private LAN to Powerlynx over an encrypted tunnel. Once the tunnel is up, Powerlynx can reach those private NAS addresses to authorize and disconnect users (CoA / PoD), and the NAS gets a single, stable address to use as its RADIUS server.
It is an alternative to WireGuard and OpenVPN. Like OpenVPN, IPSec is intended for advanced users with networking experience — WireGuard remains the simplest option and is available through the MikroTik simple setup. Choose IPSec when your router or site gateway speaks IKEv2 and you need certificate- or PSK-based tunnels, or when one tunnel must serve several NAS devices behind the same site.
How it works
After the tunnel is established:
- Your NAS device(s) use
10.11.0.2as their RADIUS server IP. - Powerlynx reaches the NAS devices on their private IPs (e.g.
192.168.88.5) through the tunnel, so it can send CoA (authorize a user) and PoD (disconnect a session). - The tunnel carries a route for the whole
10.11.0.0/16overlay, so any NAS behind the tunnel can reach Powerlynx services.
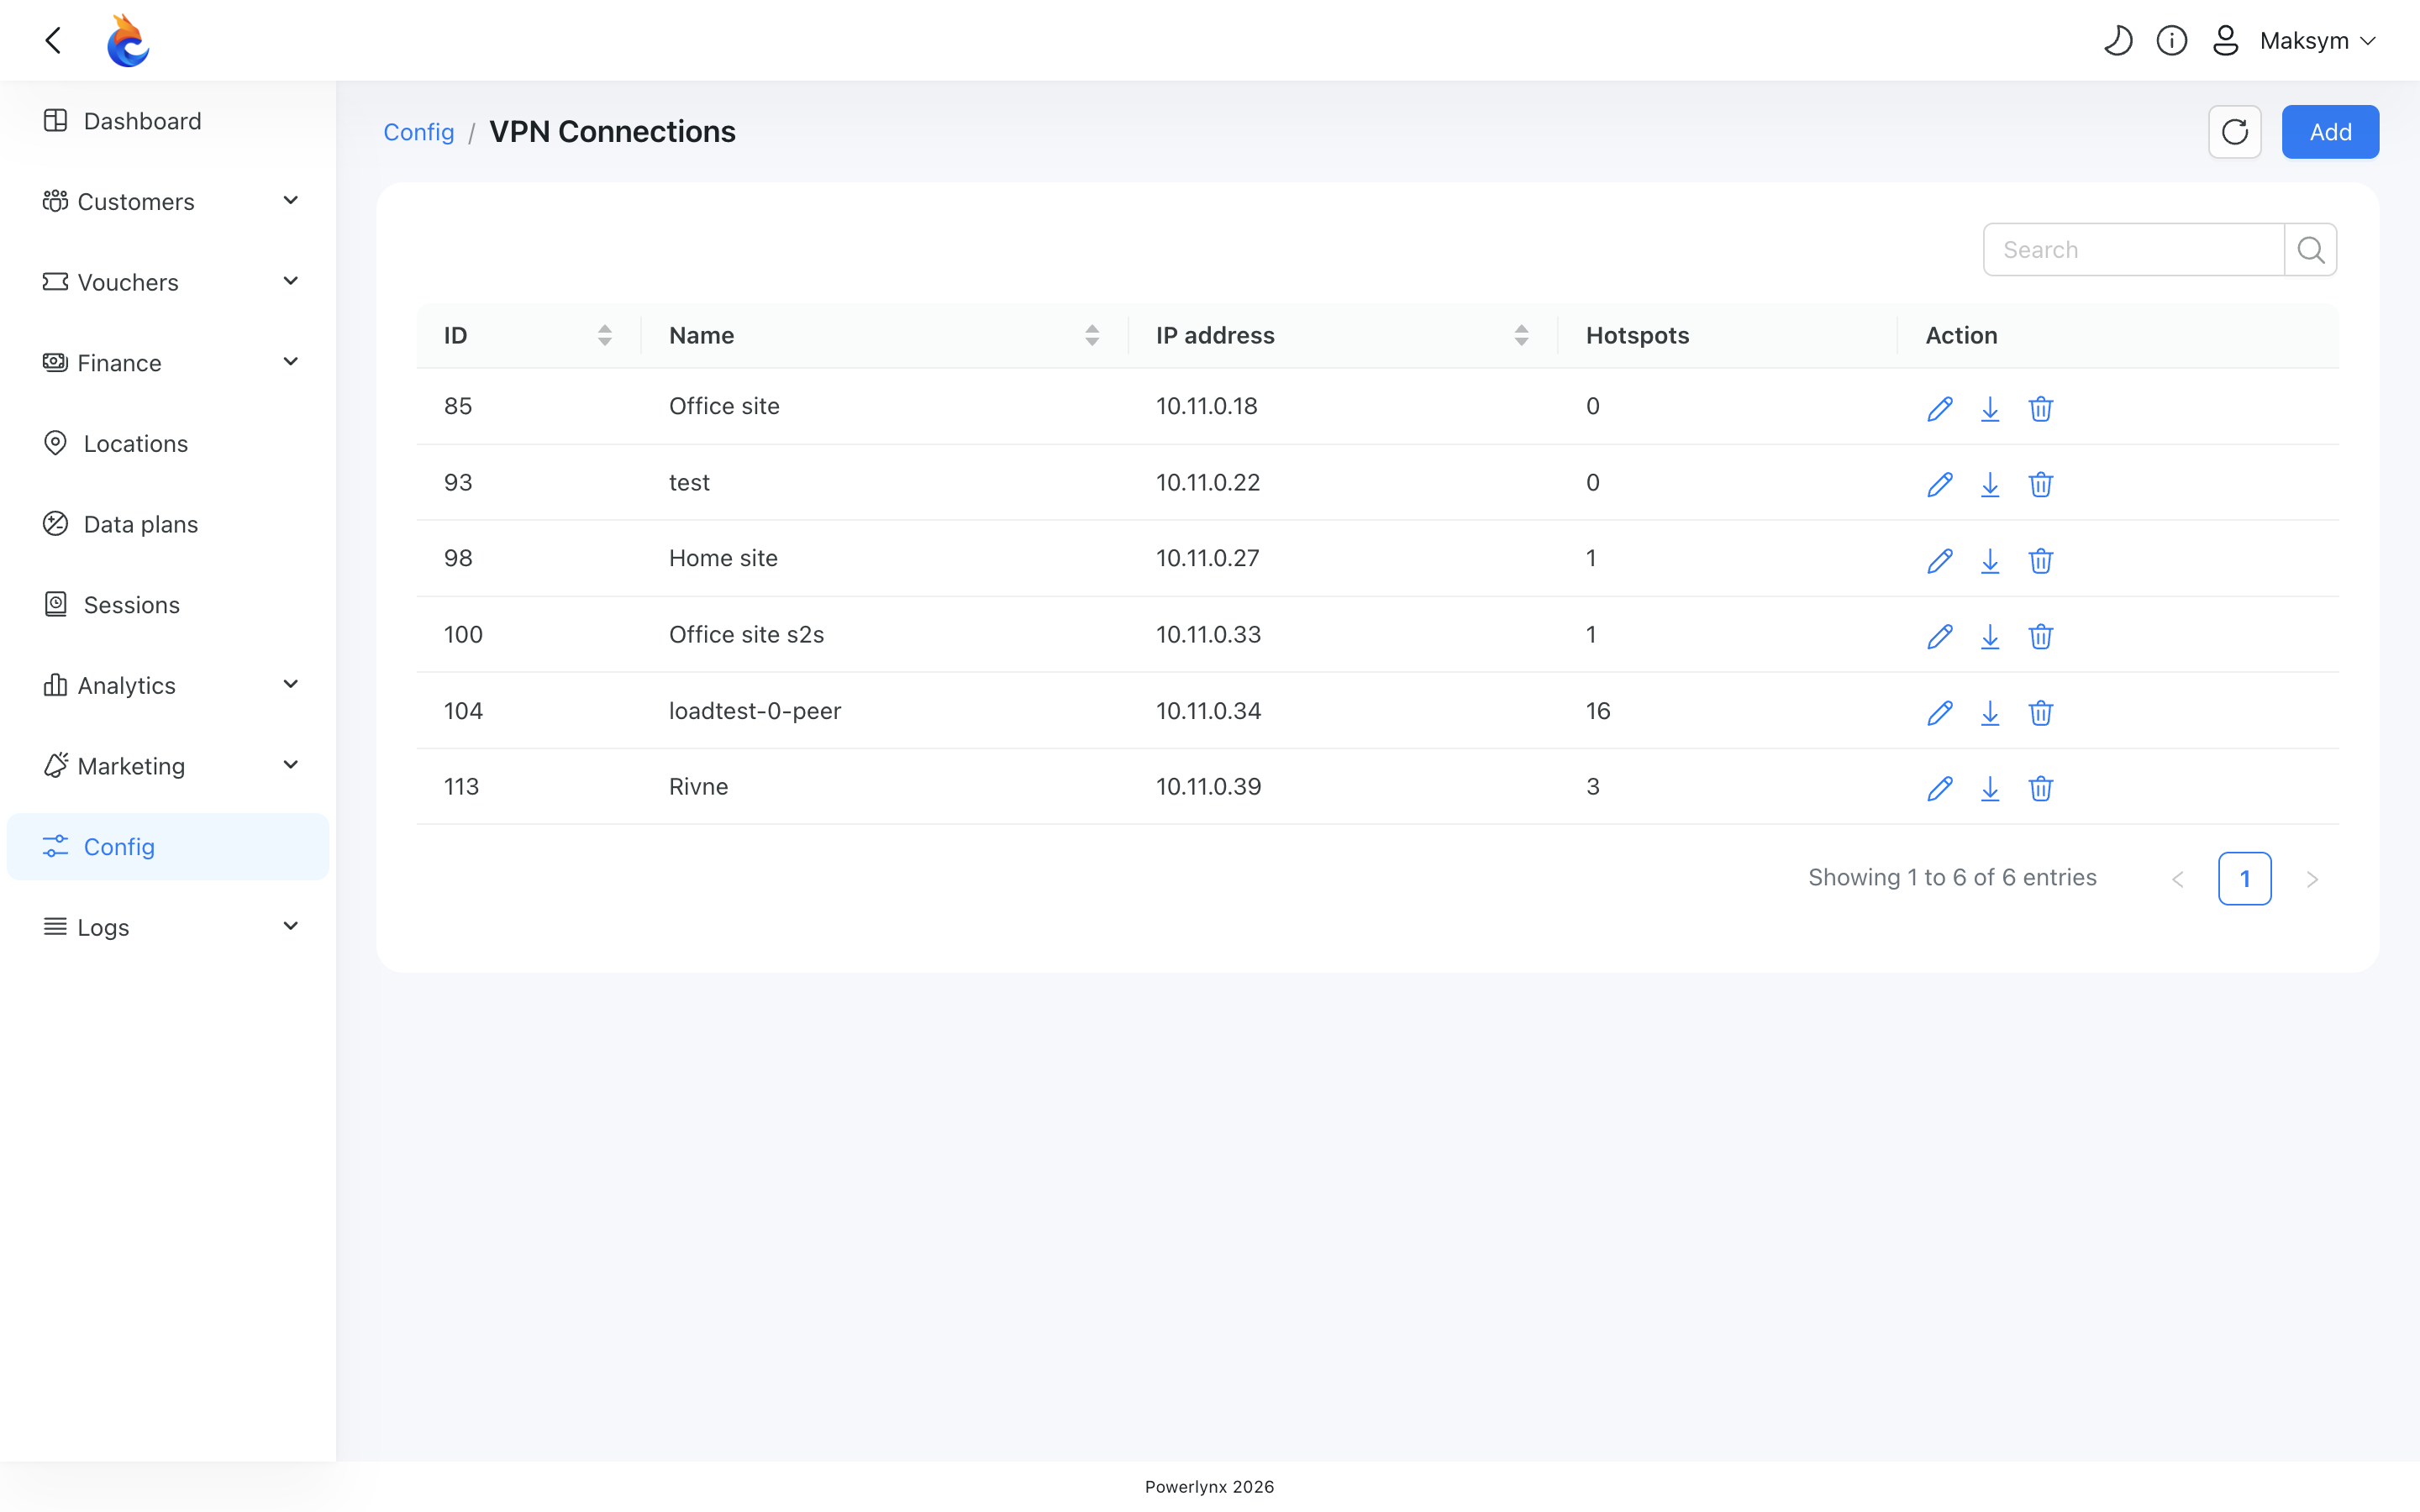
A single VPN connection can be shared by several hotspots — useful when one site gateway fronts multiple access points.
Choosing a connection mode
You pick the mode when you create the connection, and it is locked afterwards.
| Mode | When to use it | Typical device |
|---|---|---|
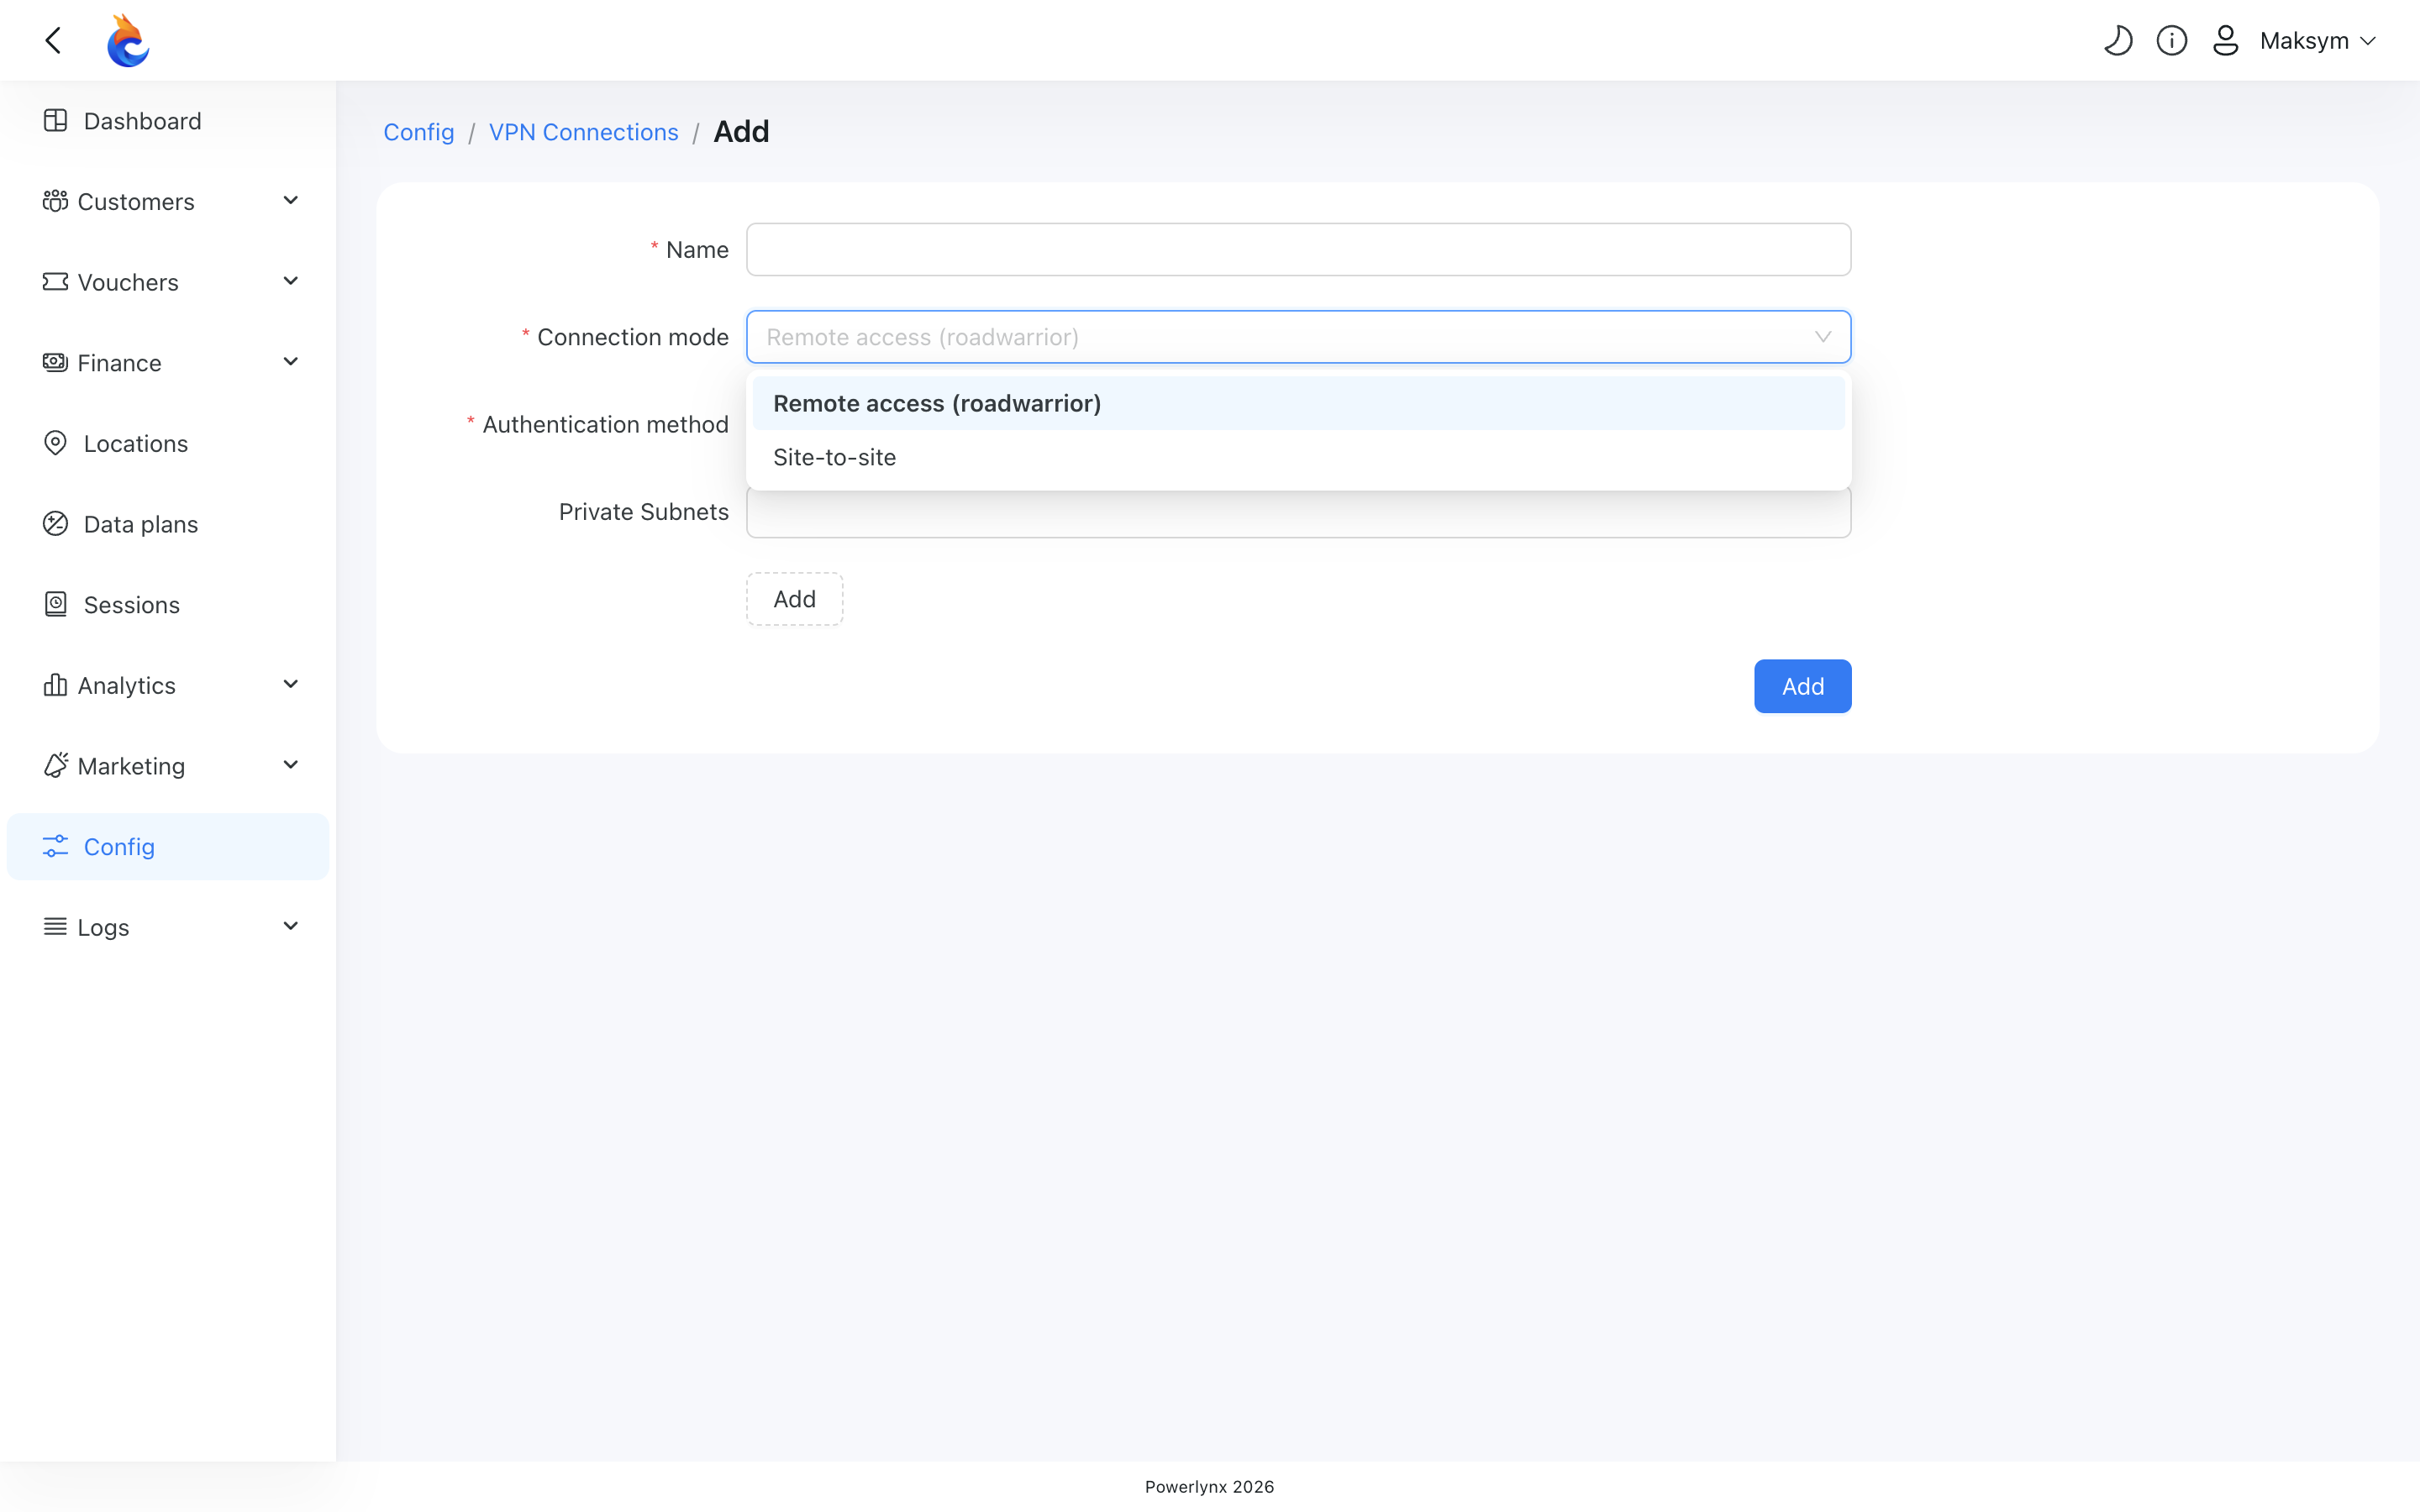
| Remote access (roadwarrior) | The router can request a virtual IP over IKEv2. One peer = one device dialling in. This is the default. | MikroTik, strongSwan, FortiGate, most CPE routers |
| Site-to-site | The site router only negotiates fixed networks and won't request a virtual IP. | Nokia 7750-SR, Cisco IOS-XR, large enterprise gateways |
TIP
If your device is a Nokia 7750-SR (or any gateway that refuses to request a virtual IP), you must choose Site-to-site. In Remote access mode such devices fail to connect.
Choosing an authentication method
Also chosen at creation and locked afterwards:
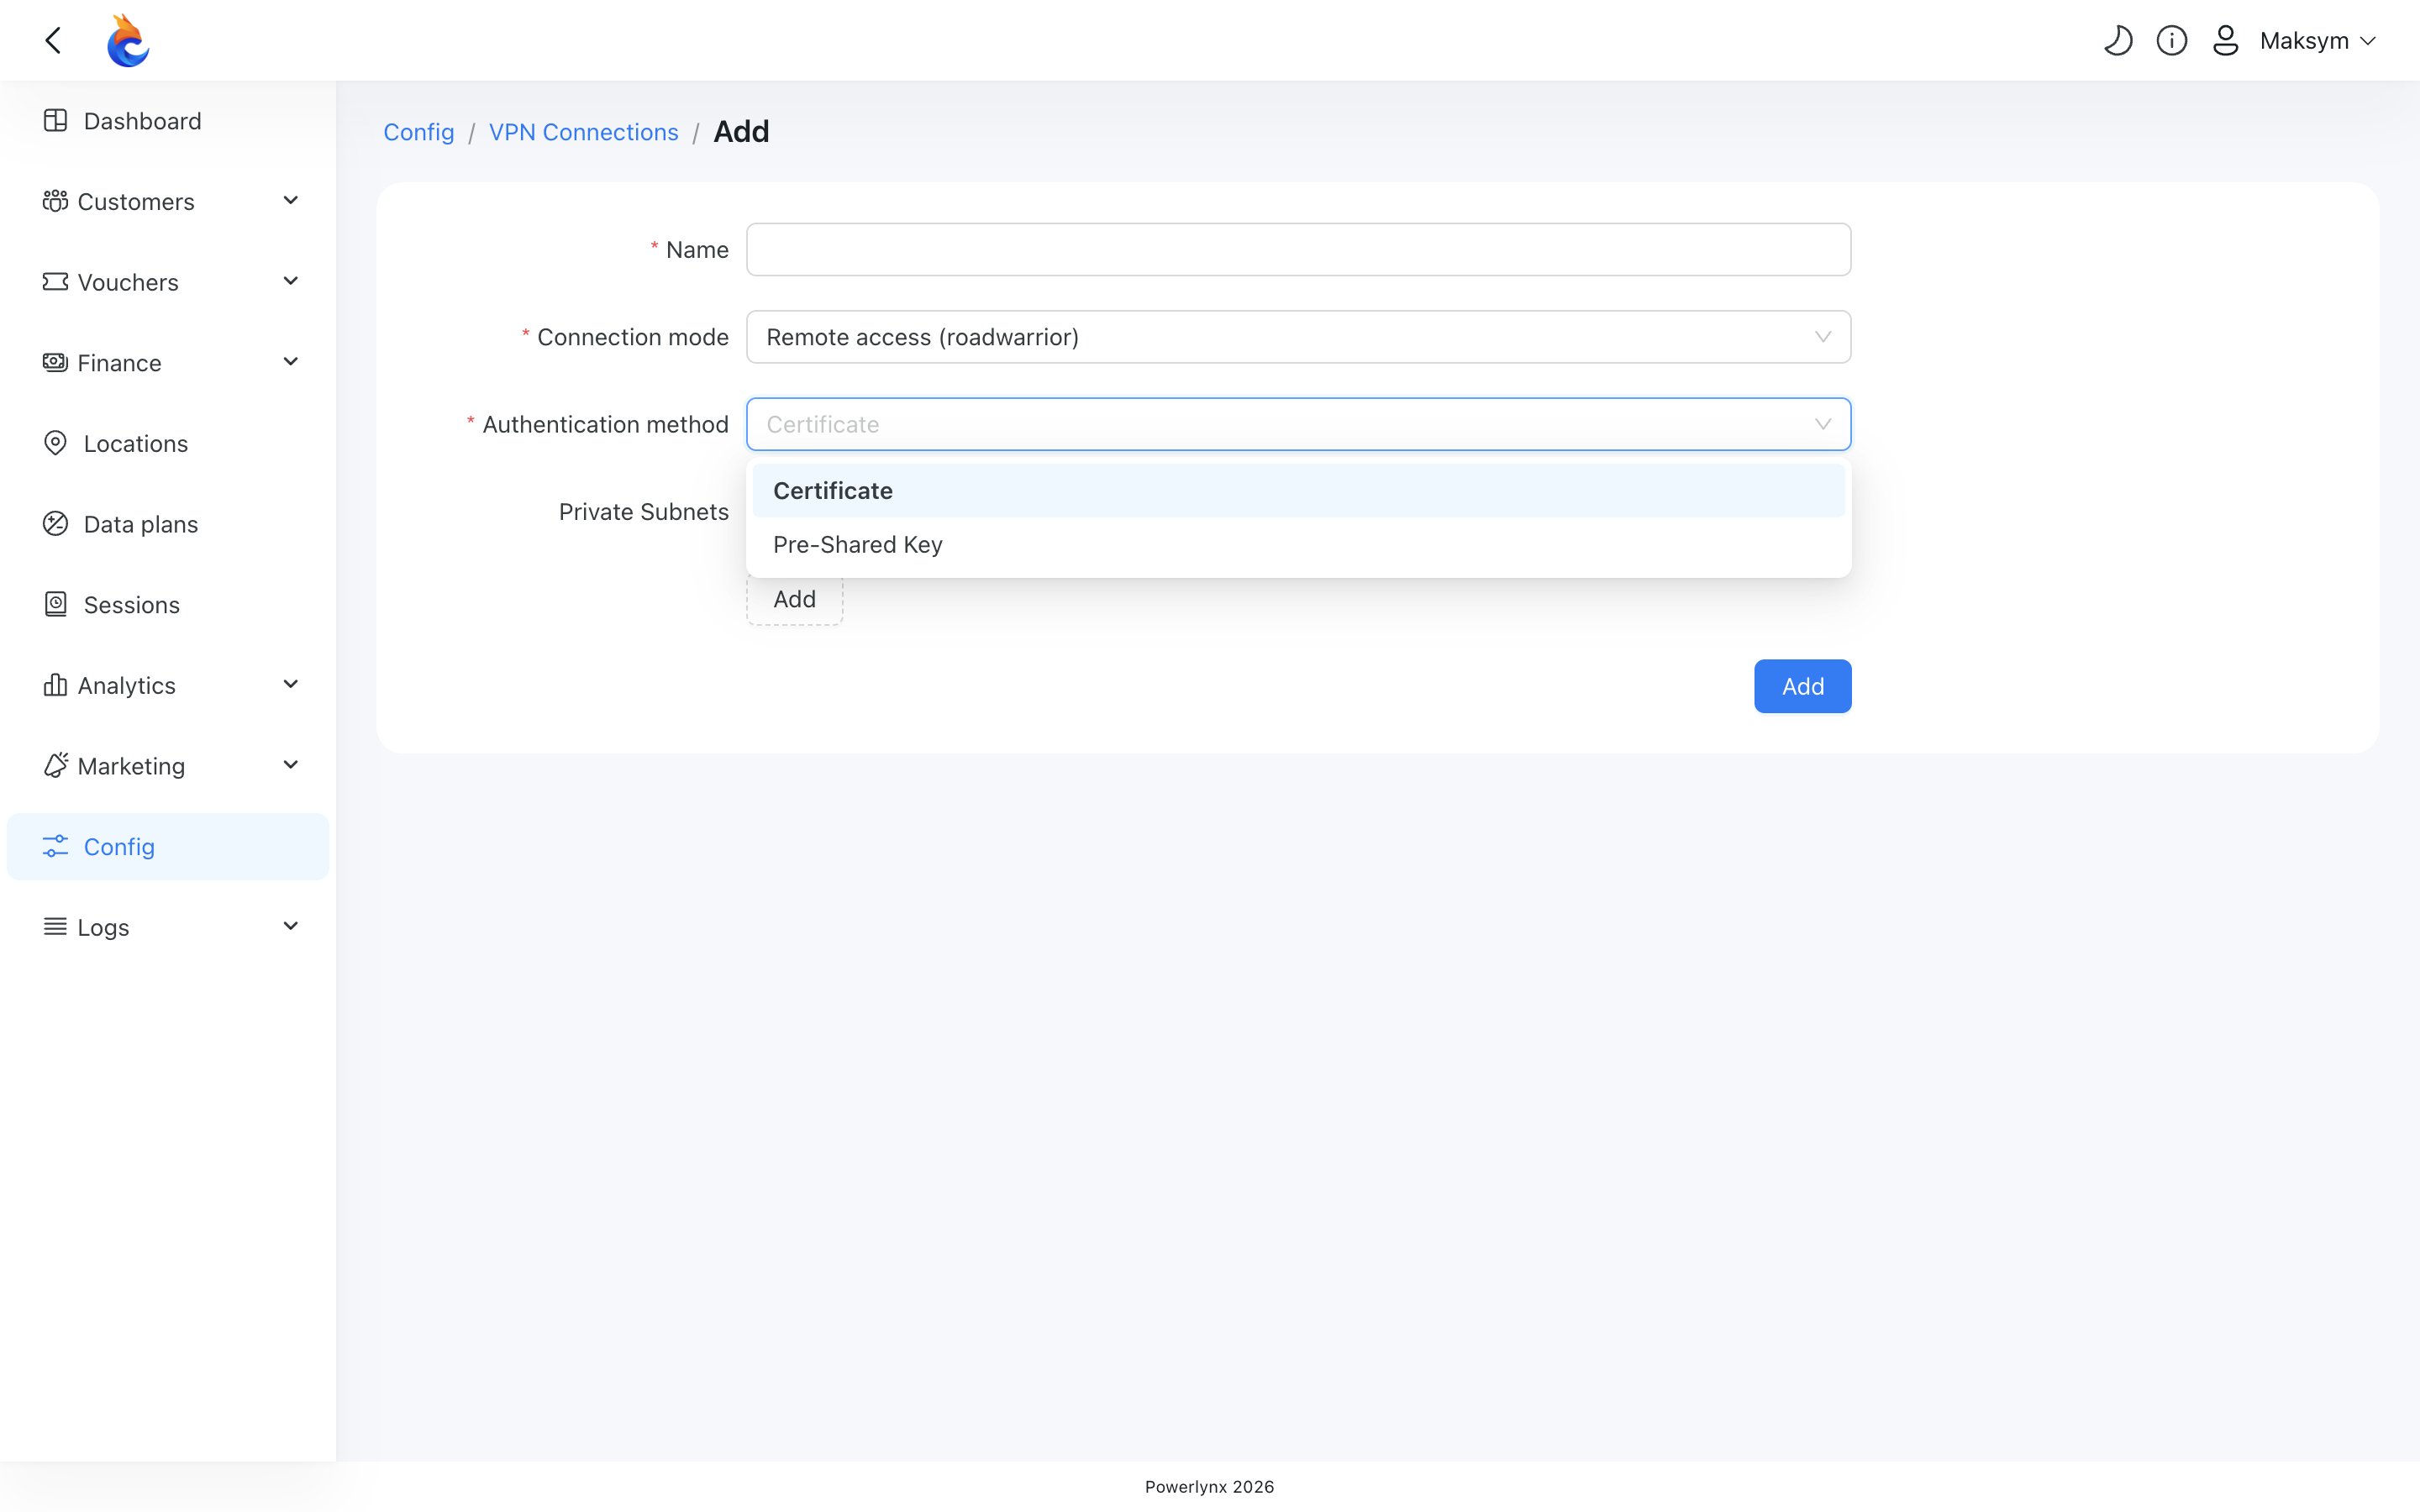
- Certificate — Powerlynx issues a per-device certificate signed by its internal authority. The download archive includes the configuration file plus three certificate files. Revoking one device is as simple as deleting its connection — no shared secret to rotate. Use this whenever your device supports certificates.
- Pre-Shared Key (PSK) — Powerlynx generates a strong key and embeds it in the configuration file. Use PSK for devices that don't handle certificates cleanly, or for a quick first setup.
WARNING
The PSK is shown to you only once, inside the downloaded configuration file. There is no "show key" button — keep the downloaded archive safe. (Re-downloading gives you the same configuration again.)
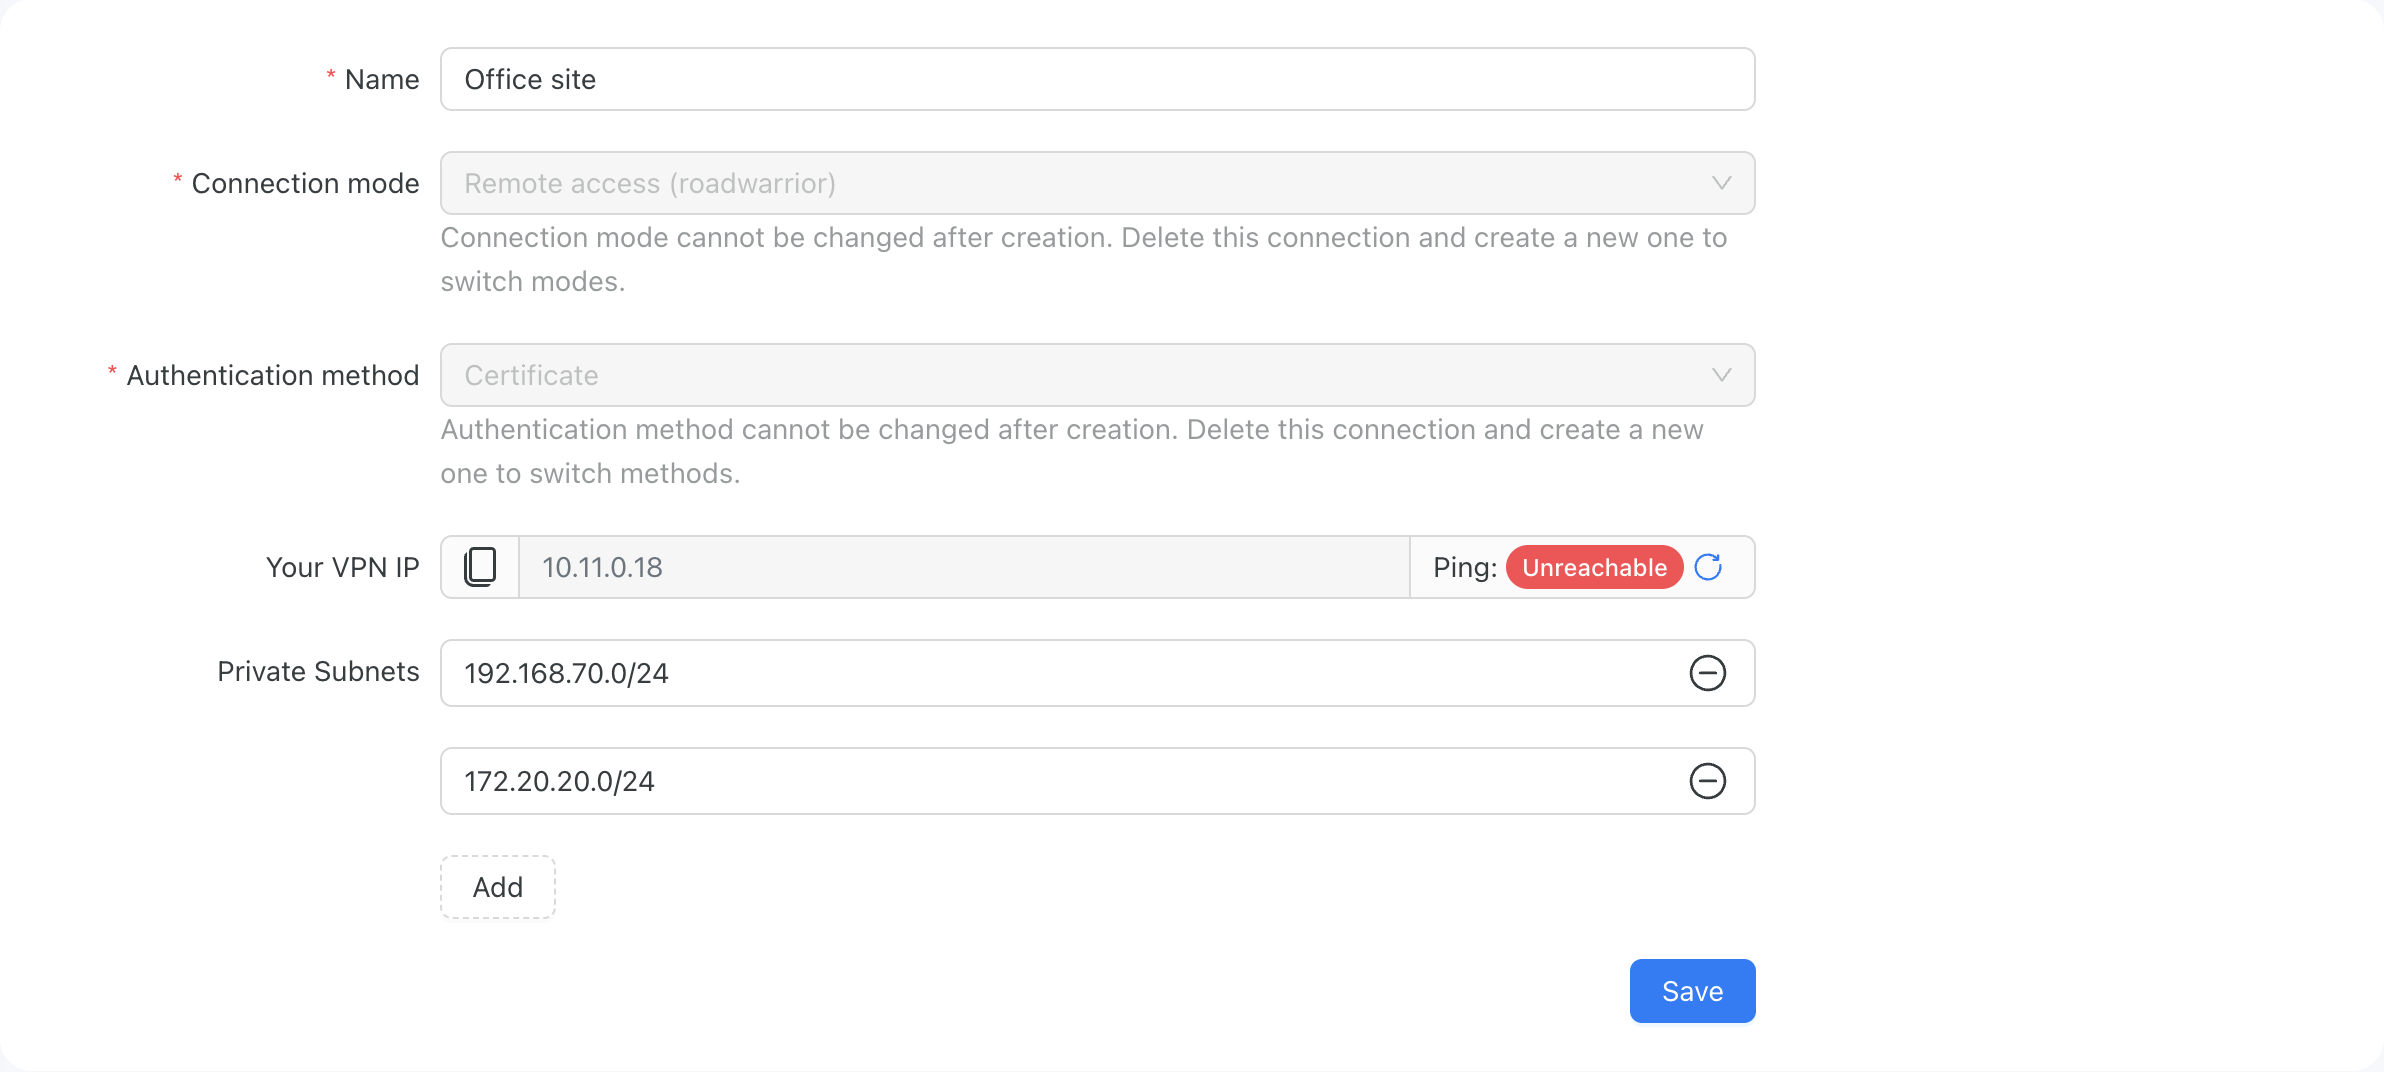
Step 1 — Create a VPN connection
Go to Config → Networking → VPN Connections. The list shows every IPSec connection you own, its tunnel IP, and how many hotspots are attached.
Click Add and fill in the form:
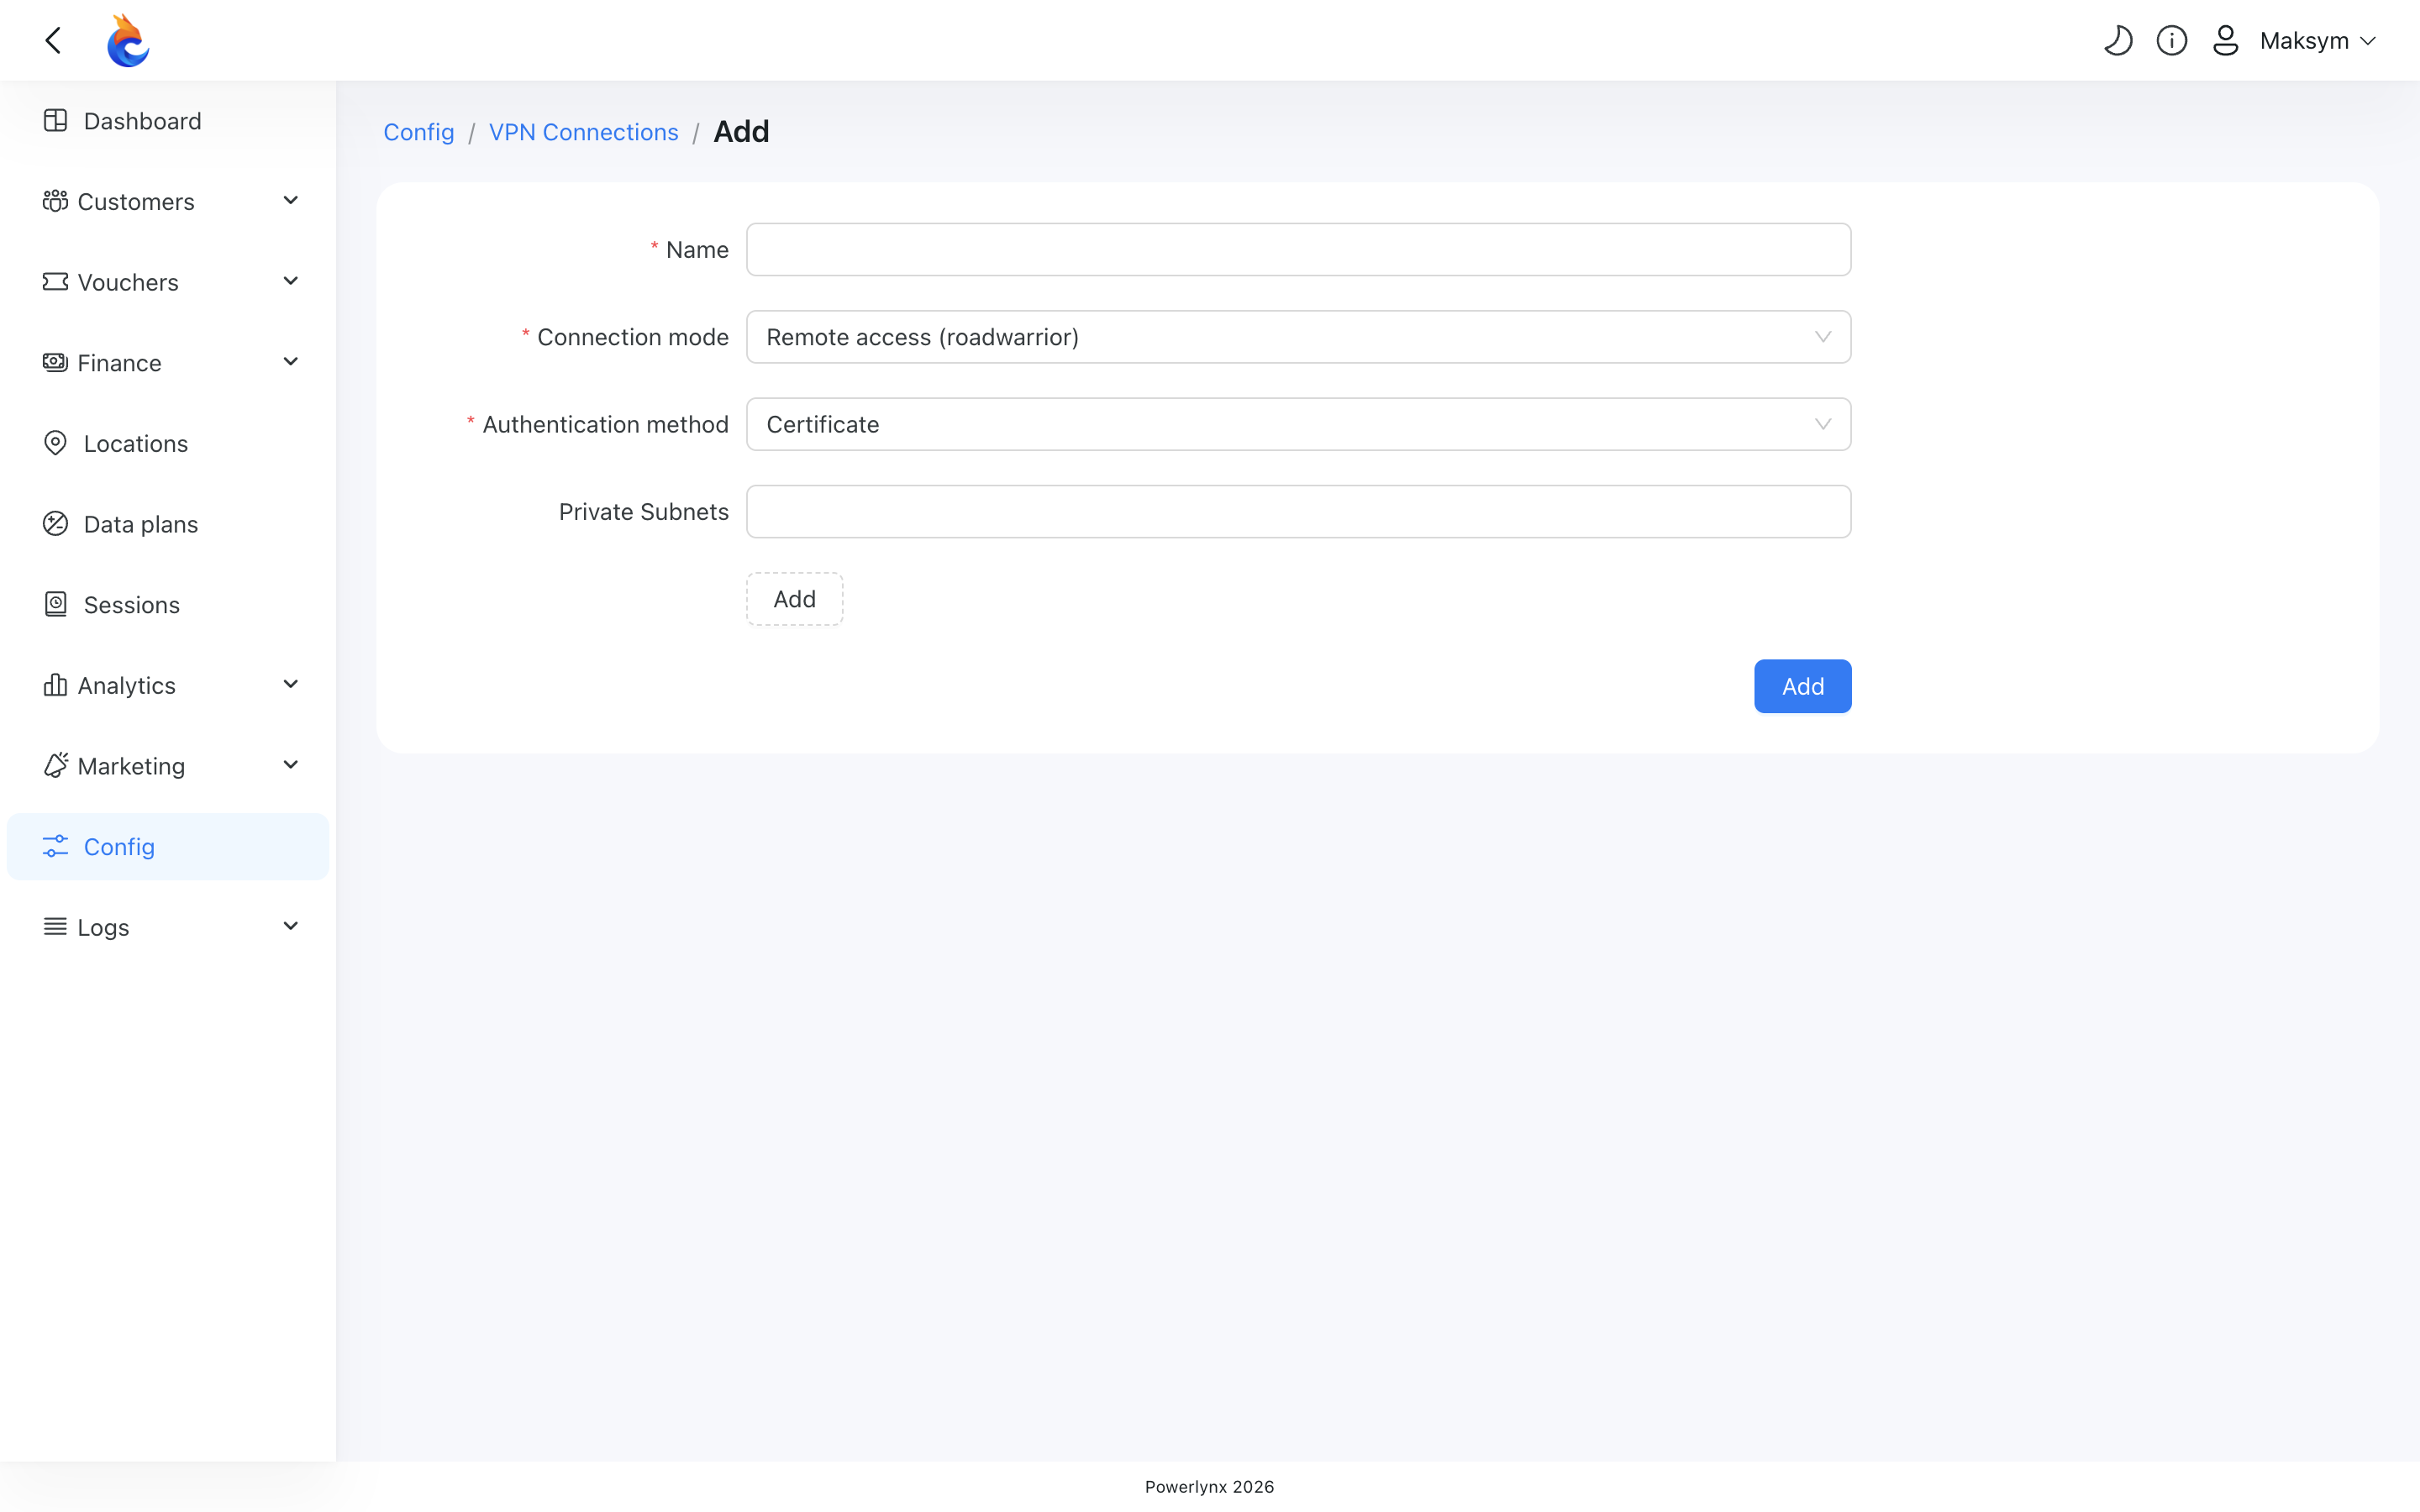
- Name — a label for the connection (e.g. Acme HQ, Sofia branch).
- Connection mode — Remote access or Site-to-site (see the table above). Locked after saving.
- Authentication method — Certificate or Pre-Shared Key. Locked after saving.
- Private Subnets — the network ranges behind the tunnel that Powerlynx needs to reach (e.g.
192.168.88.0/24). Site-to-site requires at least one subnet now; for Remote access you can leave it empty and add subnets later.
Click Save. Powerlynx assigns a tunnel IP, generates the certificate or key, and prepares the connection.
TIP
A subnet must be a valid network address with host bits set to zero — use 192.168.1.0/24, not 192.168.1.5/24. Subnets also can't overlap each other or subnets used by another of your VPN connections.
Step 2 — Download the configuration
On the VPN Connections list, click Download on the connection's row.
You get a ZIP archive:
| Authentication | Archive contents |
|---|---|
| Certificate | configuration file + three certificate files (client certificate, client key, authority certificate) |
| PSK | a single configuration file with the key embedded |
The configuration file already contains your server address, the connection mode, and the right tunnel settings. You can load it as-is on a strongSwan client; for other vendors (MikroTik, Cisco, Nokia) you re-enter the same values in the device's own interface — server public IP, peer identity, certificate or key, and the network ranges shown in the configuration file.
Step 3 — Install it on your device
Load the archive into your router's IKEv2 client:
- strongSwan — place the configuration file and certificates into the matching strongSwan folders and reload.
- MikroTik — import the certificate files, then recreate the peer, identity, and policies from the configuration file. Keep the two tunnels (management and private-subnet) as separate policies — MikroTik allows one policy per tunnel.
- Nokia 7750-SR — choose Site-to-site mode in Powerlynx, then configure the IKE/IPSec gateway with the certificate or key from the archive.
Make sure your device can reach the Powerlynx server's public IP on the IKE ports (UDP 500 and 4500). Once the tunnel is up, your device receives the 10.11.0.0/16 route and can reach RADIUS at 10.11.0.2.
Step 4 — Verify the tunnel
Open the connection's Edit view. The top shows the tunnel IP and a live ping indicator — green means the tunnel is established and the peer is responding.
INFO
The ping indicator is shown only for Remote access connections — Site-to-site peers don't have an assigned tunnel IP, so it's hidden there.
If ping shows Unreachable, the usual causes are: the tunnel hasn't established yet (check your device's IKE log), the device hasn't installed the 10.11.0.0/16 route, or — for certificate connections — the certificate revocation list can't be reached (see Troubleshooting).
The Connection mode and Authentication method fields are read-only after creation:
To change either one, delete the connection and create a new one — switching them requires new credentials and a reconfigured device, so a clean recreate is safer.
Step 5 — Add or adjust private subnets
You can change the private subnets any time on the Edit view. (A Site-to-site connection must always keep at least one subnet.)
After you save, Powerlynx updates the tunnel and routing automatically. Your remote device must also allow the new subnet on its side — most clients pick this up on the next key renewal; if traffic doesn't flow, restart the tunnel on the device.
Step 6 — Attach hotspots
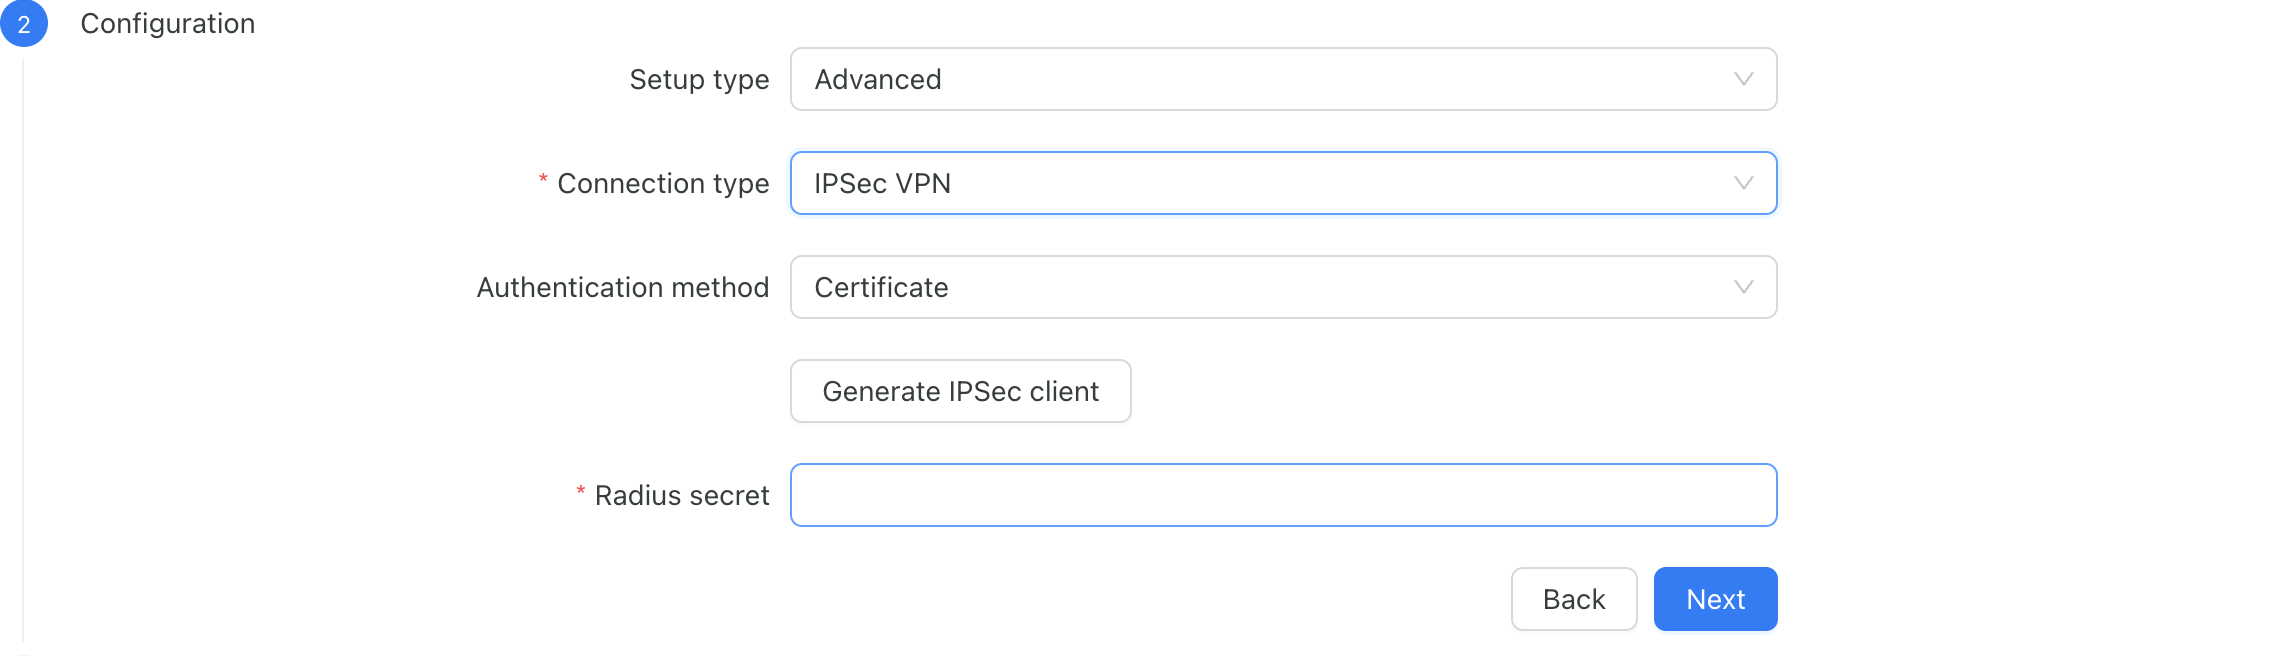
Once the tunnel is up, attach hotspots so Powerlynx routes their RADIUS traffic through the right tunnel. On the hotspot form (Locations → (your location) → Hotspots → Add), set Setup type: Advanced, then pick a connection type.
Option A — Hotspot with its own tunnel (IPSec VPN)
Use this when one hotspot has its own dedicated tunnel. Choose Connection type: IPSec VPN, pick the authentication method, click Generate IPSec client, then download its configuration from the IPSec VPN tab on the hotspot.
Option B — Hotspot sharing a connection (Existing VPN)
Use this when several NAS devices live behind the same tunnel (e.g. a gateway fronting several access points). Choose Connection type: Existing VPN:
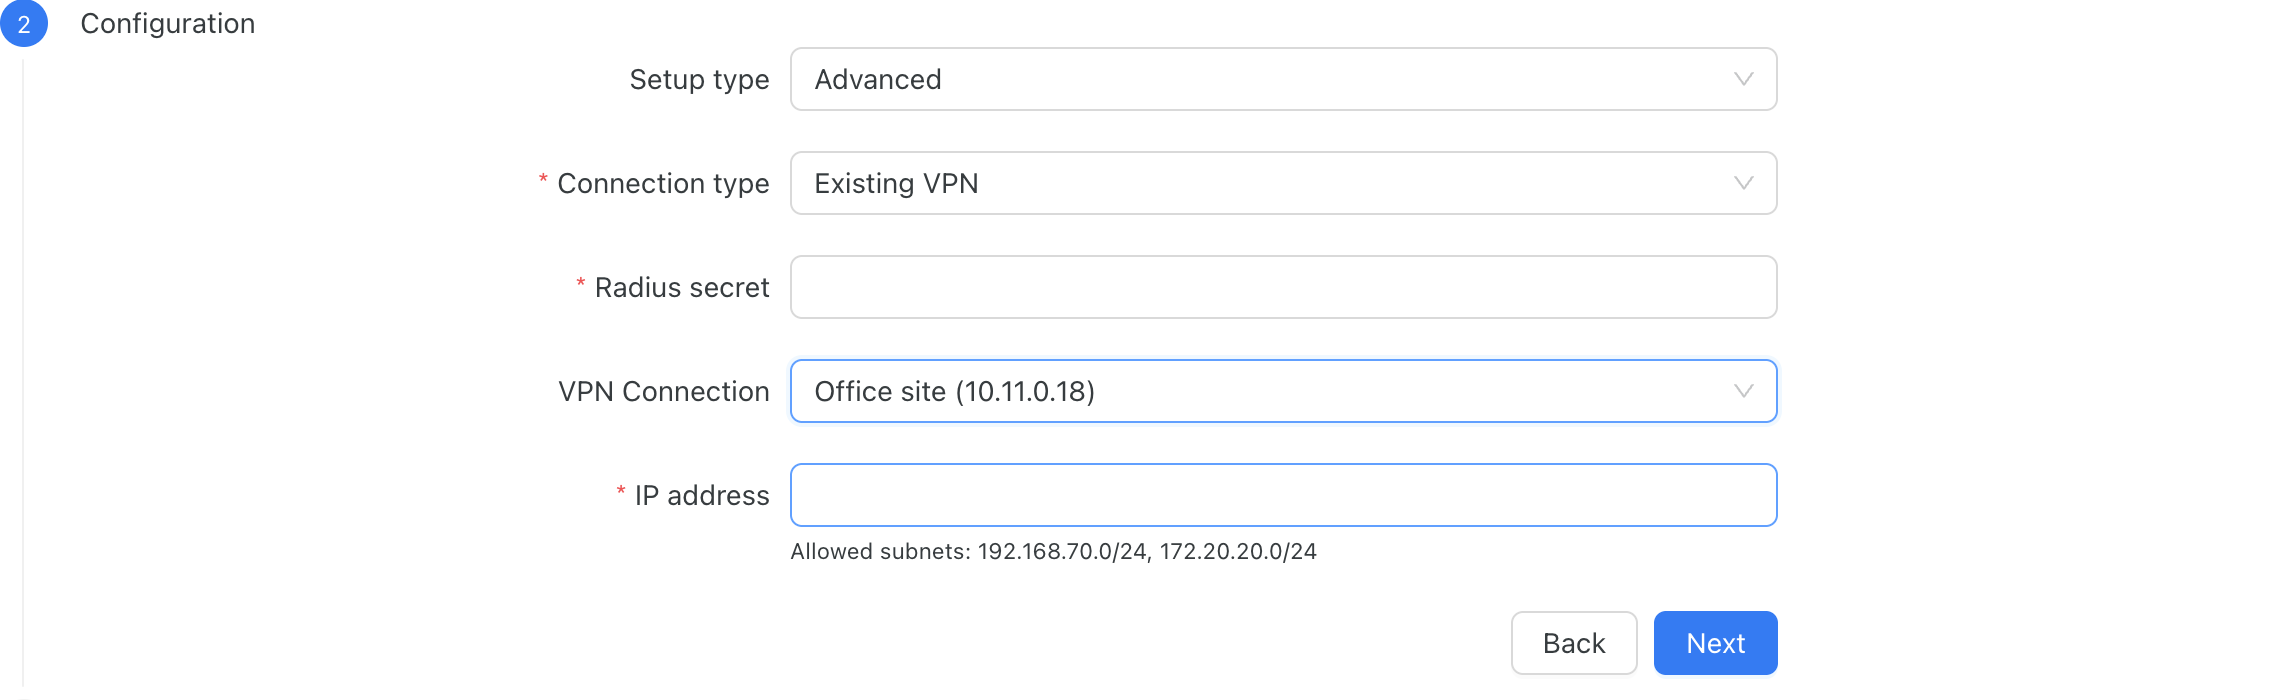
- Pick a VPN Connection from the dropdown.
- In the IP address field, enter the private IP of this specific NAS device behind the tunnel (e.g.
192.168.88.5). The form shows the connection's allowed subnets underneath as a hint. This lets Powerlynx tell apart several hotspots that share the same tunnel. - (Optional) PoD IP — only set this if your NAS handles disconnects on a different control IP than authorization. Leave empty otherwise.
- Finish the rest of the hotspot form (RADIUS secret, splash page, etc.) and save.
After saving you can ping the NAS IP (and PoD IP) from the hotspot view to confirm they're reachable through the tunnel.
Removing a connection
Click Delete on the VPN Connections list. Powerlynx won't delete a connection while hotspots still use it — remove or repoint those hotspots first. For certificate connections, deleting revokes the certificate automatically, so the credentials can't be reused.
Troubleshooting
| Symptom | What to check |
|---|---|
| Tunnel never establishes | Your device can reach the server's public IP on UDP 500/4500. The peer identity matches the configuration file. For PSK, no extra spaces were added when copying. |
| Tunnel is up but RADIUS doesn't authenticate | The hotspot Connection type matches what you set up (IPSec VPN vs Existing VPN). For Existing VPN, the NAS IP matches the address the device actually sends in its RADIUS requests. |
| Authorize/disconnect (CoA / PoD) doesn't reach the NAS | The NAS's subnet is listed on the VPN connection, the NAS IP belongs to that subnet, and the tunnel ping is green. |
| Form rejects a Site-to-site connection with no subnets | Site-to-site needs at least one private subnet — add a network range. |
| Certificate device can't fetch the revocation list | The certificate revocation list URL given to your device must be reachable from the public internet over plain HTTP (port 80). This is intentional — the list is digitally signed, and some gateways (e.g. Nokia) don't support HTTPS for it. |
INFO
This page covers the Powerlynx side of the setup. The exact steps on your router or gateway depend on the vendor — use the values from the downloaded configuration file (server address, identity, certificate or key, network ranges) when configuring the device.