Connecting TP-Link Omada to Powerlynx (self-hosted RADIUS captive portal)
This guide shows how to use a TP-Link Omada Wi-Fi deployment (EAP access points managed by an Omada controller) as a Powerlynx captive-portal NAS, using the RADIUS + External Web Portal flow.
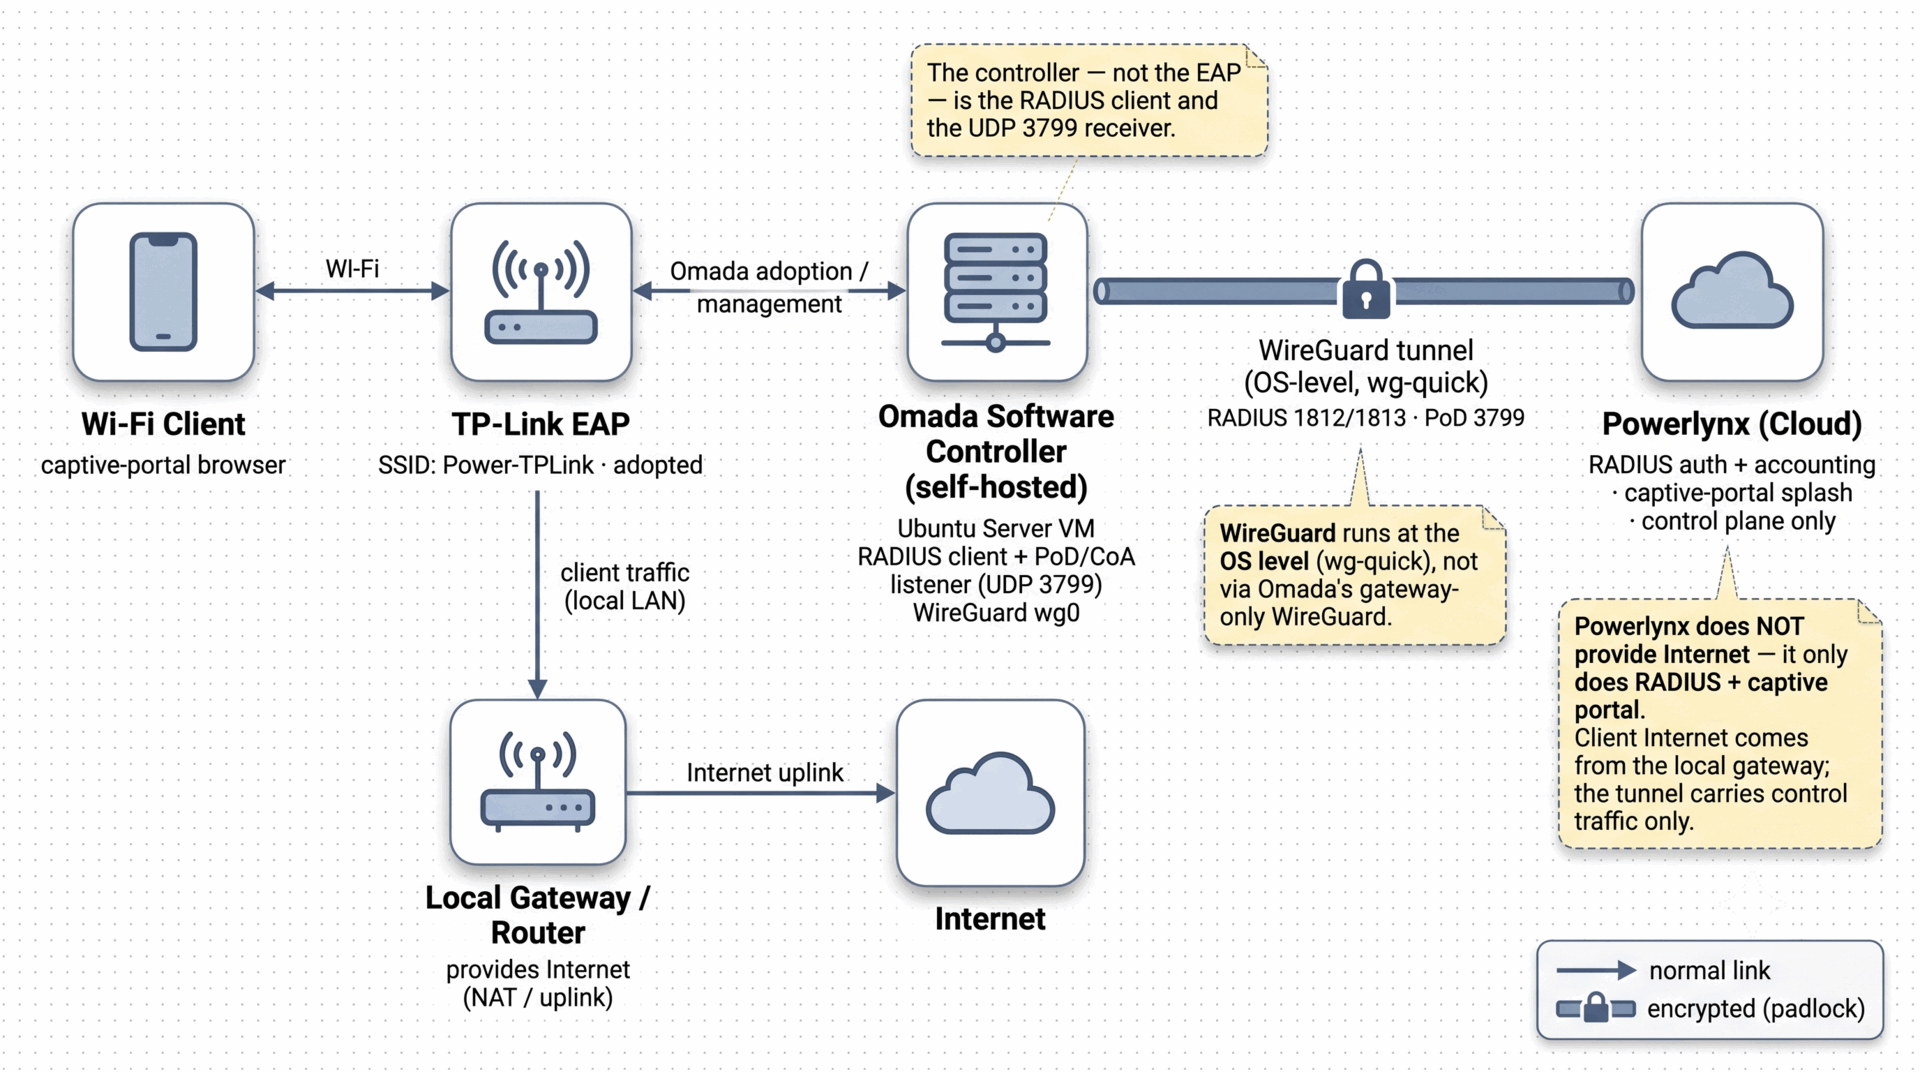
How it works, in one paragraph: the Omada controller — not each individual EAP — is the RADIUS client and the CoA/PoD (UDP 3799) receiver. A client that joins the hotspot SSID is redirected to the Powerlynx splash page. After the user logs in or pays, Powerlynx auto-POSTs the client's browser back to the controller's /portal/radius/browserauth endpoint, and the controller then performs the RADIUS exchange (auth + accounting) with Powerlynx over a WireGuard tunnel.
On-premise controller only — Omada Cloud does not work
Both setups below require a self-hosted / on-premise Omada controller. On Omada Cloud it does not work — the cloud controller cannot receive RADIUS PoD or CoA (UDP 3799) from Powerlynx, so remote disconnect and dynamic authorization are impossible there.
Two possible setups
There are two ways to build a TP-Link Omada hotspot with Powerlynx, depending on whether you use a TP-Link Omada gateway (ER-series):
- Setup 1 — Ubuntu host / Omada Software Controller as the gateway, + TP-Link EAP. Use this when you don't have (or don't want to use) a TP-Link gateway. The Ubuntu server running the Omada Software Controller fills the "gateway" role for the Powerlynx integration: it terminates the WireGuard tunnel to Powerlynx (
wg-quick, at OS level) and is the RADIUS client and the CoA/PoD (UDP 3799) receiver. You need only that server plus a TP-Link EAP — no Omada router/gateway. Client Internet is provided by the site's existing router/uplink. This guide documents this setup (below). - Setup 2 — Omada controller + TP-Link Omada gateway (ER-series) + TP-Link EAP. Use this when you do run a TP-Link Omada gateway; the gateway terminates the WireGuard tunnel to Powerlynx (Omada's built-in WireGuard is a gateway-only feature) and acts as the RADIUS client. The Powerlynx-side configuration (NAS type, hotspot, RADIUS attributes) is the same as Setup 1.
Only Setup 1 is documented
Only Setup 1 is documented step-by-step below (it is the configuration validated end-to-end). If you need assistance with Setup 2 (a TP-Link Omada gateway), please contact our support team at support@powerlynx.app.
Setup 1 — Ubuntu host + Omada Software Controller as the gateway (no TP-Link gateway)
This is the full, validated step-by-step: EAP access points behind a self-hosted Omada Software Controller on an Ubuntu host, with no TP-Link gateway — the Ubuntu host is the WireGuard endpoint, RADIUS client and PoD receiver.
1. Architecture / topology
Traffic and control chain:
Wi-Fi client → TP-Link EAP (SSID) → self-hosted Omada Controller → WireGuard → Powerlynx
                                     (RADIUS client + UDP 3799 listener)
Wi-Fi client → TP-Link EAP (SSID) → self-hosted Omada Controller → WireGuard → Powerlynx
(RADIUS client + UDP 3799 listener)- The controller is the RADIUS client (sends Access-Request / accounting) and the UDP 3799 listener that receives Disconnect (PoD) requests from Powerlynx.
- The WireGuard tunnel terminates at the operating-system level on the controller host (
wg-quick), not via Omada's built-in WireGuard. Omada's WireGuard is a gateway/ER-series-only feature and does nothing on a Software Controller. - Powerlynx does not provide Internet access. It is the control plane only — RADIUS auth/accounting and the captive-portal splash page. Client Internet is provided by the site's own gateway / uplink (a separate router). The WireGuard tunnel carries only the RADIUS/CoA control traffic between the controller and Powerlynx — never user data.
2. Prerequisites
| Requirement | Detail |
|---|---|
| Host OS | Linux — Ubuntu 16.04 / 18.04 / 20.04 / 22.04 / 24.04, or Debian 8–12 (64-bit). Windows is also supported. |
| Java | OpenJDK 17+ (64-bit) for controller v5.15.20 and above (earlier builds use Java 8+). |
| MongoDB | Up to MongoDB 8 for v5.15.20+ (up to v7 for 5.14.20+). |
| jsvc | Apache Commons Daemon (jsvc) — v1.0.15 recommended with OpenJDK 17. |
| Controller | Omada Software Controller, v5 line (this guide uses the 5.15.x release; the current shipping line is v6.2.x, so pick 5.15.x under "Previous Version" on the download page). |
| Access point | A TP-Link Omada EAP (e.g. EAP225 v3+). |
| Static IP | Static IP for the controller host — EAP adoption and RADIUS config reference it by IP. |
| Powerlynx | A Powerlynx Location and a hotspot already created. |
For host hardware sizing and the full requirement matrix, follow TP-Link's official install guide (see References).
3. Install the Omada controller
Install the Omada Software Controller (v5 line) on the Ubuntu host. Official download and install links are in the References section at the end.
# 1. OpenJDK 17 + jsvc
sudo apt update
sudo apt install -y openjdk-17-jre-headless jsvc curl gnupg

# 2. MongoDB 8.0
curl -fsSL https://www.mongodb.org/static/pgp/server-8.0.asc | \
  sudo gpg -o /usr/share/keyrings/mongodb-server-8.0.gpg --dearmor
echo "deb [ arch=amd64,arm64 signed-by=/usr/share/keyrings/mongodb-server-8.0.gpg ] https://repo.mongodb.org/apt/ubuntu jammy/mongodb-org/8.0 multiverse" | \
  sudo tee /etc/apt/sources.list.d/mongodb-org-8.0.list
sudo apt update && sudo apt install -y mongodb-org

# 3. Install the controller .deb (download from the official page — see References)
sudo dpkg -i omada_v5.15.24.19_linux_x64_*.deb
# If dpkg complains about the jsvc version:
#   sudo dpkg --ignore-depends=jsvc -i omada_v5.15.24.19_linux_x64_*.deb

# 4. Start
sudo tpeap start
tpeap status
# 1. OpenJDK 17 + jsvc
sudo apt update
sudo apt install -y openjdk-17-jre-headless jsvc curl gnupg
# 2. MongoDB 8.0
curl -fsSL https://www.mongodb.org/static/pgp/server-8.0.asc | \
sudo gpg -o /usr/share/keyrings/mongodb-server-8.0.gpg --dearmor
echo "deb [ arch=amd64,arm64 signed-by=/usr/share/keyrings/mongodb-server-8.0.gpg ] https://repo.mongodb.org/apt/ubuntu jammy/mongodb-org/8.0 multiverse" | \
sudo tee /etc/apt/sources.list.d/mongodb-org-8.0.list
sudo apt update && sudo apt install -y mongodb-org
# 3. Install the controller .deb (download from the official page — see References)
sudo dpkg -i omada_v5.15.24.19_linux_x64_*.deb
# If dpkg complains about the jsvc version:
# sudo dpkg --ignore-depends=jsvc -i omada_v5.15.24.19_linux_x64_*.deb
# 4. Start
sudo tpeap start
tpeap statusThen open the UI at https://<controller-ip>:8043 and run the setup wizard: create the admin account, create a site, and skip Omada Cloud access (this is an on-prem setup).
First start is slow
The first start can take several minutes, and the web ports (8043/8088) only bind at the very end of startup. If nmap shows them "closed" while the service reports "running", it is still starting — watch logs/server.log until the ports open.
Verify the install
java -version                          # OpenJDK 17
sudo tpeap status                      # "Omada Controller is running"
sudo ss -tlnp | grep -E '8043|8088'    # web ports listening = startup finished
java -version # OpenJDK 17
sudo tpeap status # "Omada Controller is running"
sudo ss -tlnp | grep -E '8043|8088' # web ports listening = startup finishedFirewall ports
If the host runs a firewall, open these (controller v5.x):
| Port | Purpose |
|---|---|
| TCP 8043 / 8088 | HTTPS / HTTP management + captive portal |
| TCP 8843 | HTTPS captive portal |
| UDP 29810 | EAP discovery |
| TCP 29811–29814 | device adoption / management / firmware |
| TCP 29815–29816 | device data / remote CLI (v5.9+) |
For the Powerlynx side of the tunnel also allow:
| Direction | Port | Purpose |
|---|---|---|
| Controller → Powerlynx (outbound) | UDP 1812 / 1813 | RADIUS auth / accounting |
| Powerlynx → Controller (inbound) | UDP 3799 | CoA / PoD (disconnect) |
4. Adopt the EAP and create the WLAN (SSID)
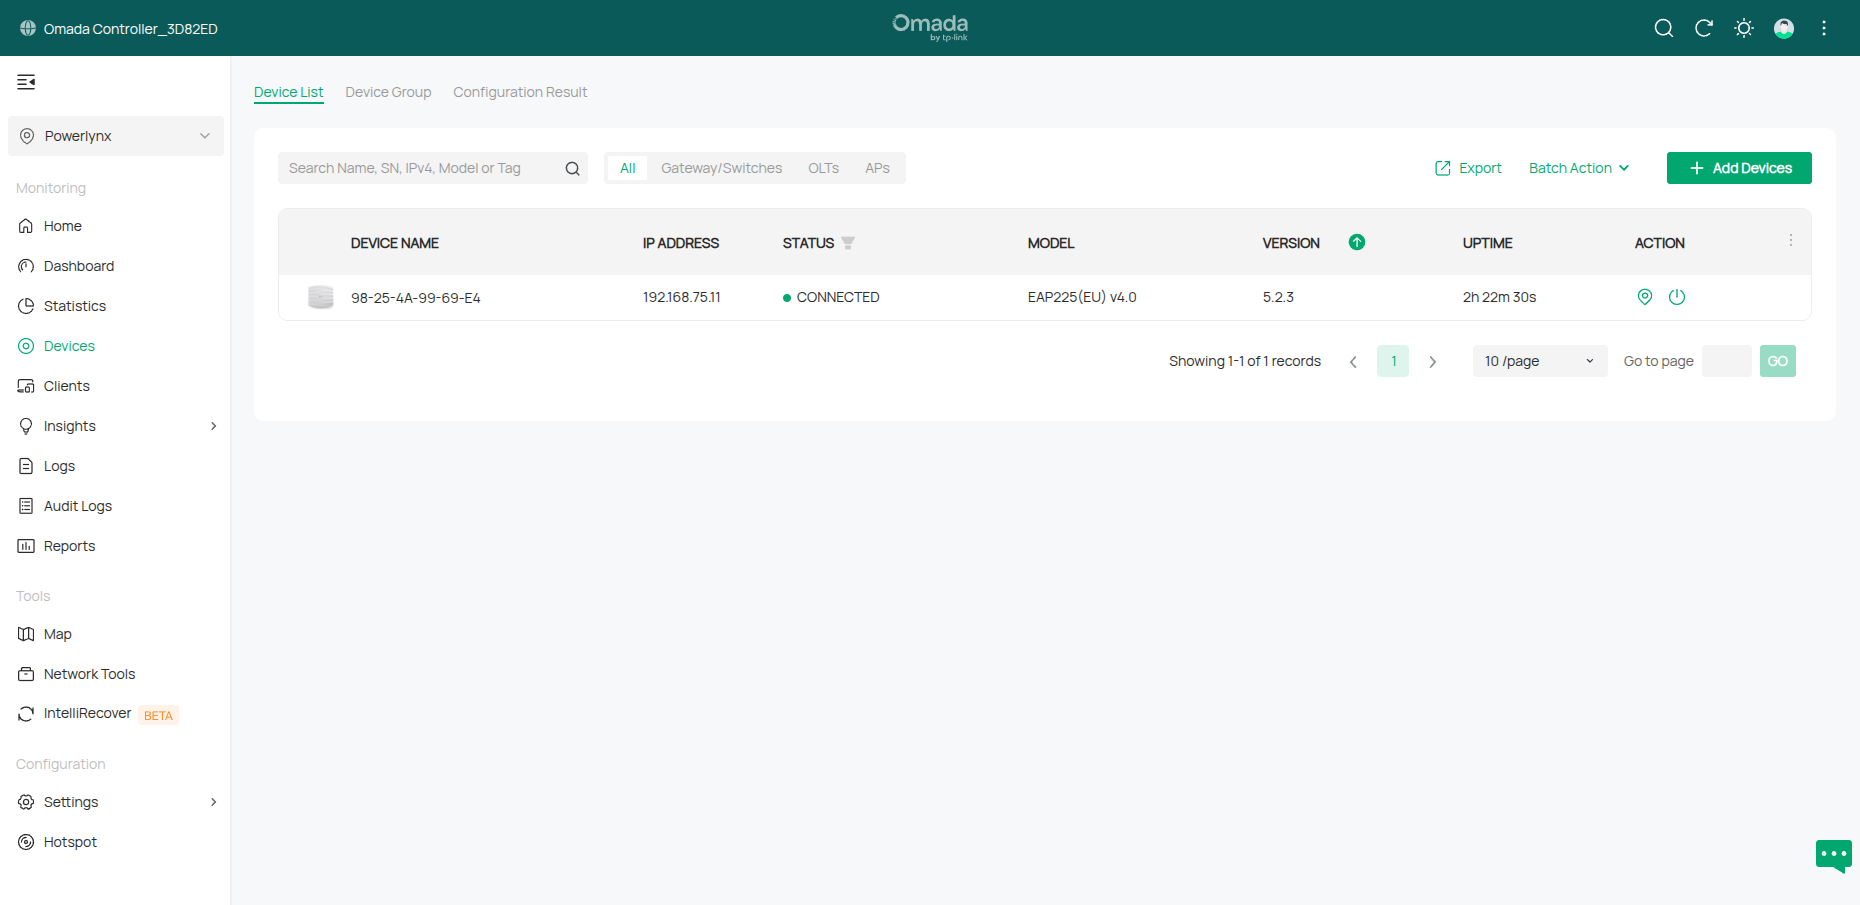
- Power up the EAP on the same L2 network as the controller; it appears under Devices.
- Adopt it and wait for status CONNECTED.
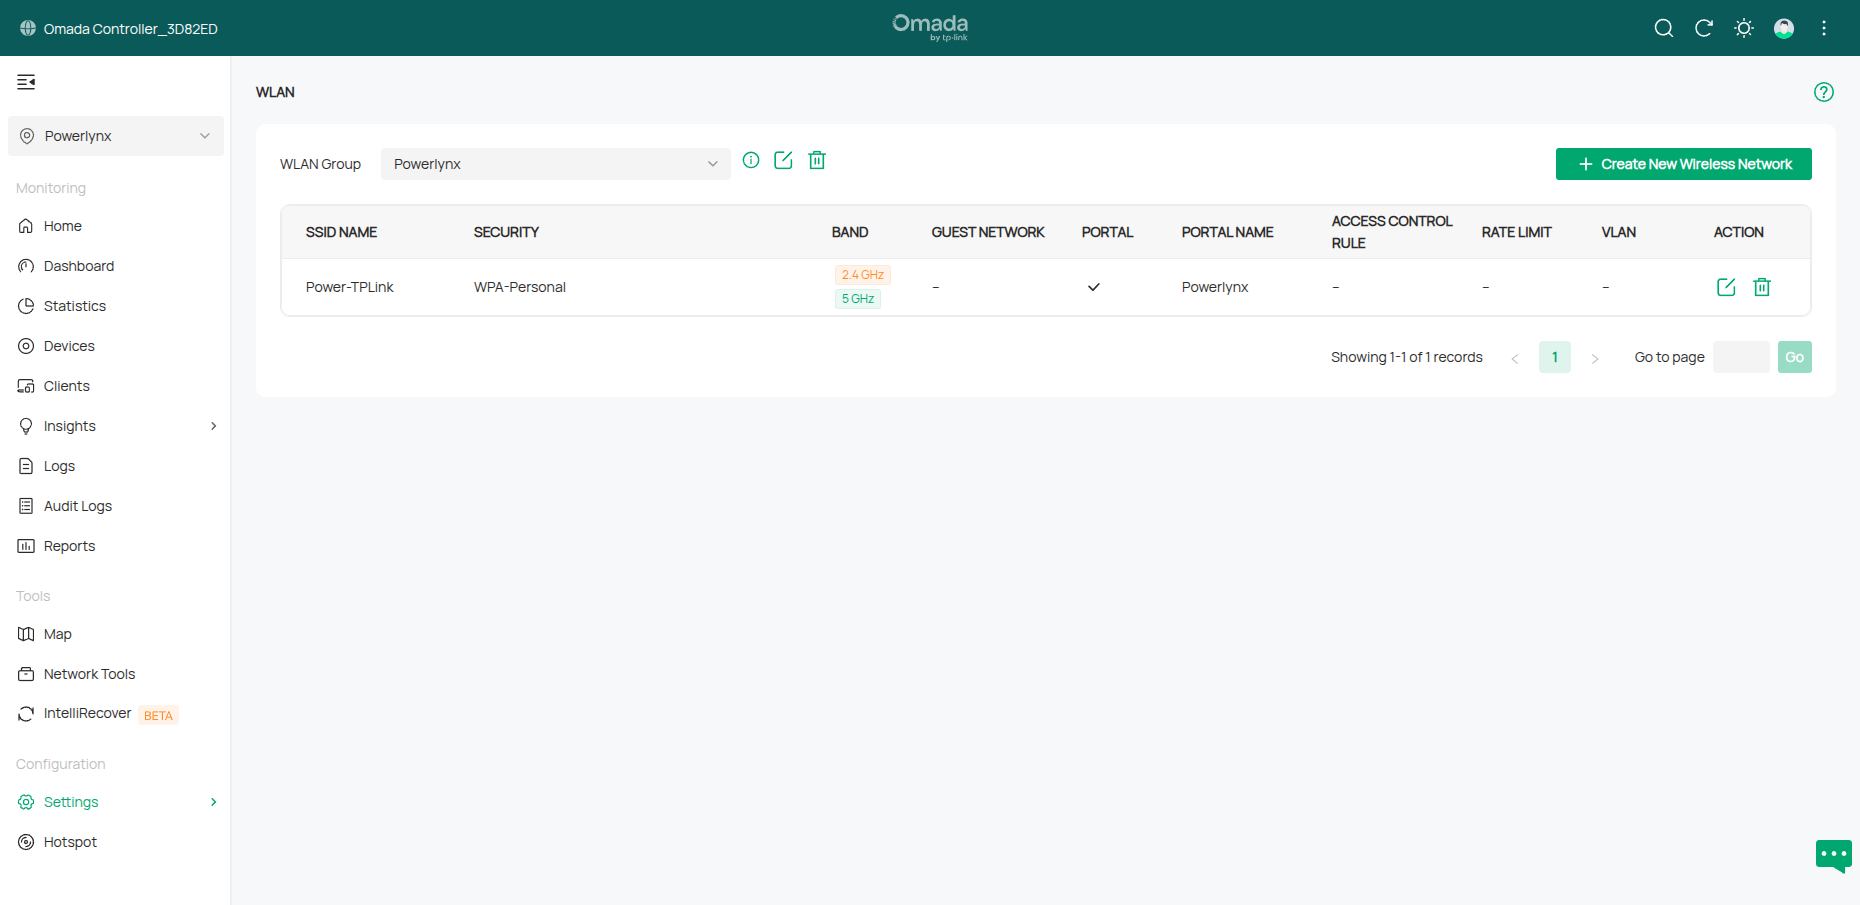
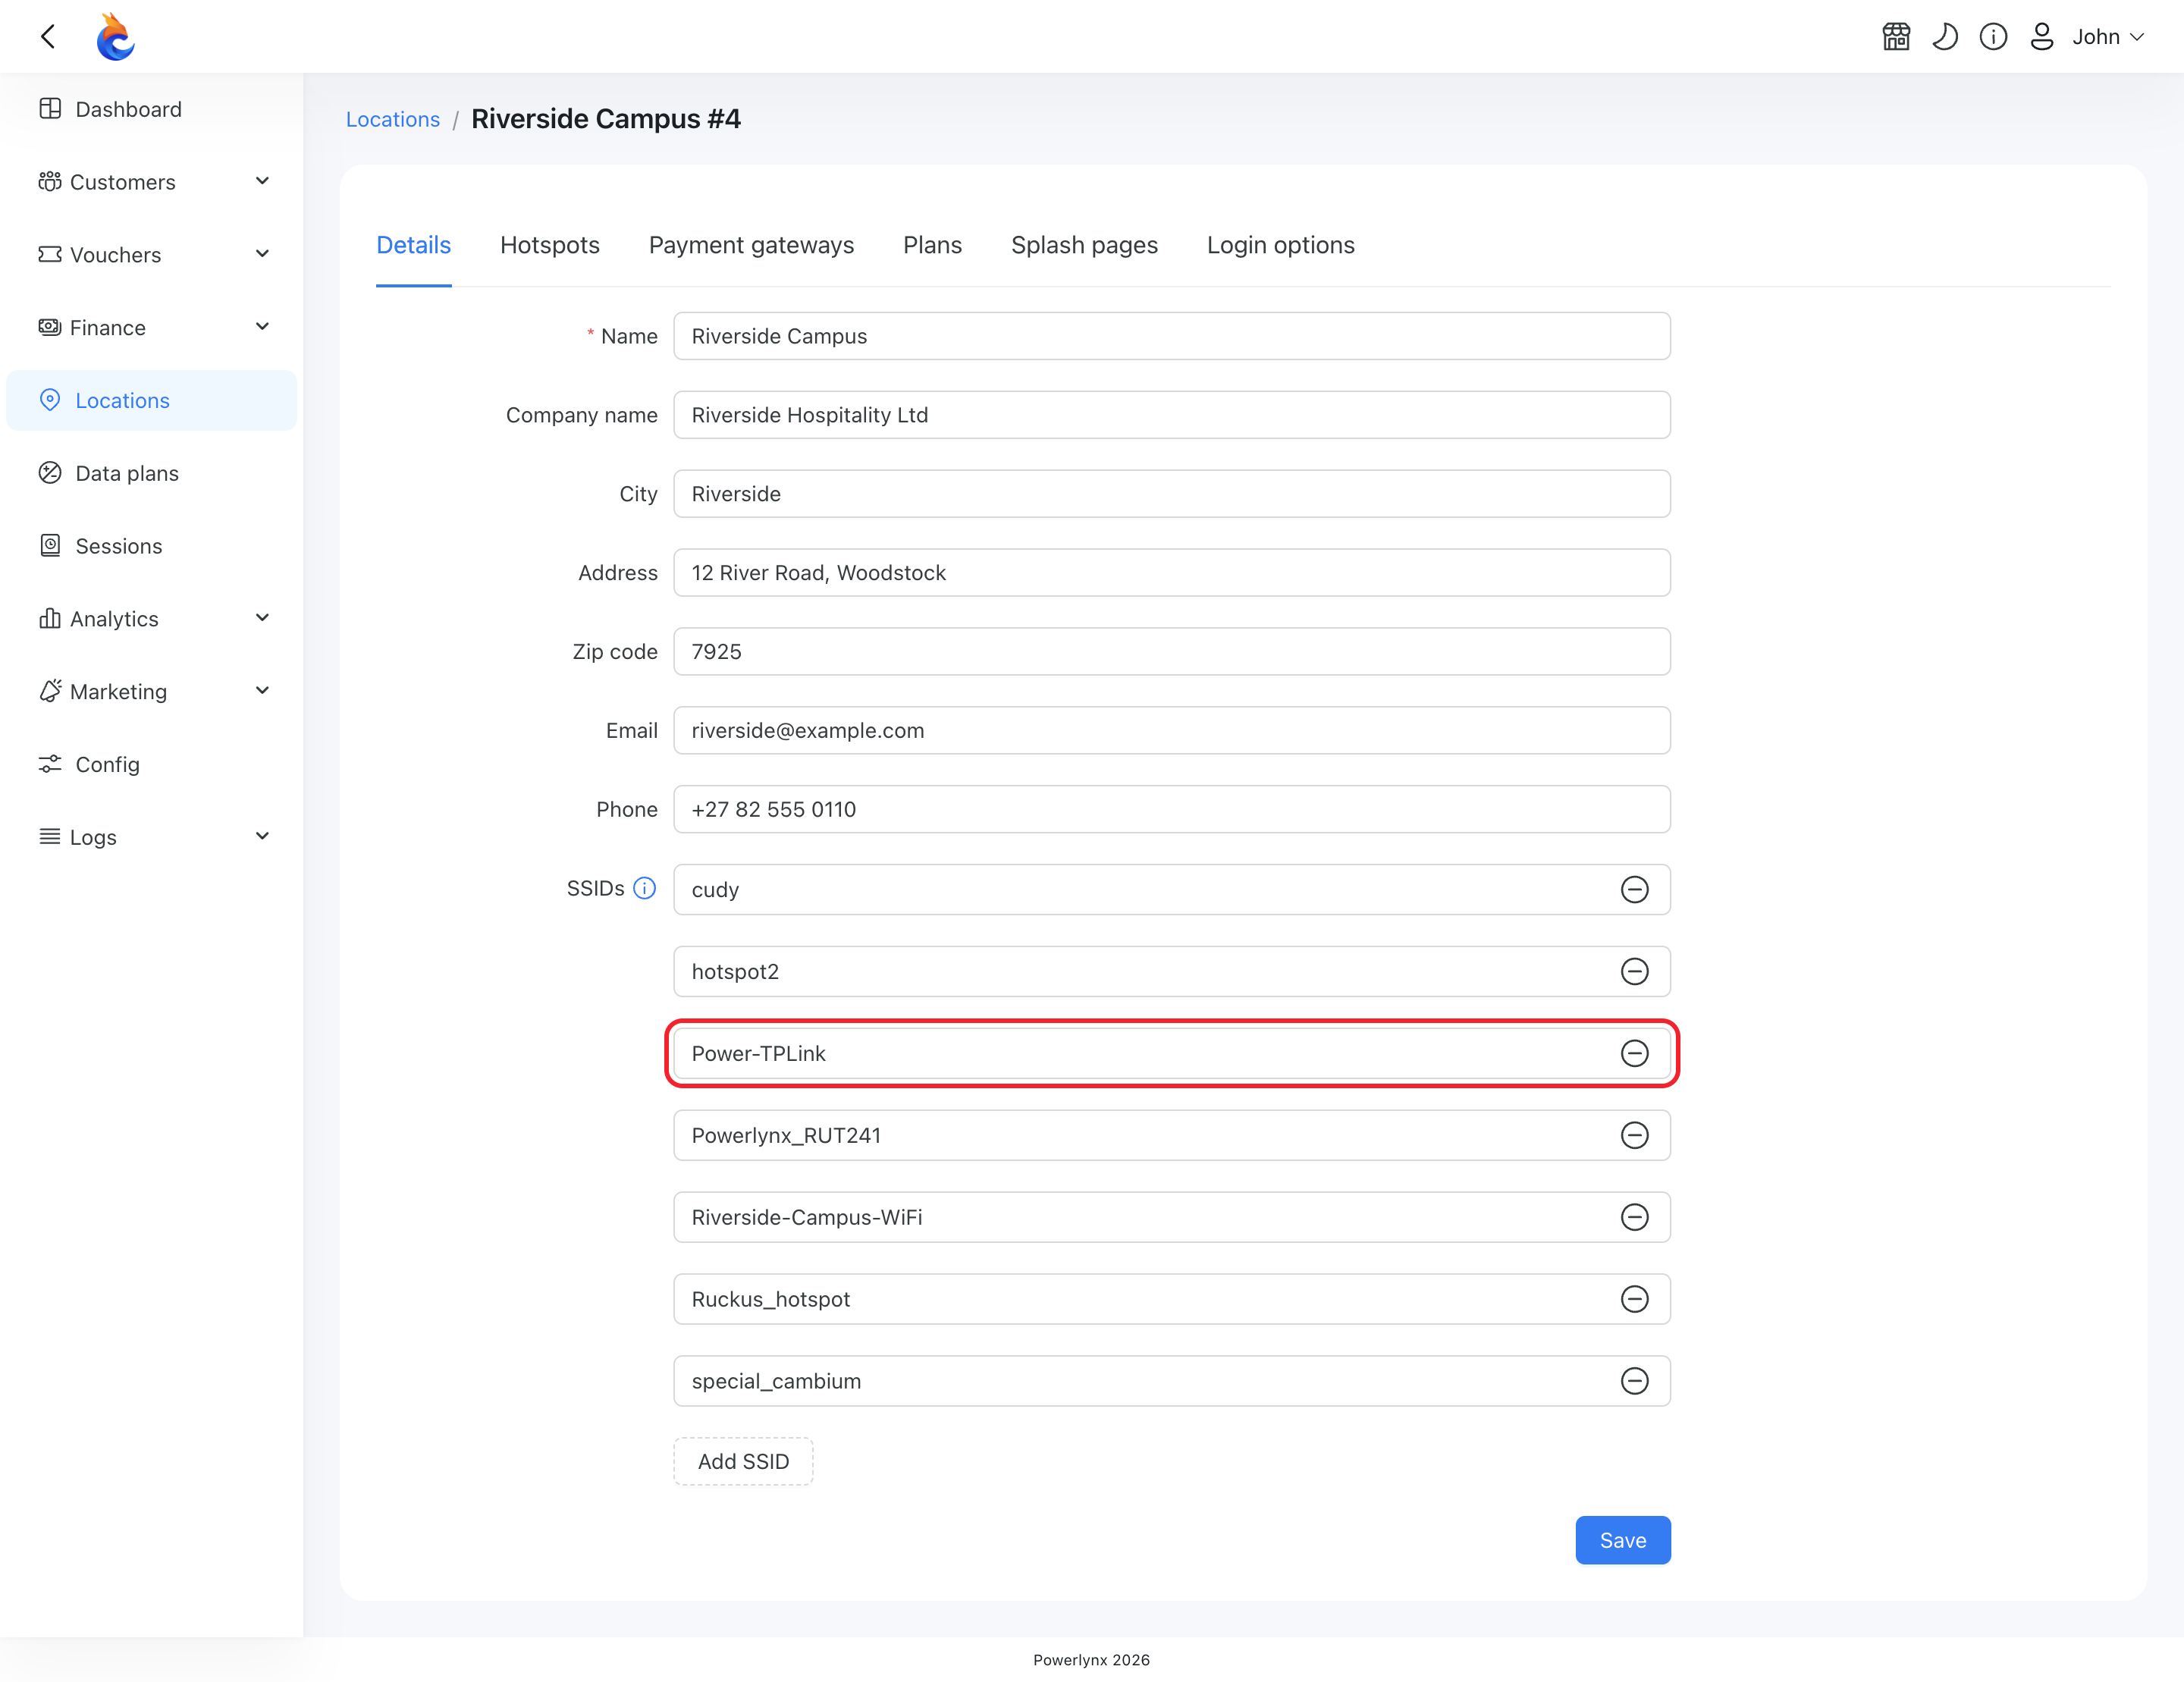
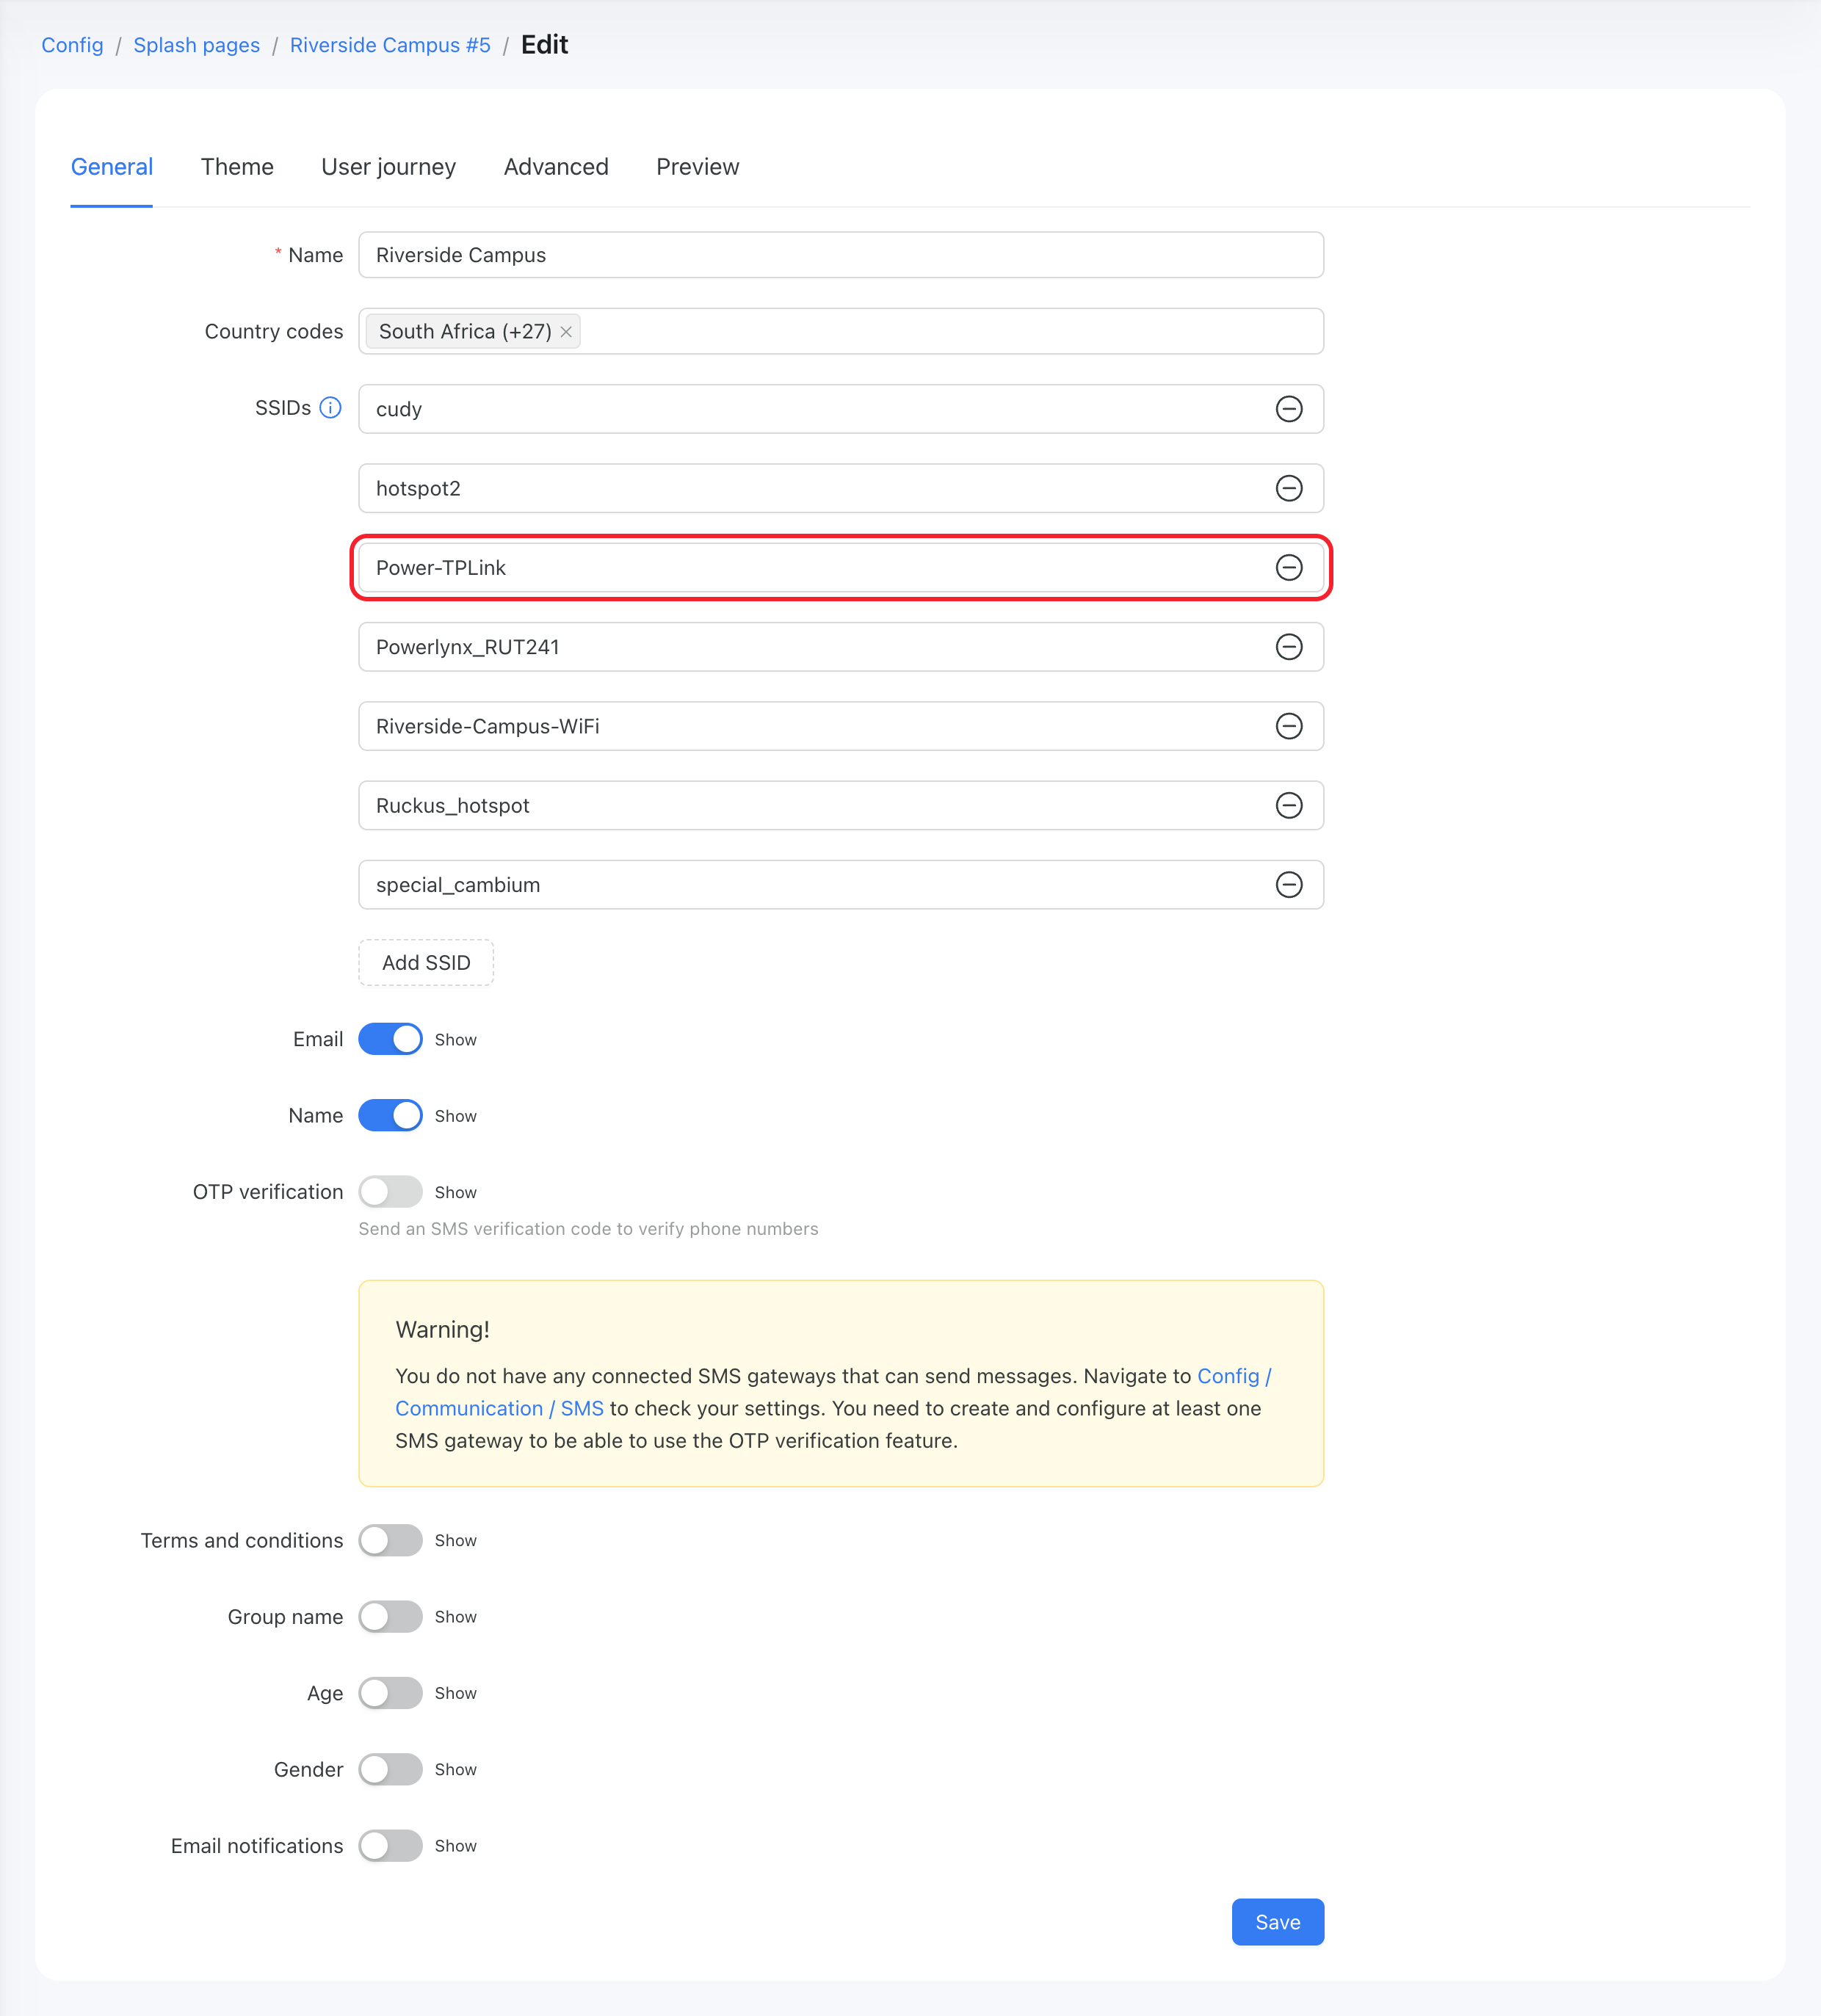
- Create a WLAN / SSID for the hotspot (Settings → Wireless Networks → WLAN) and set its name — this guide uses
Power-TPLink. For a lab, Open or WPA-Personal both work; production hotspots normally use an Open SSID so the captive portal can intercept unauthenticated clients. The Portal (section 7) is then applied to this WLAN.
The SSID name must match on both sides
Powerlynx decides which Location and Splash Page a session belongs to by the SSID name (not by RADIUS realm/domain). The WLAN name set on the Omada EAP (here Power-TPLink) must be entered exactly as the SSID on the Powerlynx side — on the Location and its Splash Page. If the names differ, the session will not map to the correct splash page / location.
5. WireGuard tunnel (controller host ↔ Powerlynx)
The tunnel runs at the OS level on the Ubuntu host. Install WireGuard on the host:
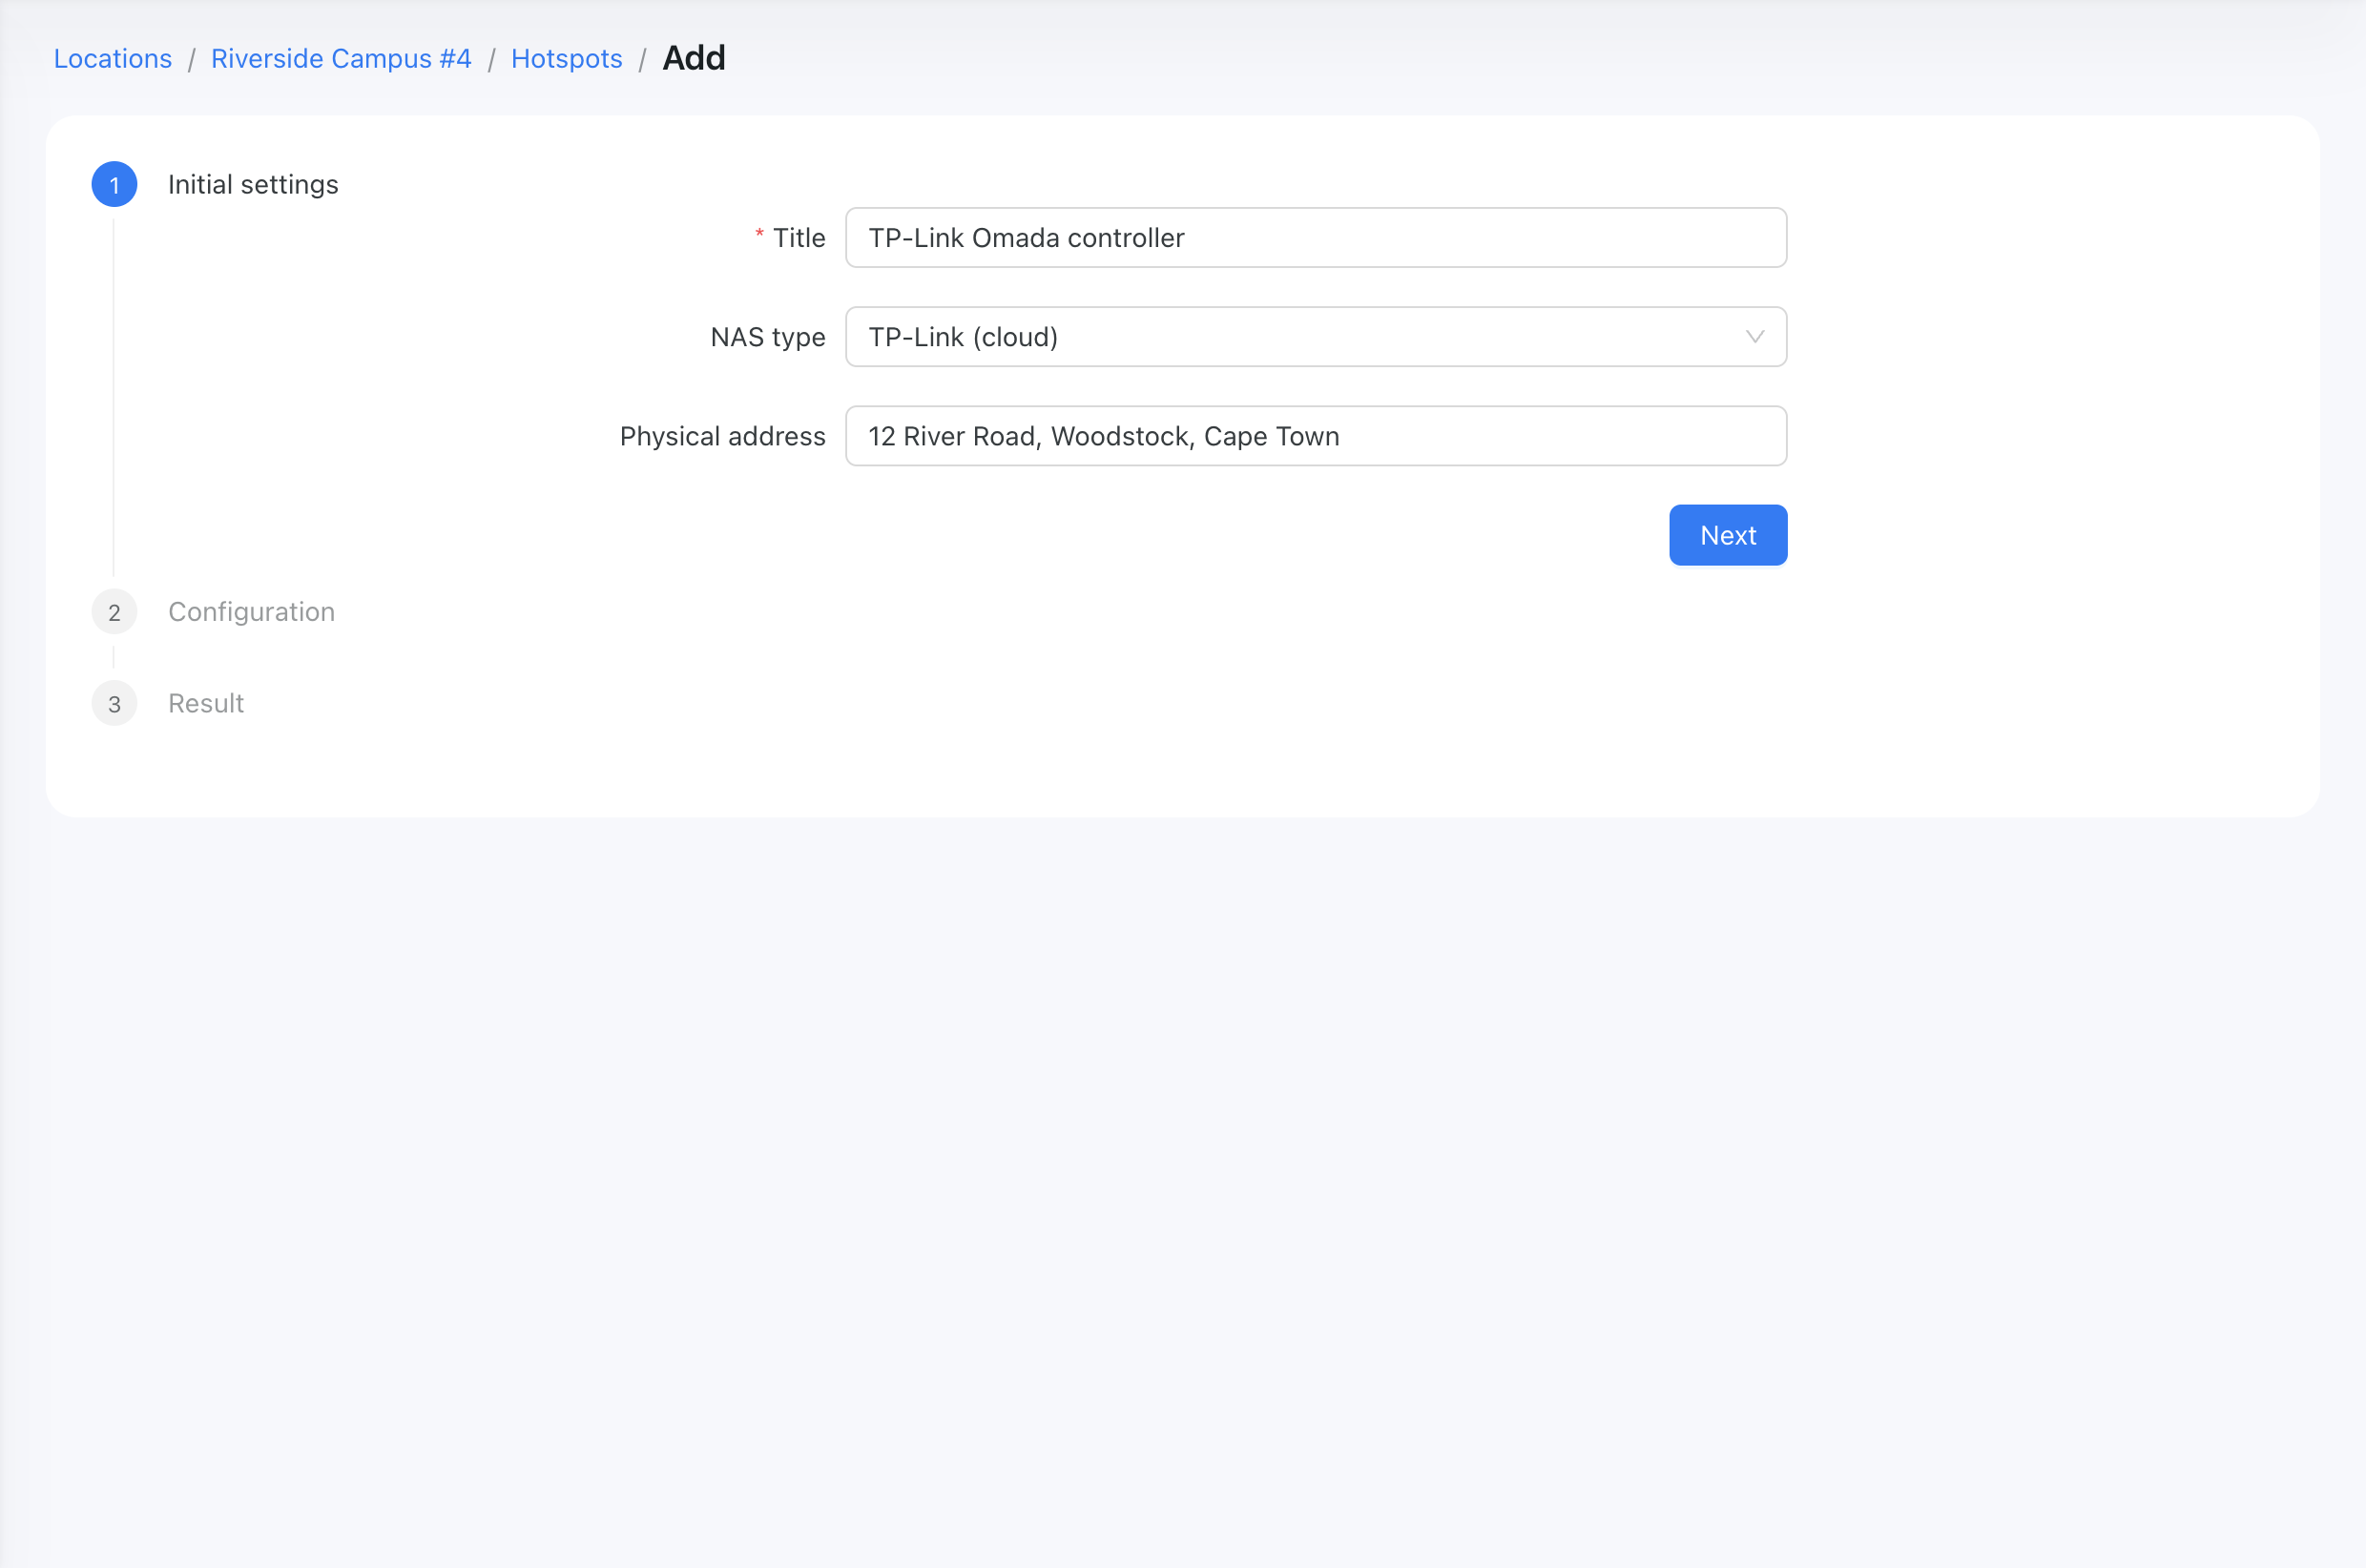
sudo apt update && sudo apt install -y wireguardsudo apt update && sudo apt install -y wireguardIn Powerlynx, create the hotspot: Location → Hotspots → Add. On the first wizard step (Initial settings), enter a Title, choose NAS type = TP-Link (cloud), then click Next.
On the Configuration step, set Connection type = Wireguard, click Generate Wireguard keys, enter the Radius secret, and finish the wizard. Generating shows the client private key — copy it now for the Ubuntu side.
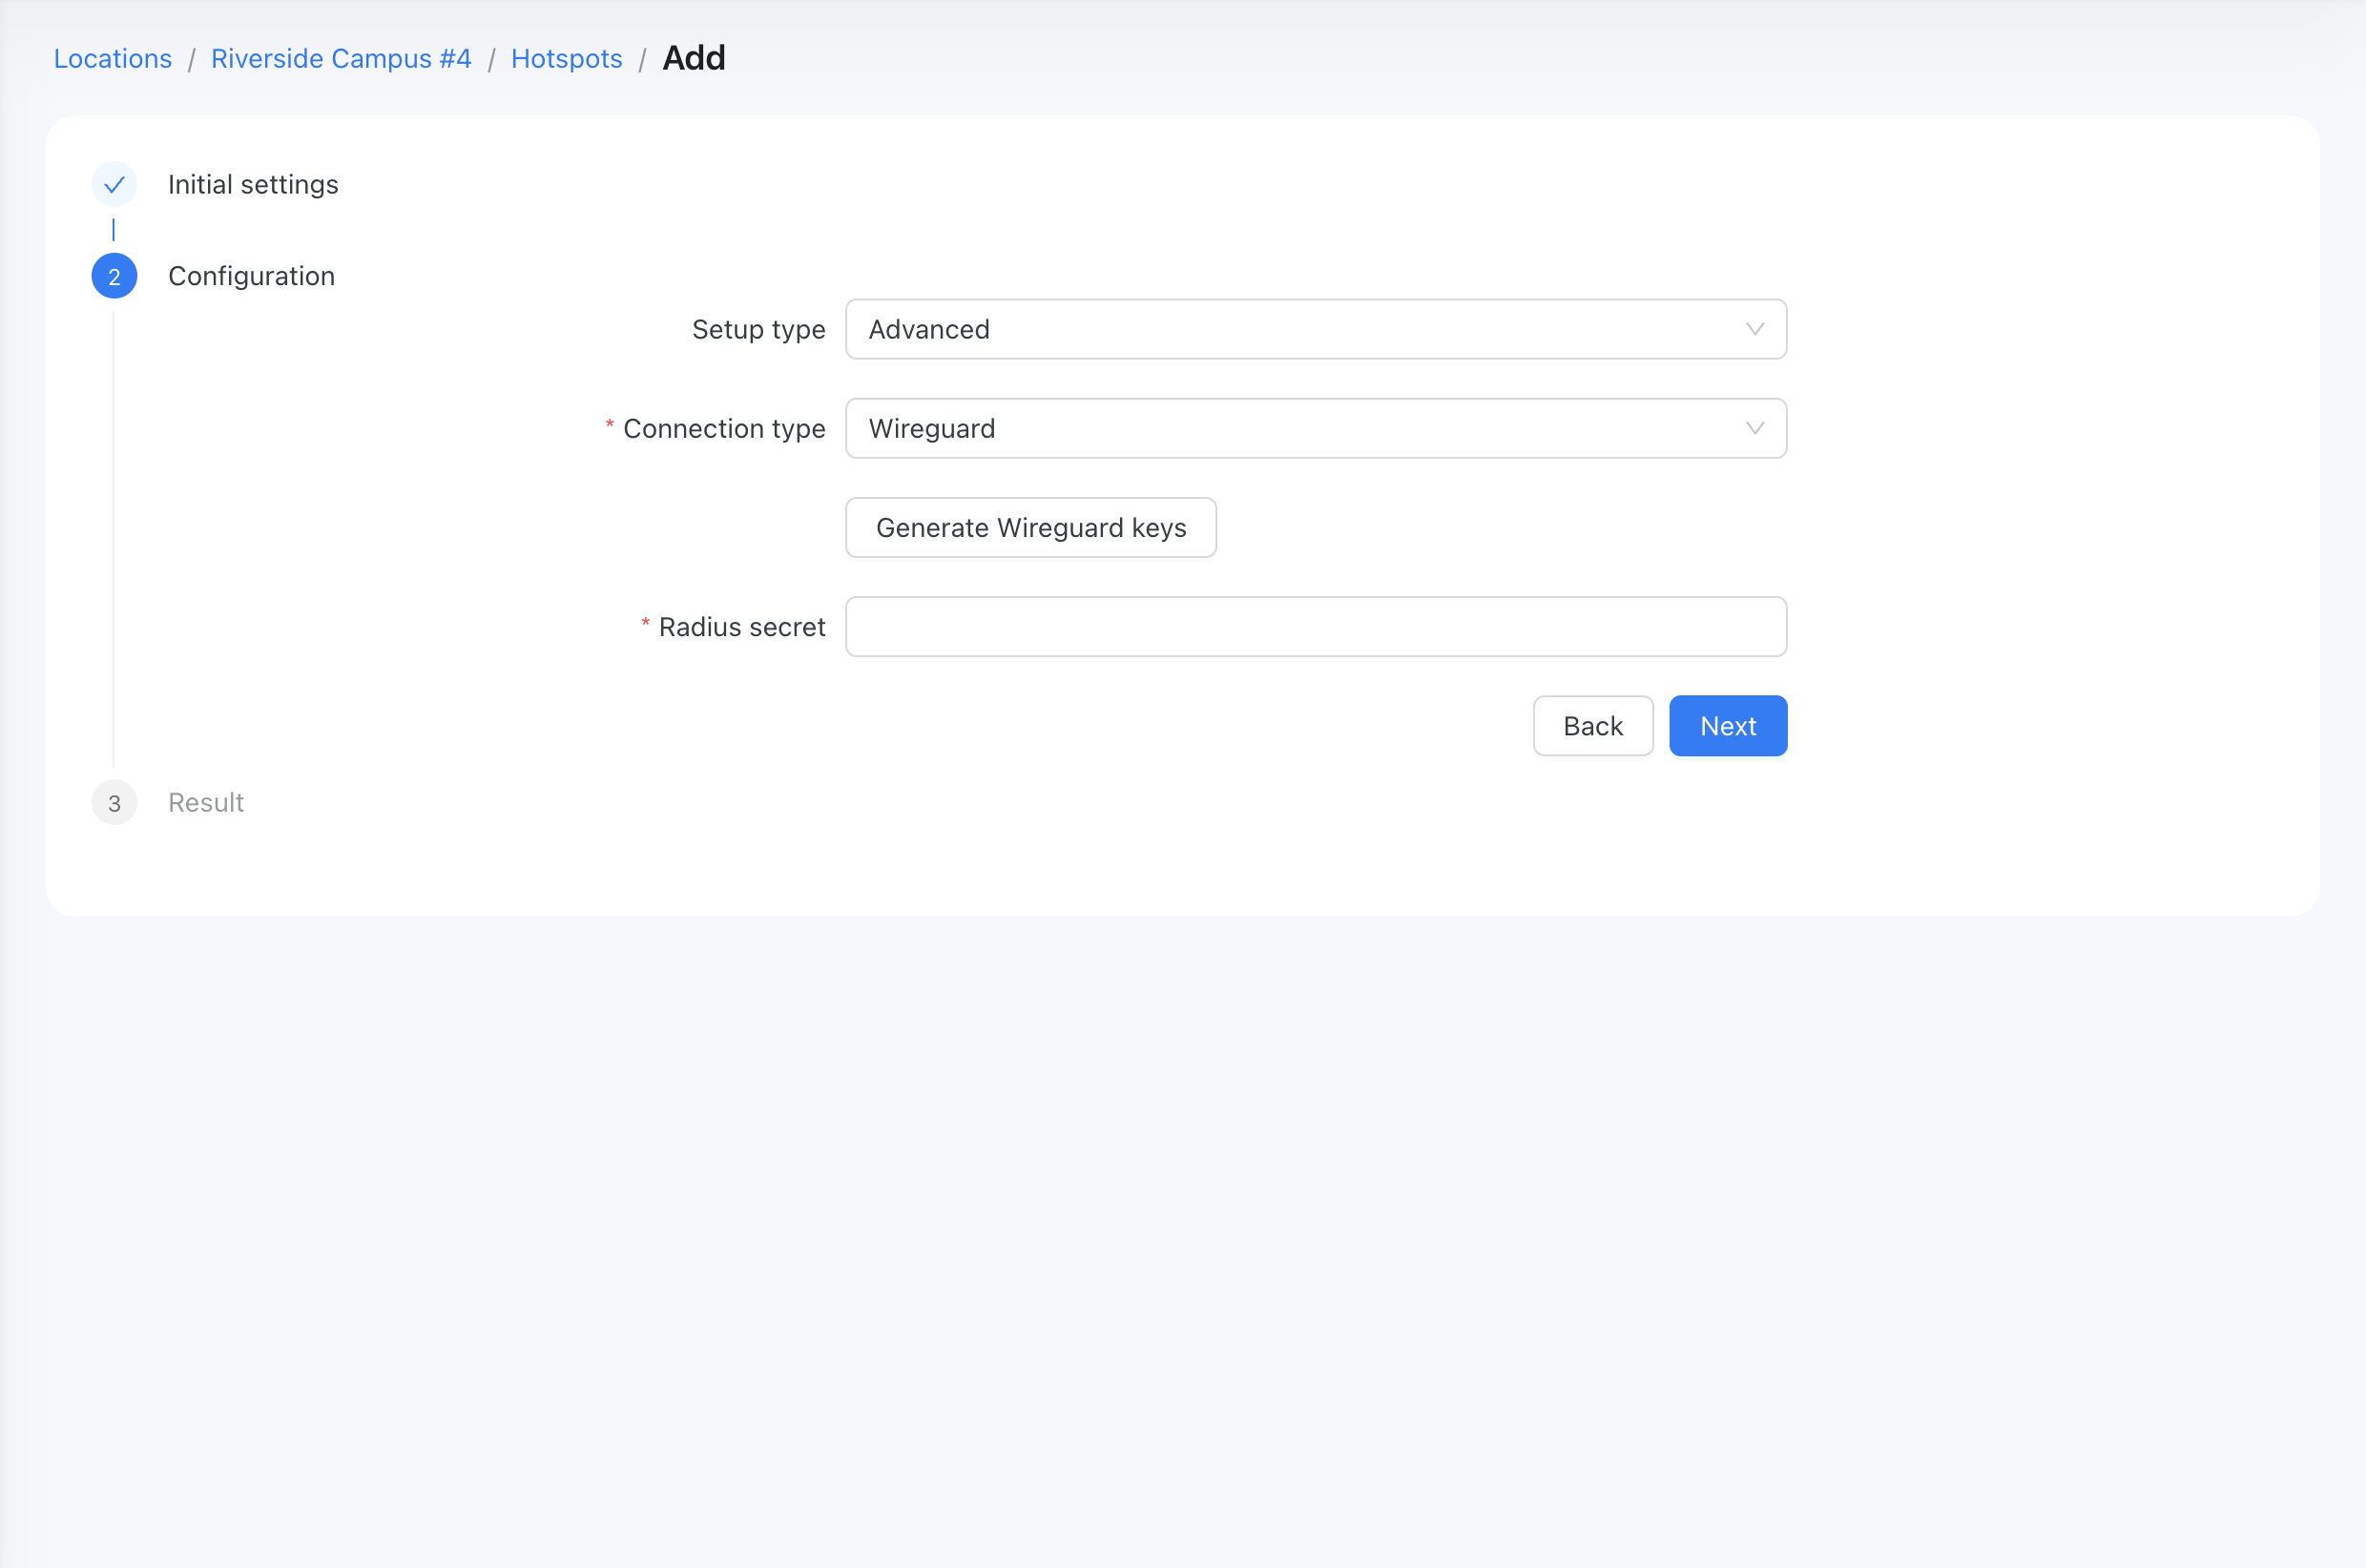
The client private key is shown only once
The client private key is shown only at generation time; afterwards Powerlynx displays only the client PUBLIC key. You only ever need to Generate once. "Regenerate keys" is for re-keying later and is destructive — it issues a new pair and drops the existing peer, so the host would have to be reconfigured with the new key.
Take the server endpoint and server public key from the hotspot's VPN configuration page in Powerlynx (the "Configure VPN" view). These are the Powerlynx-side values your
[Peer]needs. (Powerlynx only generates a MikroTik.rscrouter script for MikroTik NAS devices — a TP-Link Omada setup has none, so read these values from the Powerlynx UI.)Create
/etc/wireguard/wg0.confon the Ubuntu host:
[Interface]
PrivateKey = <client-private-key-from-generate>
Address    = <controller-tunnel-ip>/32

[Peer]
PublicKey  = lPYDyIwk5X4tyUMNT9ny/nyPSyHwk31mzm2ahOH7iV0=
Endpoint   = 139.84.243.134:443
AllowedIPs = 172.16.0.1/32
PersistentKeepalive = 15
[Interface]
PrivateKey = <client-private-key-from-generate>
Address = <controller-tunnel-ip>/32
[Peer]
PublicKey = lPYDyIwk5X4tyUMNT9ny/nyPSyHwk31mzm2ahOH7iV0=
Endpoint = 139.84.243.134:443
AllowedIPs = 172.16.0.1/32
PersistentKeepalive = 15- Bring it up, enable it on boot, and verify:
sudo wg-quick up wg0                   # start the tunnel now
sudo systemctl enable wg-quick@wg0     # start automatically on boot
systemctl status wg-quick@wg0.service  # should be "active (exited)"
sudo wg show                           # peer, latest handshake, transfer counters
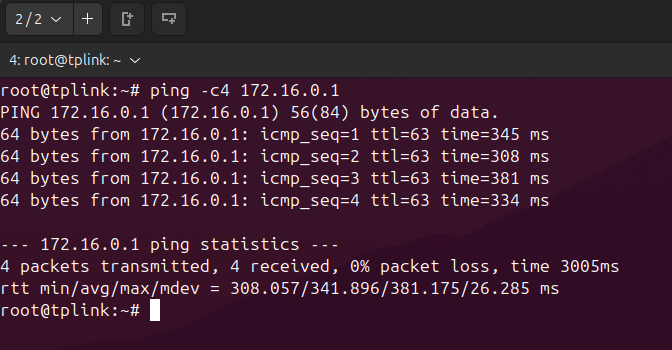
ping -c4 172.16.0.1                    # confirm connectivity through the tunnel
sudo wg-quick up wg0 # start the tunnel now
sudo systemctl enable wg-quick@wg0 # start automatically on boot
systemctl status wg-quick@wg0.service # should be "active (exited)"
sudo wg show # peer, latest handshake, transfer counters
ping -c4 172.16.0.1 # confirm connectivity through the tunnelA successful ping to the Powerlynx tunnel address confirms the tunnel is up:
6. Powerlynx hotspot configuration
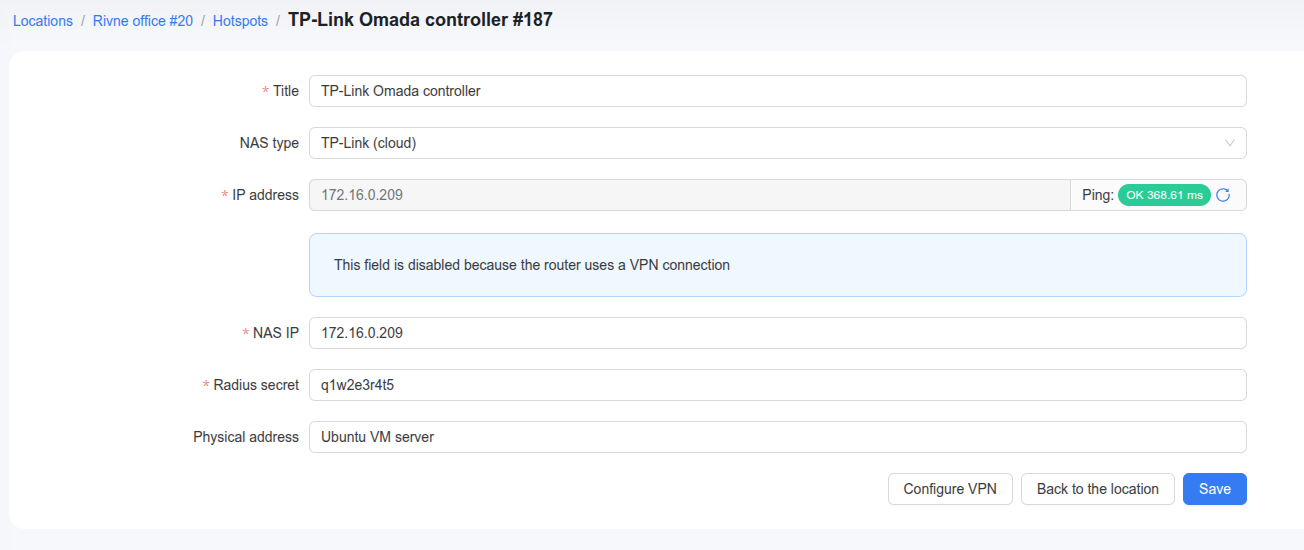
On the Powerlynx hotspot (Location → hotspot):
| Field | Value |
|---|---|
| NAS type | TP-Link (cloud) |
| Connection type | WireGuard |
| NAS IP | <controller-tunnel-ip> (the controller's WireGuard address) |
| RADIUS secret | <your-radius-secret> |
7. Omada Portal + RADIUS profile
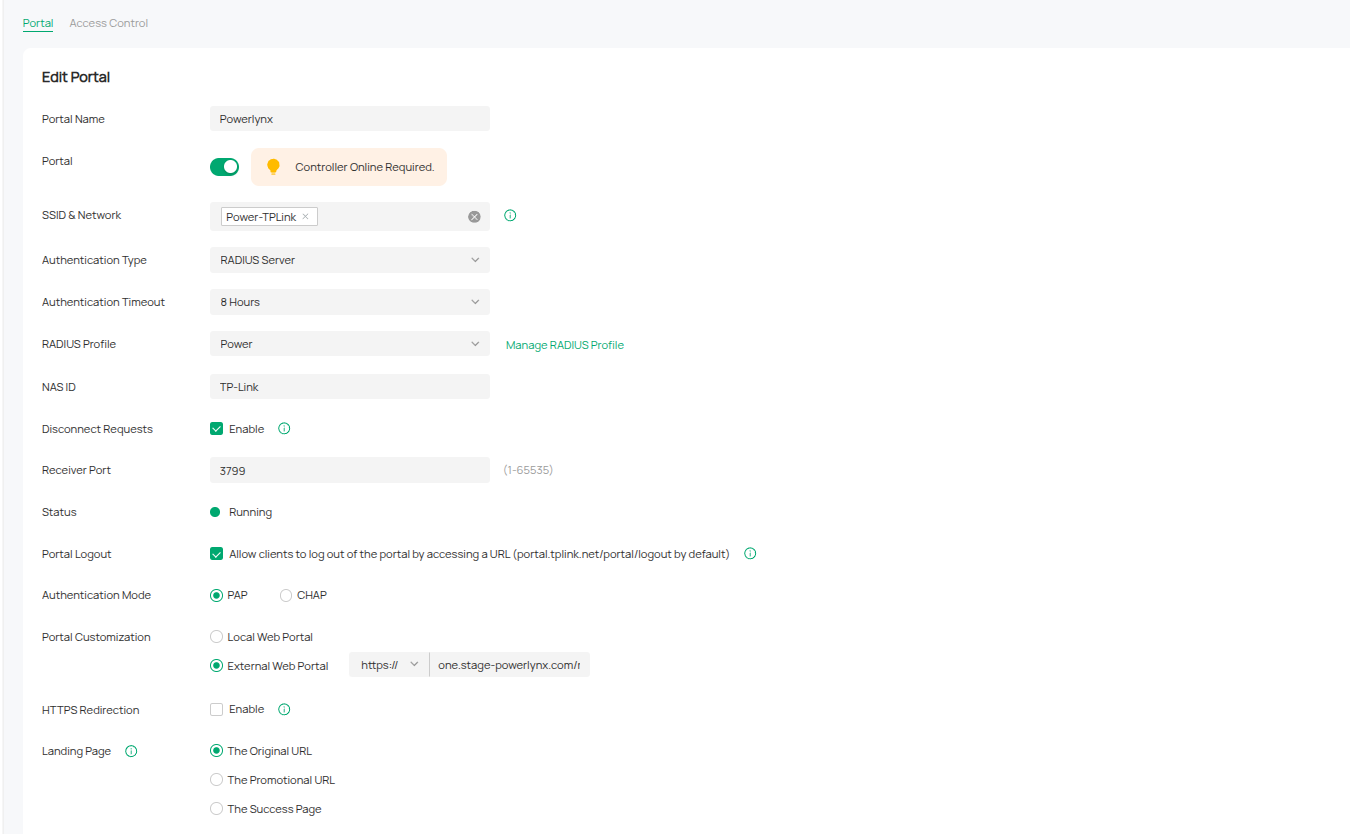
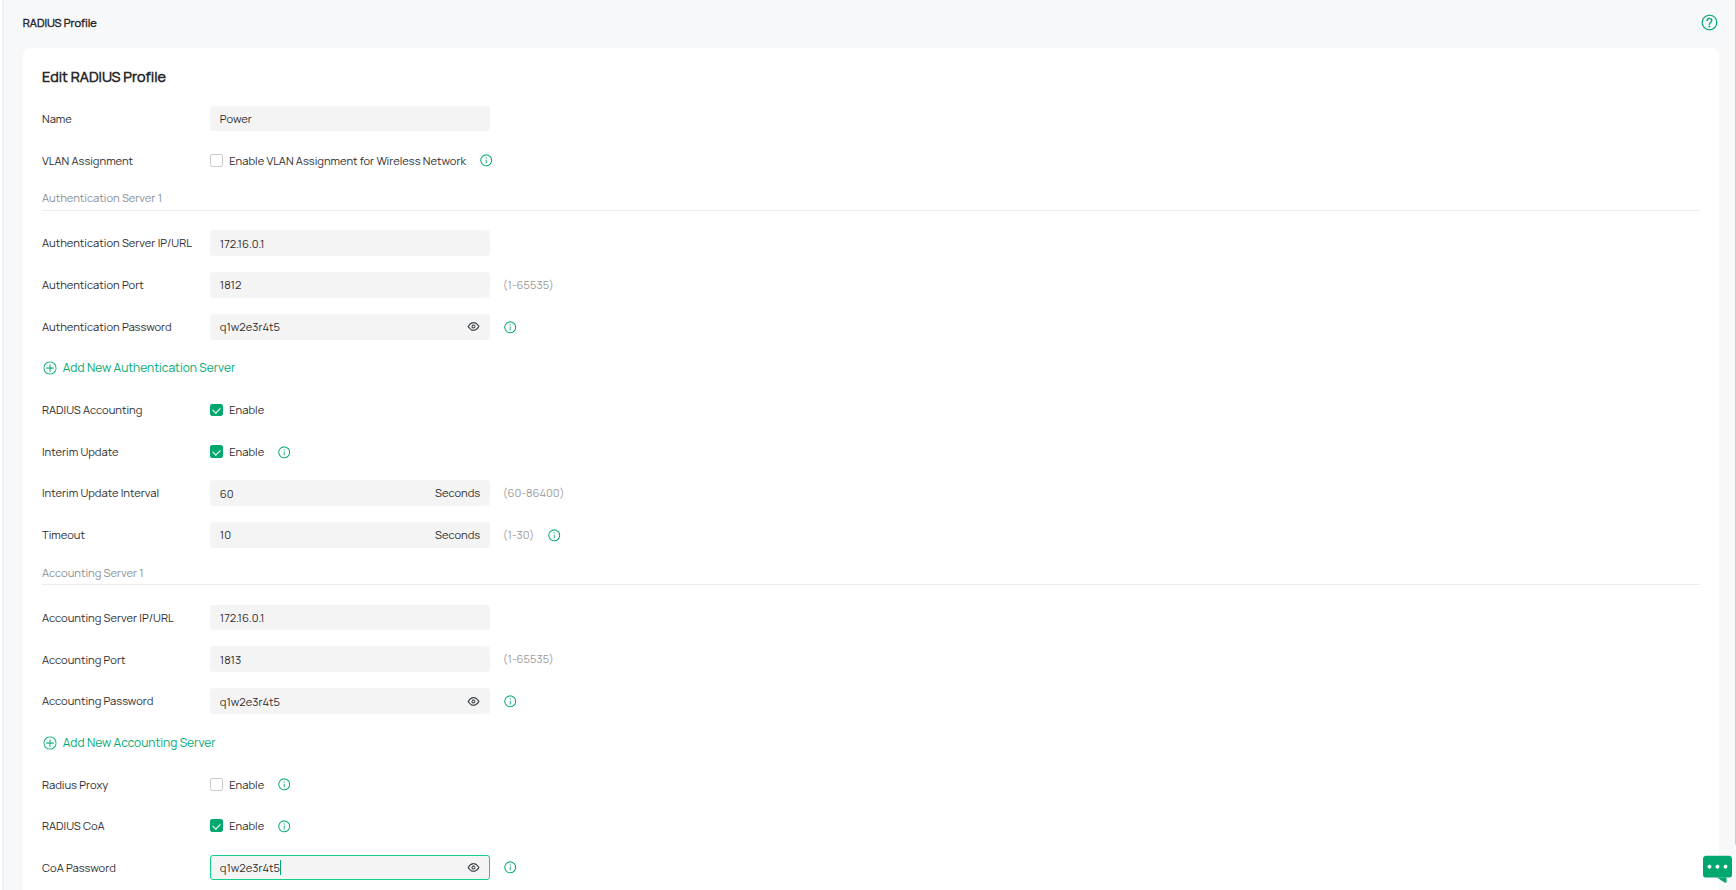
This is the critical configuration. In the controller: Settings → Authentication → Portal and Settings → Profiles → RADIUS Profile.
Portal
| Setting | Value | Note |
|---|---|---|
| Authentication Type | RADIUS Server | Do not pick "External Portal Server" — that is the deprecated controller-API flow Powerlynx does not use. |
| External Web Portal URL | https://yourpowerlynxdomain.app/redirect-flow | Your Powerlynx portal's redirect-flow URL — replace yourpowerlynxdomain.app with your own Powerlynx domain. |
| Disconnect Requests | Enabled | Enables the PoD listener. |
| Receiver Port | 3799 | |
| Authentication Mode | PAP | CHAP as fallback. |
RADIUS Profile
| Setting | Value | Note |
|---|---|---|
| Authentication Server | 172.16.0.1:1812 | By IP, not hostname — a hostname silently breaks accounting. |
| Accounting Server | 172.16.0.1:1813 | Same — by IP. |
| Auth / Accounting / CoA password | <your-radius-secret> | Exactly the hotspot's RADIUS secret, all three fields. |
| Accounting | Enabled | |
| Interim Update Interval | 300 s (production) / 60 s (lab) | Must stay under Powerlynx accounting_interval × factor — see section 8. |
Pre-Authentication Access (walled garden)
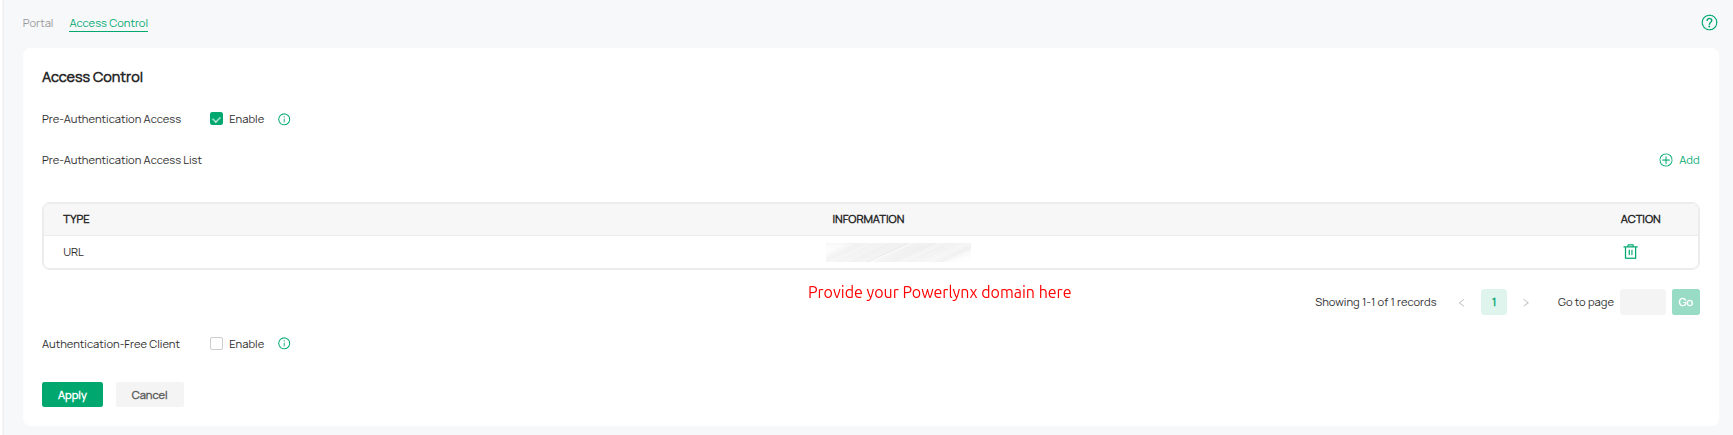
In the Portal's Access Control tab, enable Pre-Authentication Access and add your Powerlynx domain to the list, so an unauthenticated client can reach the Powerlynx splash page before it logs in.
8. Recommended RADIUS attributes (Powerlynx NAS type "TP-Link (cloud)")
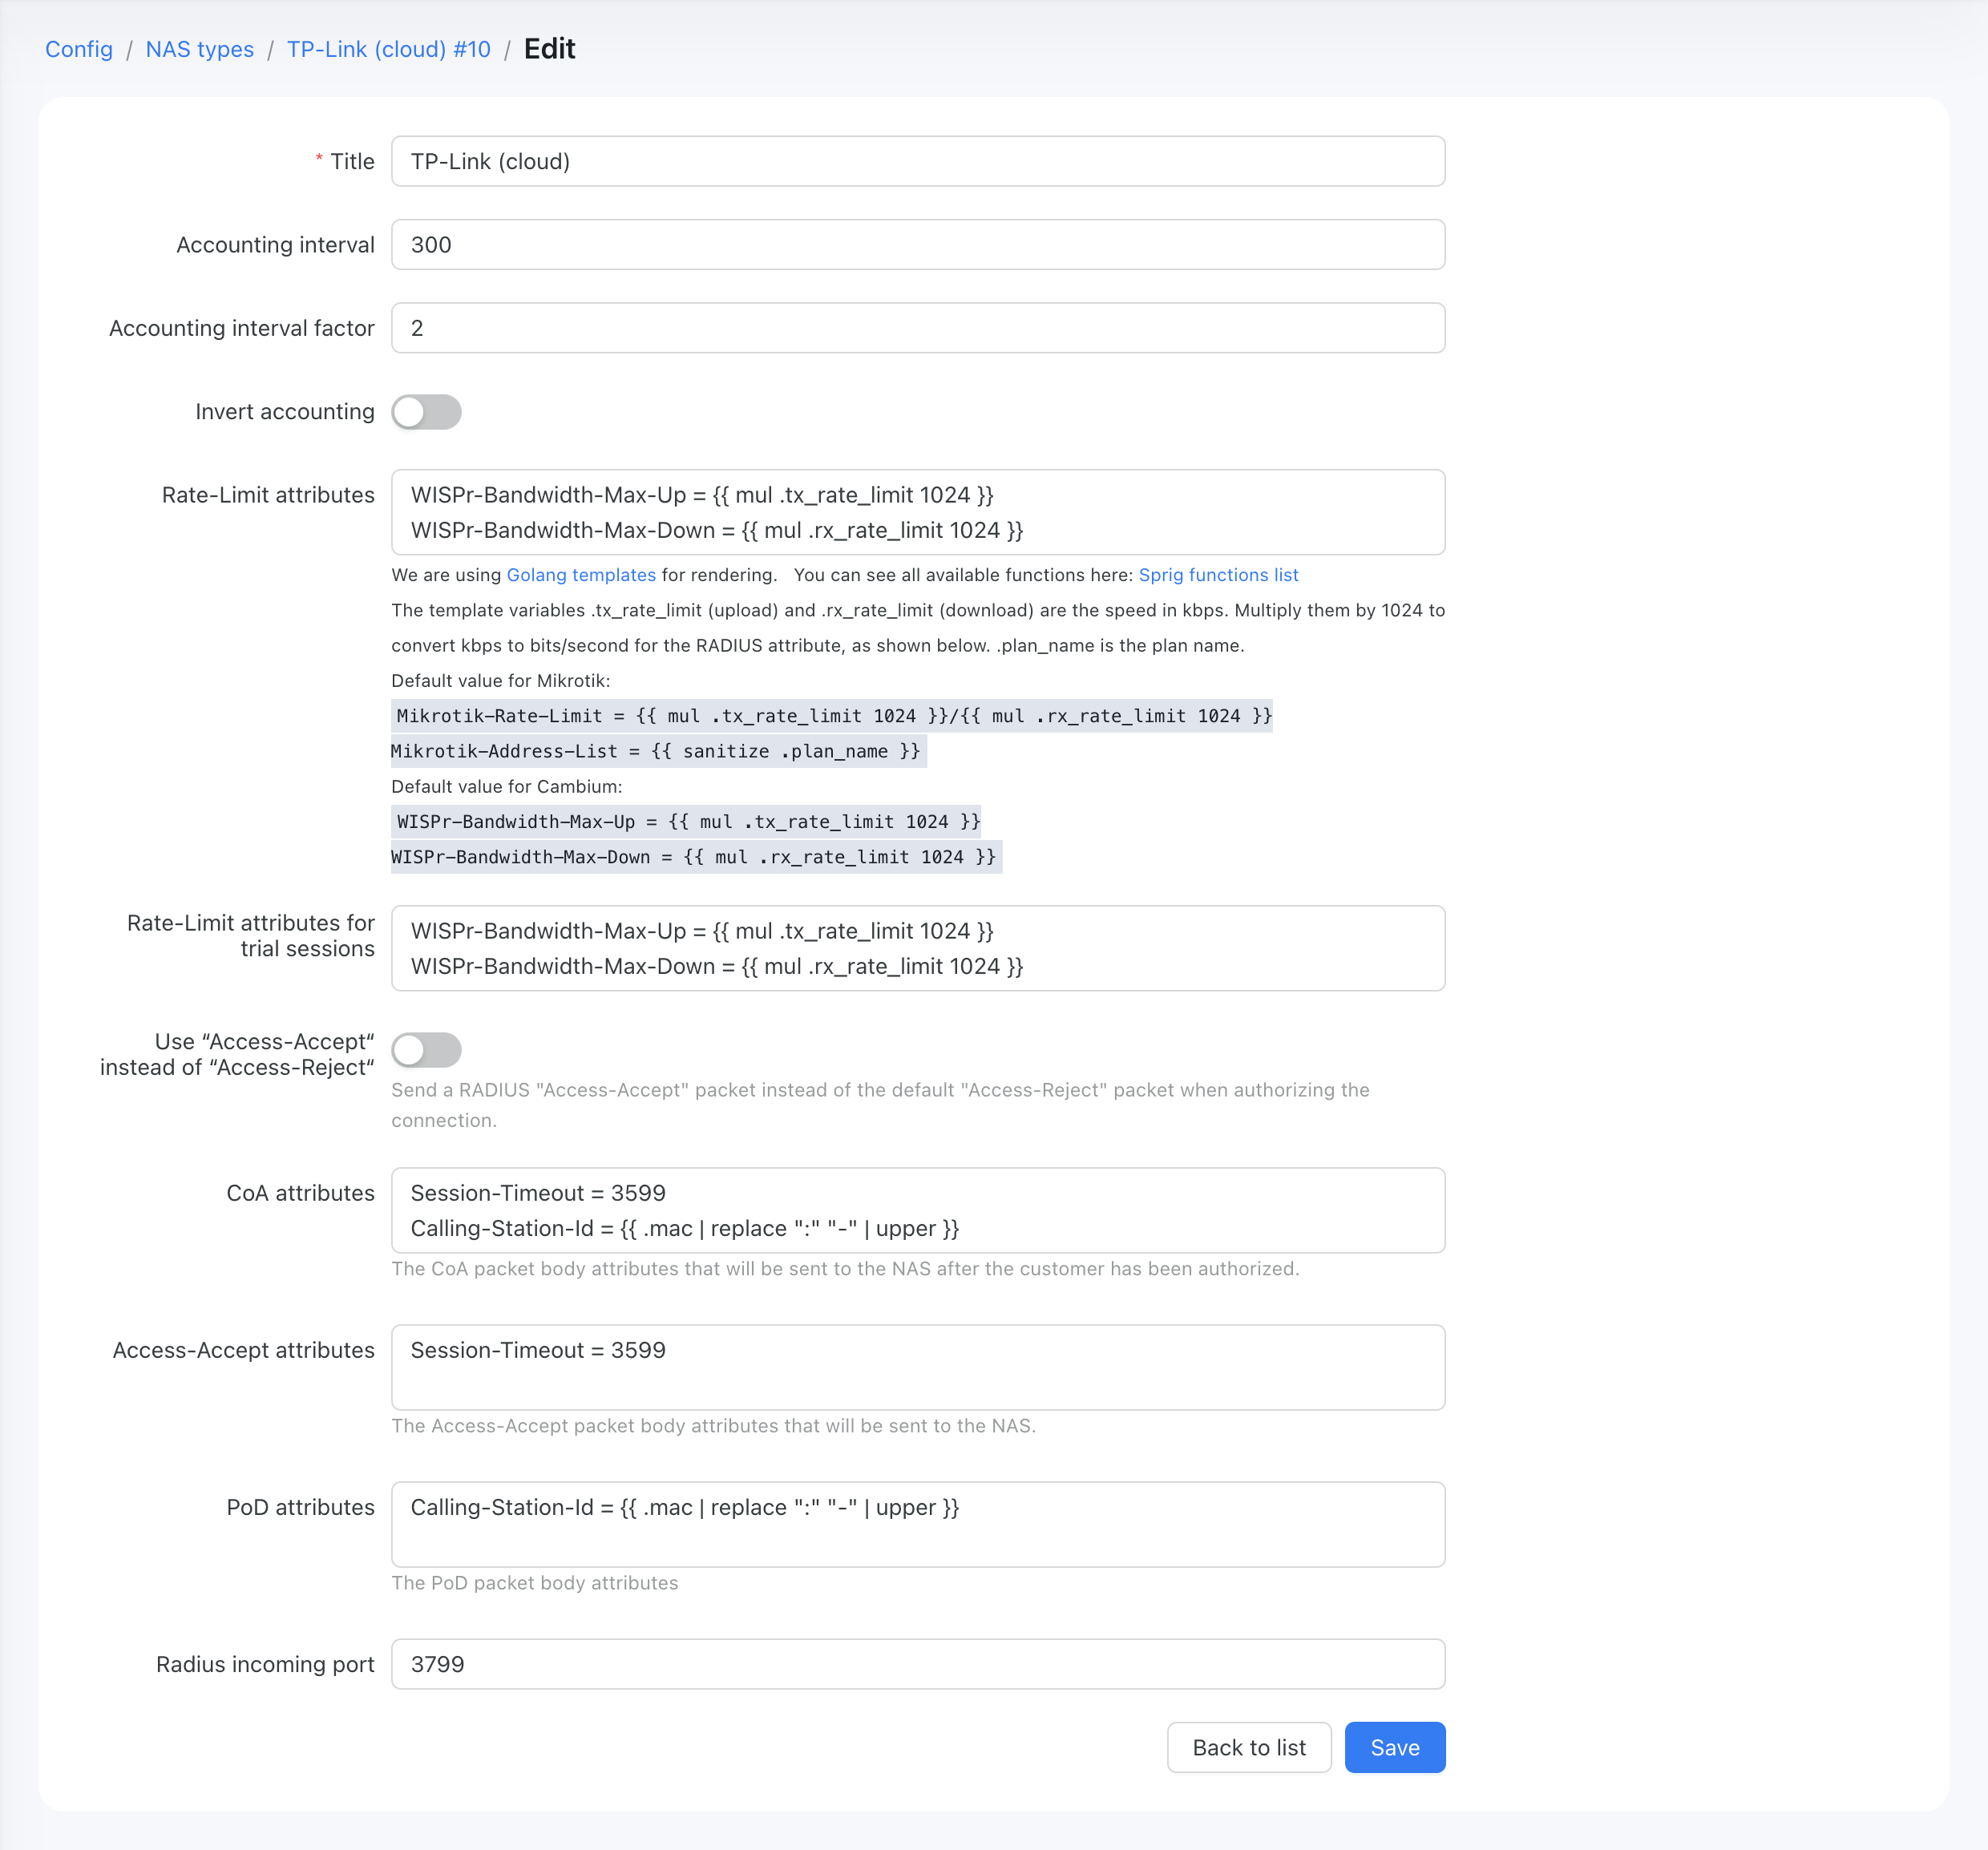
Set these on the Powerlynx NAS-type attribute templates. These values are what make rate limiting, session time, accounting direction, and disconnect actually work with Omada.
| Group | Attribute | Recommended value | Why |
|---|---|---|---|
| Rate limit | WISPr-Bandwidth-Max-Up | {{ mul .tx_rate_limit 1024 }} | Upload cap (kbps → bps). |
| Rate limit | WISPr-Bandwidth-Max-Down | {{ mul .rx_rate_limit 1024 }} | Download cap (kbps → bps). |
| Access-Accept | Session-Timeout | {{ .time_left }} | Per-voucher remaining time. |
| PoD | User-Name | {{ .mac }} | Identifies the client to disconnect. |
| PoD | Calling-Station-Id | {{ .mac | upper | replace ":" "-" }} | Critical — must match Omada's MAC format. See below. |
| Accounting | Invert accounting | ON | See below. |
The Calling-Station-Id line is what makes PoD work
Omada matches disconnects by a MAC in UPPERCASE with HYPHENS (e.g. AA-BB-CC-DD-EE-FF). Powerlynx's plain {{ .mac }} renders lowercase-with-colons, which Omada will not match — the disconnect is silently ignored with no ACK. Use {{ .mac | upper | replace ":" "-" }} so the value matches Omada's own format.
Invert accounting (ON): Omada is RFC-standard — Acct-Input = upload, Acct-Output = download. With Invert accounting ON, Powerlynx maps these to the correct download/upload direction in its UI.
Interim Update interval (important coupling). Powerlynx force-closes a session if no accounting update arrives within accounting_interval × factor (the Powerlynx NAS-type fields). So the invariant is:
Omada Interim Update interval < Powerlynx
accounting_interval × factor
- Production (recommended): a 300 s interim interval is a common Wi-Fi / captive-portal choice — it keeps volume/time accounting reasonably current without flooding the RADIUS server. (RFC 2869 sets the floor at ≥ 60 s and suggests ≥ 600 s; 300 s is the usual hotspot compromise for tighter quota accuracy, and 600 s is fine if you prefer strict RFC alignment.) To use 300 s safely, set the Powerlynx NAS-type Accounting interval = 300 and factor = 2 (a 600 s closer window), and Omada's Interim Update Interval = 300 s.
9. Verify
On the controller host, capture RADIUS traffic on the tunnel interface:
sudo radsniff -i wg0 -p 1812 -x           # captures 1812/1813/3799
# or, for disconnect only:
sudo tcpdump -ni wg0 -vv 'udp port 3799'
sudo radsniff -i wg0 -p 1812 -x # captures 1812/1813/3799
# or, for disconnect only:
sudo tcpdump -ni wg0 -vv 'udp port 3799'Checklist:
| Phase | Expect |
|---|---|
| Auth | Access-Request → Access-Accept. User-Name = MAC (no separator, uppercase); Calling-Station-Id = MAC upper-hyphen; NAS-IP-Address = <controller-tunnel-ip>. |
| Accounting | Start → Interim (at your configured interval) → Stop; download/upload direction correct with Invert ON. |
| PoD / disconnect | Trigger the disconnect from Powerlynx early in the session (so a Session-Timeout expiry cannot be mistaken for a successful kick). Success = a Disconnect-Request (carrying Calling-Station-Id in upper-hyphen) → Disconnect-ACK → client dropped with an Acct-Stop cause that is not Session-Timeout. |
The Disconnect-ACK packet is the definitive PoD success signal
If you see a Disconnect-Request but no ACK, re-check the Calling-Station-Id format (section 8).
Where to see authorized / online devices
- Powerlynx — the top-level Sessions page (and the Location's sessions view) lists live/online sessions for the hotspot: client MAC, plan/voucher, data used, start and expiry.
- Omada controller — Clients shows the device as
AUTHORIZED(auth typeRadius - …); Hotspot Management → Authorized Clients shows per-client download/upload, start and expiration time, and status.

10. Limitations & gotchas
- CoA-Request is NOT supported by Omada — it returns
CoA-NAK(Error-Cause "Unsupported-Attribute"). Only Disconnect/PoD works. Anything that would rely on a mid-session CoA (changing rate/time, trial→paid promotion) will not take effect on Omada; it requires disconnect + re-authentication instead. - Trial Sessions are not currently usable with the TP-Link Omada NAS type. With Trial sessions enabled (Config → Captive portal → Trial sessions), the trial flow does not work on Omada — the client is authorized and then immediately dropped (
Session-Timeout= 0, lands on the status page with no Internet). Leave Trial sessions disabled for locations served by a TP-Link Omada hotspot, and use vouchers instead. - Omada's built-in WireGuard is gateway-only — it does nothing on a Software Controller. Terminate WireGuard at the OS level on the controller host (
wg-quick). - RADIUS servers must be set by IP, not hostname — a hostname silently breaks accounting.
- Omada Cloud has no working CoA/PoD endpoint — a self-hosted controller is required for disconnect to function.
References
Official TP-Link / Omada documentation (the tp-link.com FAQ/download links redirect to the Omada docs site support.omadanetworks.com; both resolve):
- Omada Software Controller — download, all versions (5.15.x is under "Previous Version"): https://www.tp-link.com/us/support/download/omada-software-controller/
- Install the Software Controller on Linux (FAQ 3272): https://www.tp-link.com/us/support/faq/3272/
- Ports used by the Omada Controller (FAQ 3281): https://www.tp-link.com/us/support/faq/3281/
- RADIUS + External Web Portal API (FAQ 2912): https://www.tp-link.com/us/support/faq/2912/
- Omada Software Controller — product overview: https://www.tp-link.com/en/business-networking/management-platform/omada-software-controller
- Omada SDN Controller — user guide: https://www.tp-link.com/us/user-guides/omada-sdn-software-controller/
- TP-Link EAP225 (v3) — access point: https://www.tp-link.com/us/business-networking/ceiling-mount-access-point/eap225/v3/
- RFC 2869 — RADIUS Extensions (
Acct-Interim-Interval, §5.16): https://www.rfc-editor.org/rfc/rfc2869.txt