Administrators and roles
Why roles?
Not everyone on your team needs access to everything. Your support staff may need customers and vouchers but not your finances; an accountant may need payments but should never touch your hotspots.
With roles, you decide exactly what each administrator can see and do. Next to the built-in roles, a super administrator can create custom roles — for example Support or Finance viewer — each with its own set of permissions, and give every administrator the role that fits their job. Powerlynx then shows each administrator only the menus, pages and buttons their role allows.
Built-in roles
- Super administrator — full access to everything, and the only role that can manage roles and assign them to administrators.
- Read-only — can view the whole dashboard but change nothing.
- Reseller — for administrators who work in the Reseller Portal. What they can do inside an organization comes from their organization role (Owner, Manager or Viewer).
Built-in roles can't be edited or deleted.
Managing roles
Roles are managed under Config → System → Administrators, on the Roles and permissions tab. Only super administrators see this tab.
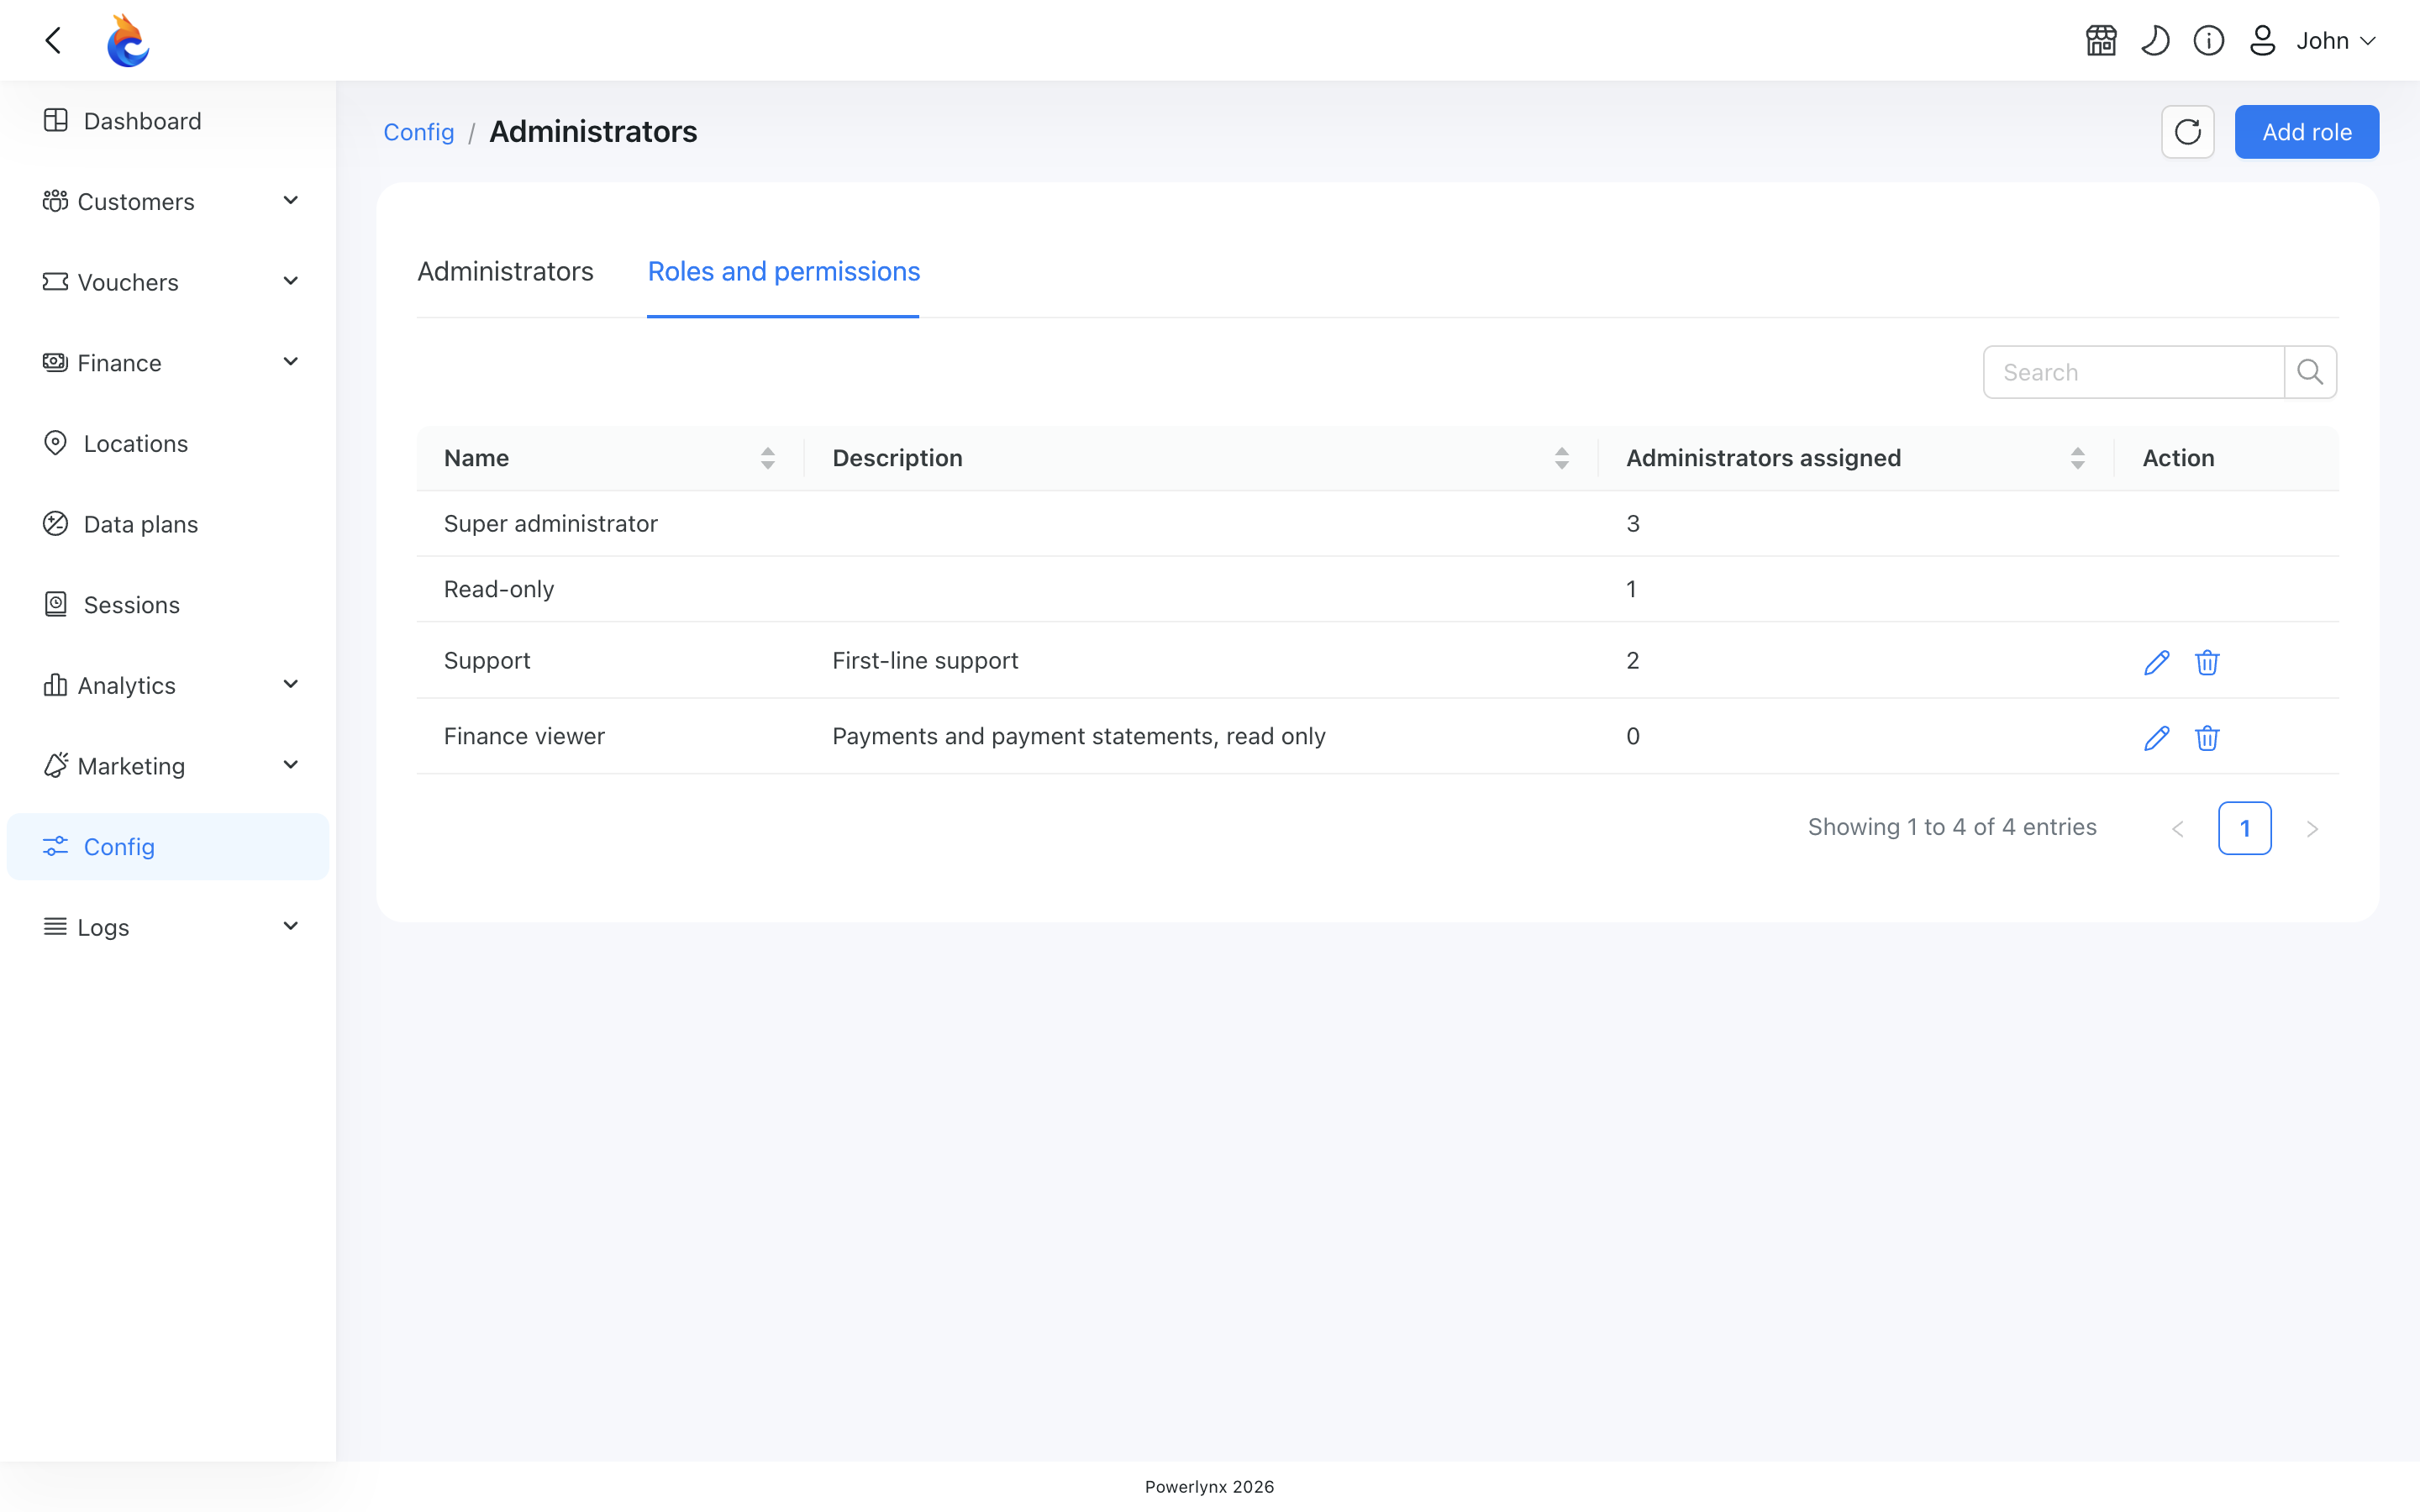
The list shows each role's Name, Description and the number of Administrators assigned. Custom roles have Edit and Delete actions; Super administrator and Read-only have none, because they can't be changed.
Creating a role
Click Add role and fill in the form:
Name — required, and unique among your roles.
Description — optional, what the role is for.
Permissions — one row per area of Powerlynx, each with a None / Read / Write switch:
- None — the area is hidden.
- Read — the administrator can open and view it.
- Write — the administrator can also create, change and delete there. Write always includes Read.
Areas with nothing to change, such as the Dashboard, offer only None and Read.
Use Select all Read, Select all Write or Clear all to set every row at once, then fine-tune.
Click Add. The new role starts with no administrators assigned.
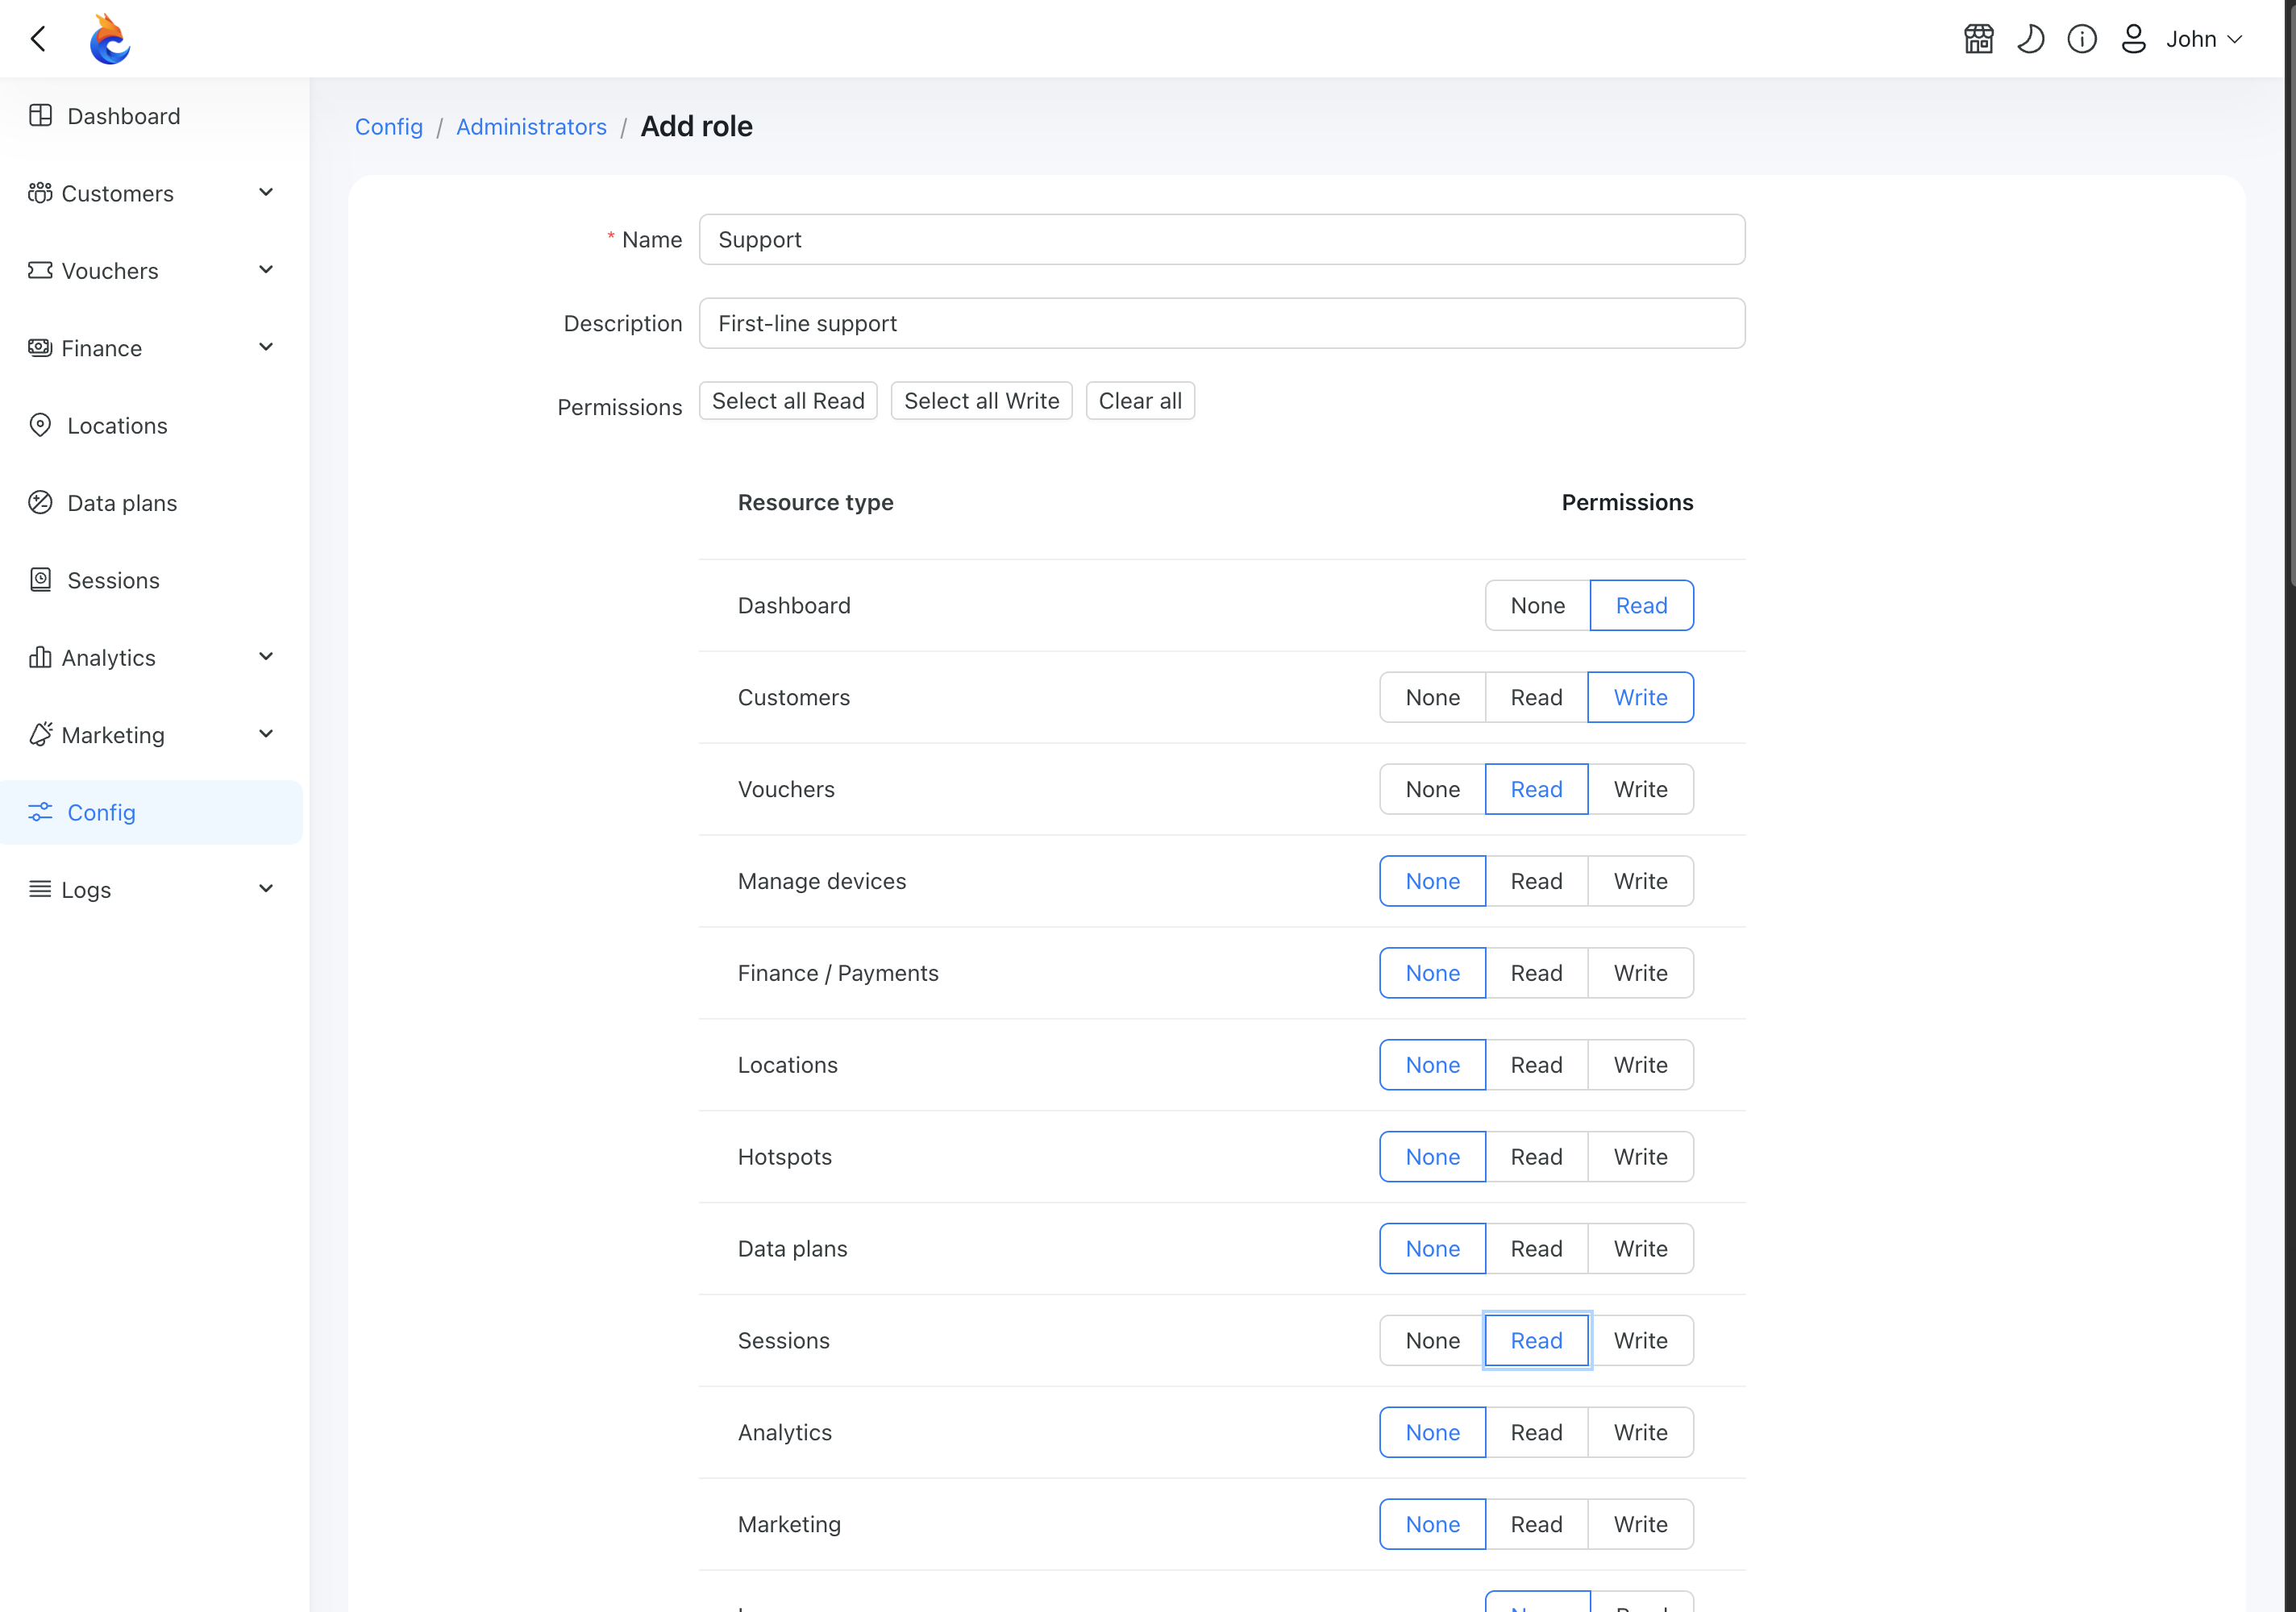
The rows cover the main sections — Dashboard, Customers, Vouchers, Manage devices, Finance / Payments, Locations, Hotspots, Data plans, Sessions, Analytics, Marketing, Logs and License — and every Config page, shown as Config · <page> (for example Config · Payment gateways or Config · Email).
TIP
Some areas are deliberately separate, so reading one thing never hands out another:
- Hotspots are separate from Locations, because they hold device credentials and configuration.
- Config · Payment gateways is separate from Finance / Payments, so someone who reads payments can't see your gateway credentials.
- Labels and Templates are Config pages of their own; reading customers doesn't open the Config section.
- Each Config tool — mass voucher creation, smart label assignment, customer vouchers reset — is its own row.
- The finance figures on the Analytics dashboard also need Finance / Payments at Read, so ticking Analytics alone doesn't reveal your revenue.
Editing a role
Click Edit on a custom role. The form shows the role's current settings, and when you save, every administrator who holds the role gets the change.
If a role was set up with only part of an area's permissions (for example through the API), the matrix shows that area as None and a warning names it. Saving clears those partial permissions unless you pick a level for each area.
INFO
An administrator who is signed in while you change their role sees the new menus and buttons after they reload the page.
Deleting a role
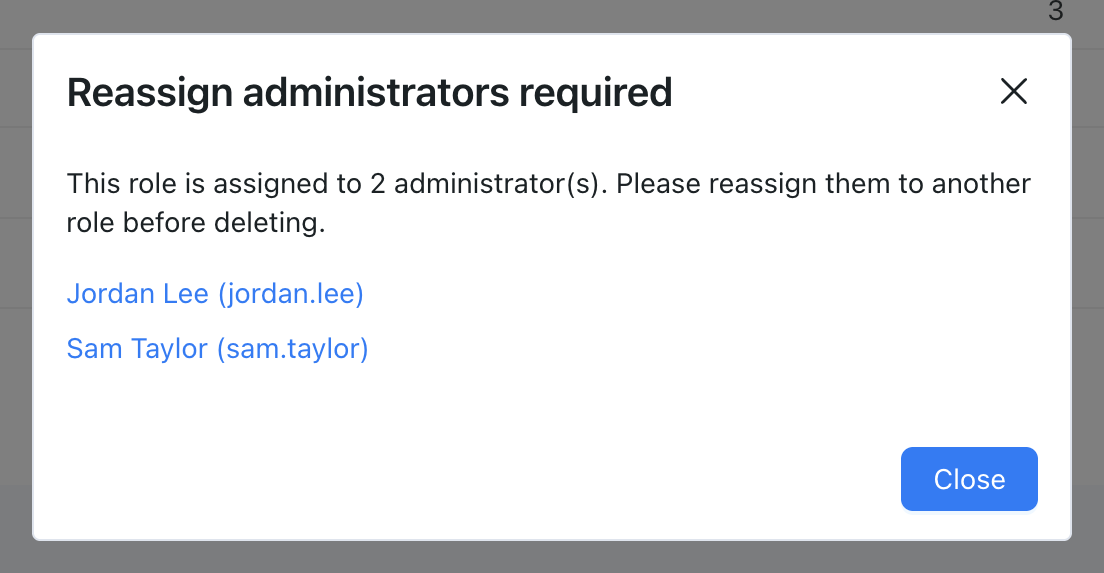
Click Delete on a custom role. A role nobody holds is deleted after you confirm. A role that is still assigned is never deleted: a Reassign administrators required window lists the administrators who hold it, each linked to their page, so you can move them to another role first.
Assigning a role to an administrator
Each administrator holds exactly one role. Choose it in the Role field when you add an administrator under Config → System → Administrators, or on an existing administrator's page. The list offers Super administrator, Read-only, Reseller and all your custom roles.
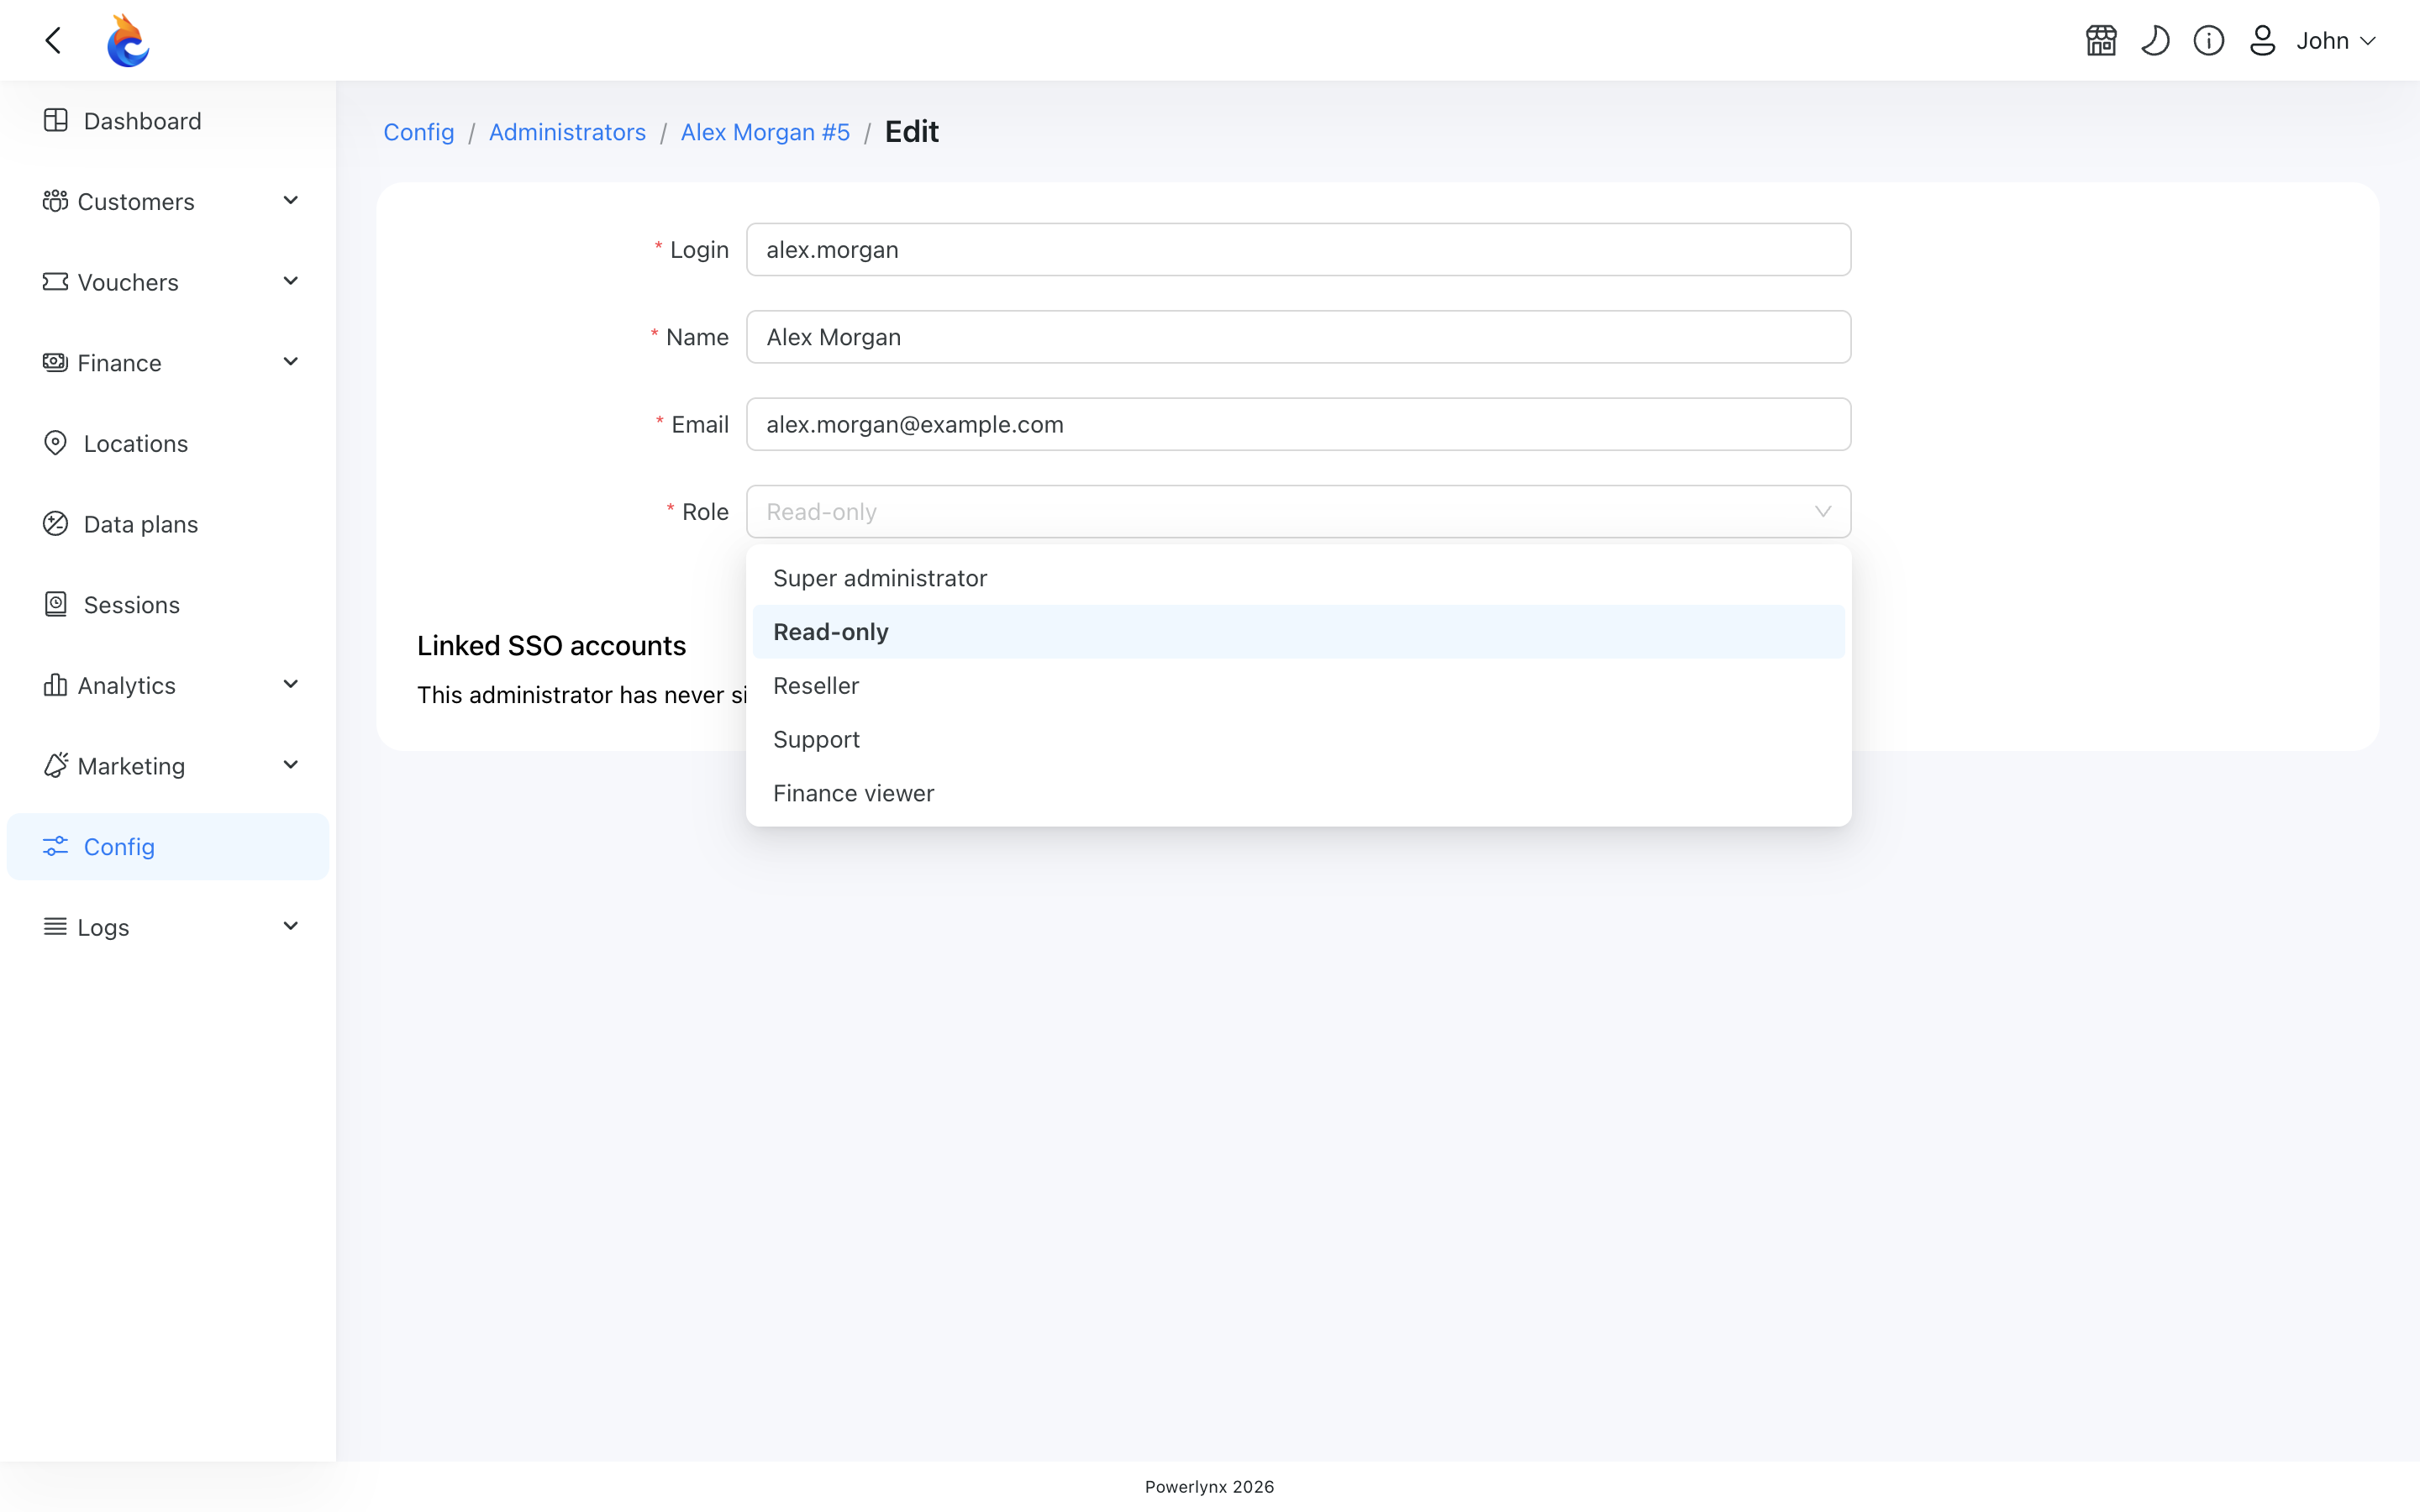
- Only a super administrator can choose a role. An administrator added by anyone else becomes Read-only.
- Changing an existing administrator's role asks you to confirm before it's saved.
- The Role column of the administrators list shows everyone's role.
WARNING
There must always be at least one super administrator. The last one can't be moved to another role or deleted — Powerlynx refuses with "At least one Super administrator must exist in the system."
What an administrator with a custom role sees
Powerlynx shows each administrator only what their role allows:
- The menu lists only the sections they can open. The Config entry appears only if they can open at least one Config page.
- Inside a page, buttons, row actions, tabs, form fields and filters they can't use are hidden rather than greyed out. The exception is a record they can only view: its edit form is shown greyed out, without a save button.
- On the dashboard, a top card for something they can't open shows
---and doesn't link anywhere, and a graph appears only if they can see the data behind it — the payments graph needs Finance / Payments, and the Top 10 plans graph needs both Vouchers and Data plans. - After login, an administrator without the Dashboard lands on the first section they can open.
- A page outside their role, opened by typing its address, shows an Access Denied page that names the page and says "You don't have permission to access this section. Contact your administrator."
Related pages
- Reseller Portal — organization roles for resellers.
- Security — password policy and session timeout for administrators.
- SSO login for administrators — let administrators sign in with your company's identity provider.