Email
Powerlynx can email your customers — a personal message to one customer, a campaign to a whole segment, or a link that confirms a customer really owns their address. Every email goes out through a mailbox you own: connect your own mail server over SMTP, or a Gmail / Google Workspace account.
What you can do
- Personal (1:1) email — from a customer's card, write and send a single email. See Sending an email to a customer.
- Mass email campaigns — send one message to one or more target groups, now or on a schedule. More info here.
- Email templates — build an email once and load it whenever you write one. See Email templates.
- Email verification — check that customers' addresses can receive mail, and ask customers to confirm them by link. See Verifying customer email addresses.
- Email logs — see every email that was sent, and why one failed. See Email logs.
Connect a mail server
Open Config → Communication → Email. The Transport tab is where you connect the mailbox Powerlynx sends from.
Enable system email
At the top of the page, Enable system email turns customer email on or off for your whole account. While it's off, nothing is sent: the Send email action on a customer, mass email campaigns and Send test email all stop before your mail server is contacted.
Switching it off doesn't touch anything below it. Your mail server settings and password are kept, and the form stays editable, so you can switch email back on later without entering anything again. If you never send email to customers, leave it off — you can then save the page without configuring a mail server at all.
SMTP
Choose SMTP as the Transport type to connect any mail server.
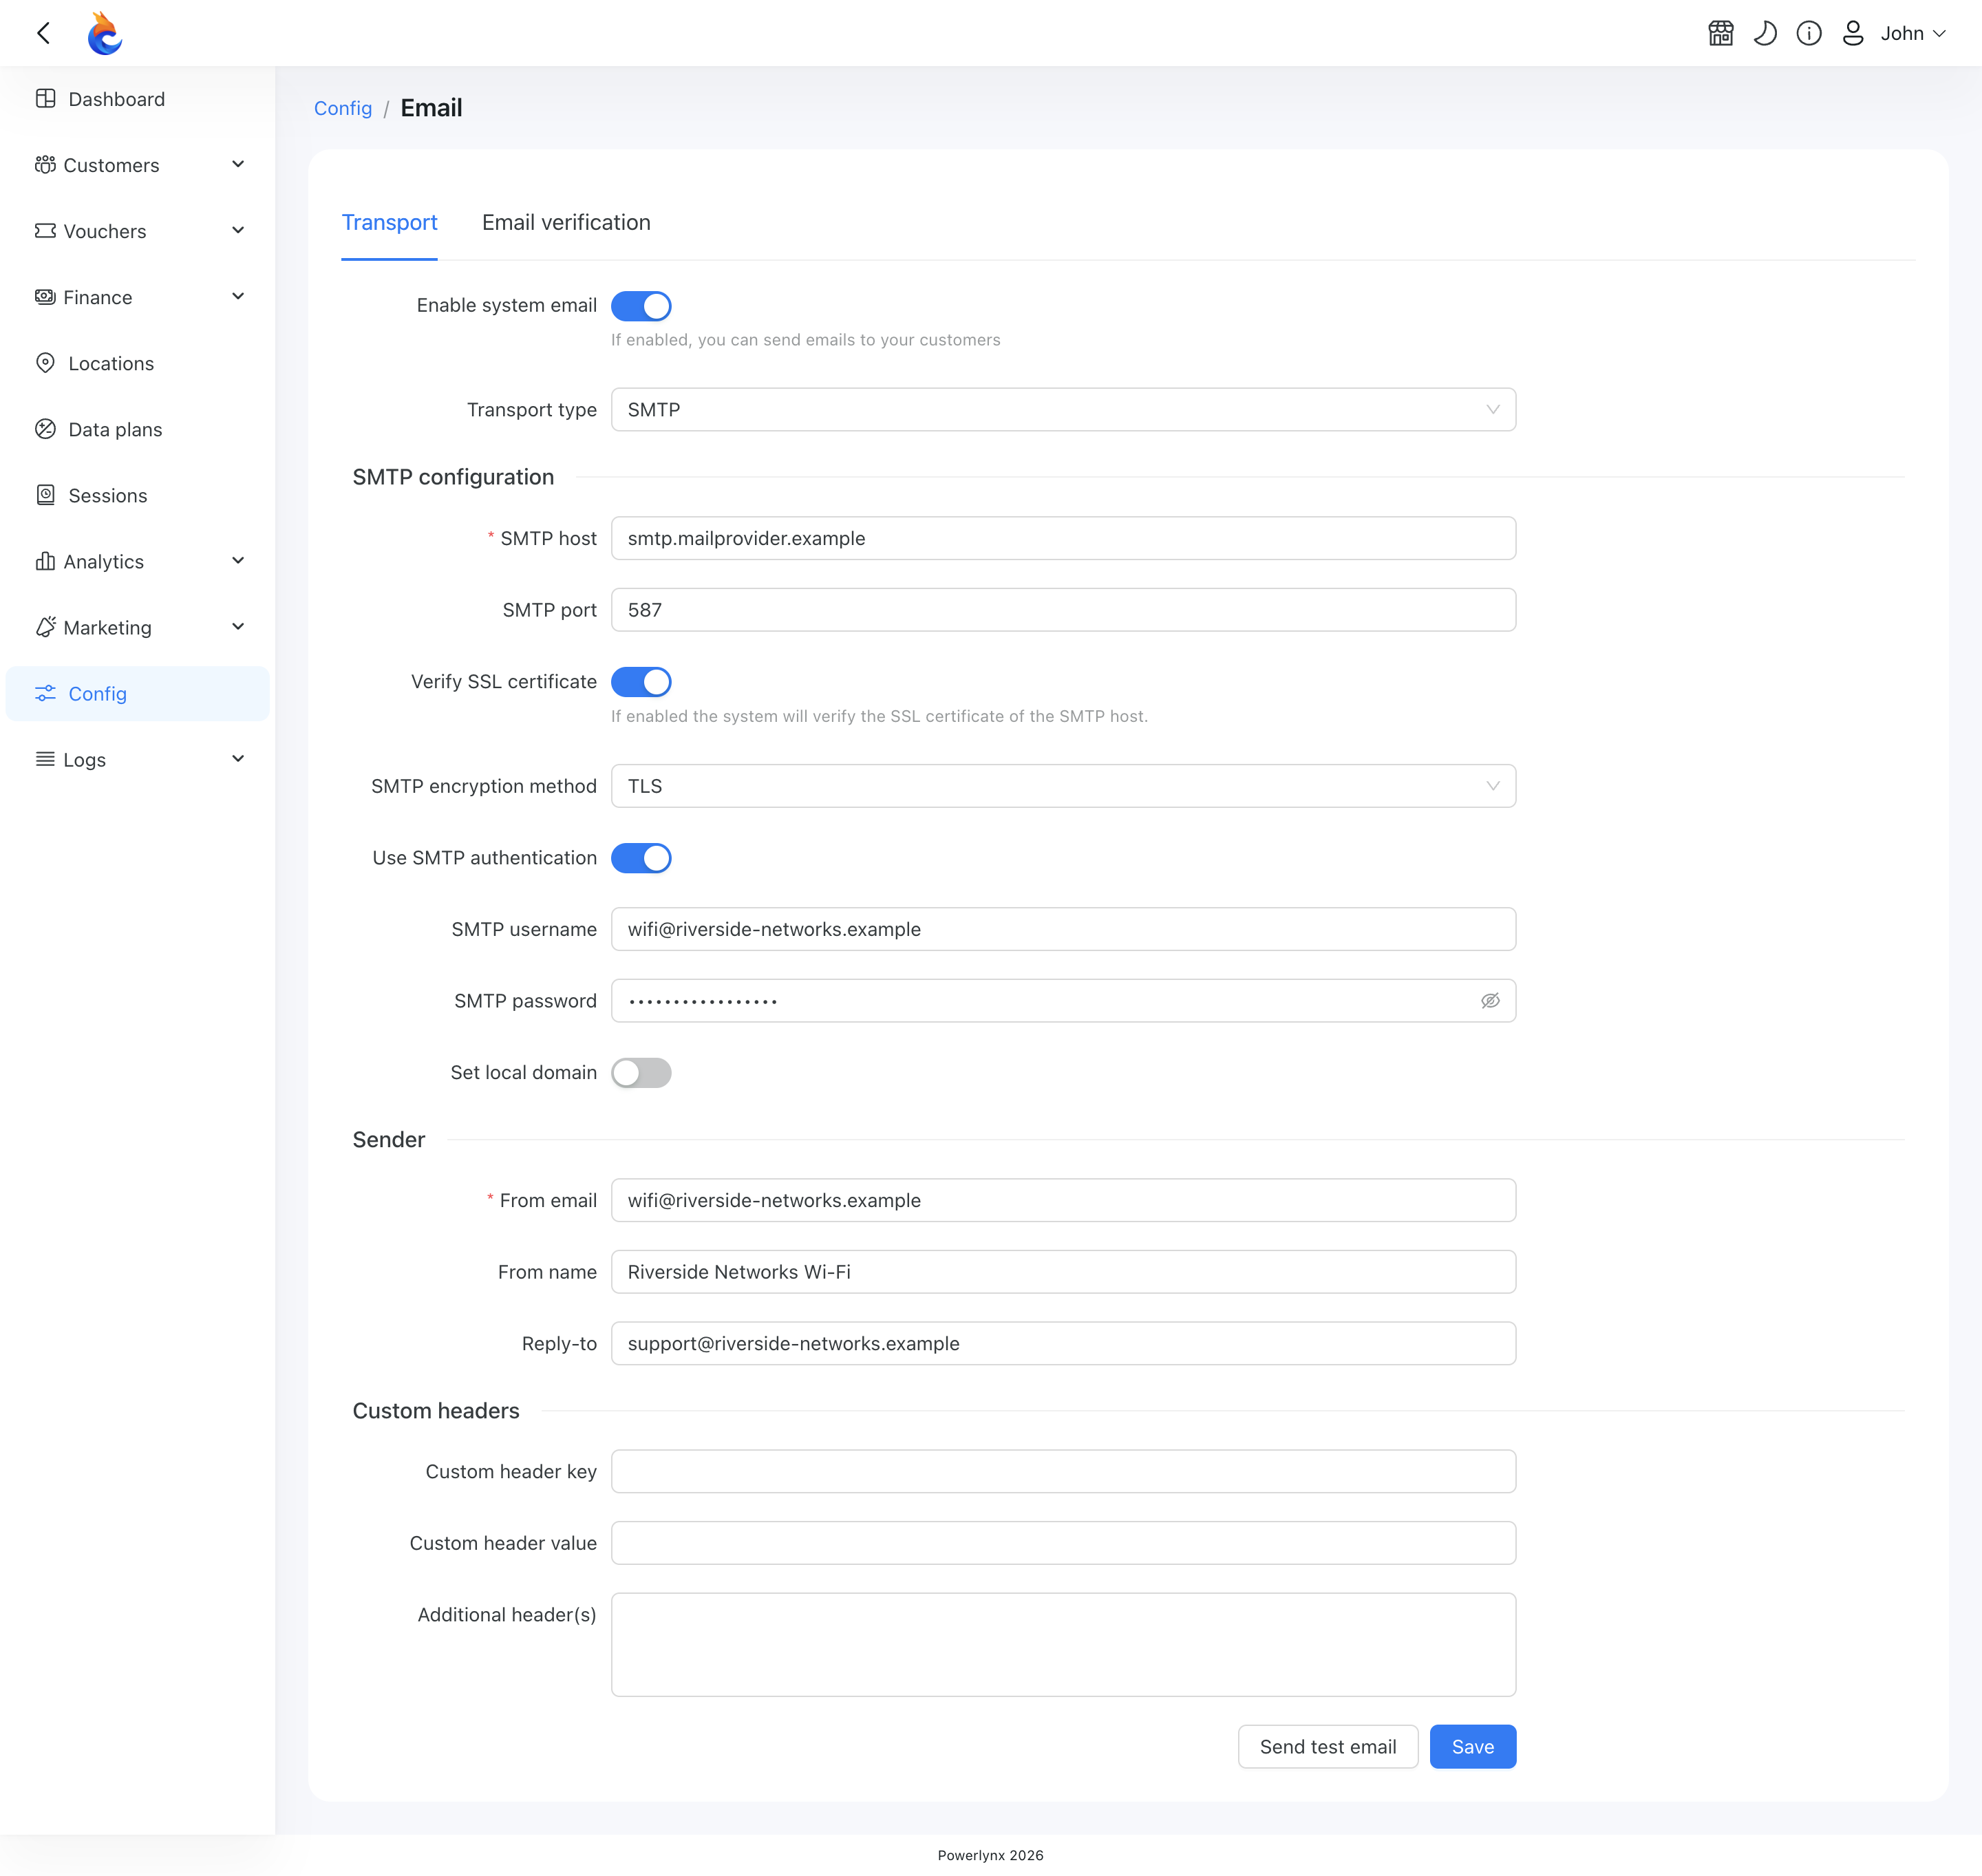
- Set local domain — turn on to enter the Local domain your server introduces itself with. Only needed if the receiving server checks it.
- SMTP host — your mail server's address.
- SMTP port — the port to connect to (
25by default). - Verify SSL certificate — on by default, so Powerlynx checks the server's certificate.
- SMTP encryption method —
None,SSLorTLS. - Use SMTP authentication — turn on if your server needs a login, then fill in SMTP username and SMTP password. The password is stored encrypted and never shown again; leave it empty to keep the current one.
- Custom headers — optional headers added to every email, as a Custom header key / Custom header value pair or as Additional header(s), one
Name: valueper line. - From email — the address your emails are sent from.
- From name — the sender name your customers see.
- Reply-to — optional address that replies go to.
SMTP host and From email are required while system email is switched on.
Click Save, then Send test email to check the connection. Enter an address in To and send: the result tells you in plain words whether it worked, or what went wrong (for example, "Wrong username or password"). For troubleshooting, expand Raw SMTP log to see the full conversation with your mail server.
Gmail
Choose Gmail as the Transport type to send from a Gmail or Google Workspace mailbox. There is no server, port or password to enter — you sign in with Google once and authorise Powerlynx to send email from that mailbox.
The mailbox is connected through a Google application that you create in your own Google account; Powerlynx doesn't provide one. You set it up once, and the page walks you through it under How to create the application.
1. Decide on the audience. This is the one choice that matters, and you can't change it later without recreating the application:
- Google Workspace (an address on your company domain) — choose Internal. The application can only be used inside your organisation, so Google doesn't review it, shows no warning and doesn't expire the authorisation.
- Personal Gmail — only External is available. Publish the application rather than leaving it in testing: an authorisation made in testing stops working after seven days. Google shows a one-time warning that the application is unverified — accept it, since it's your own application.
2. Create the application in Google Cloud.
- Create a project and enable the Gmail API.
- Configure the OAuth consent screen with the audience you chose.
- Add exactly the three scopes shown on the Powerlynx page. They let Powerlynx send email and learn which mailbox was connected — they give no access to read, change or delete your mail.
- Create an OAuth client ID of type Web application and add the Redirect URI shown on the Powerlynx page as an authorised redirect URI. Copy it rather than typing it — Google compares it character for character.
3. Save it in Powerlynx. Paste the Client ID and Client secret into Your own Google application and click Save application.
4. Connect the mailbox. Click Connect Gmail, sign in to the Google account you want to send from, and allow access. You're brought back to the Email settings page, which shows whether the connection worked.
Once connected, the page shows the mailbox, the date it was connected and its status. You can still set the sender name and reply-to address. If Google stops accepting the connection — for example, because access was revoked in your Google account — the status changes to Connection failed after the next send attempt, with the reason; click Connect Gmail again to resume sending.
Disconnect stops Powerlynx sending from the mailbox and removes the authorisation from Powerlynx. Nothing takes its place automatically: if you used SMTP before, select it and save it again. To remove the authorisation on Google's side too, use your Google account's third-party access page.
WARNING
Deleting the Google application from Powerlynx stops the mailbox connected through it from sending. Save an application again and reconnect the mailbox to resume.
Email templates
Templates let you write an email once — a name, a subject and an HTML body — and load it whenever you send an email to a customer or build a campaign.
Go to Config → Templates and set the template type to Email.
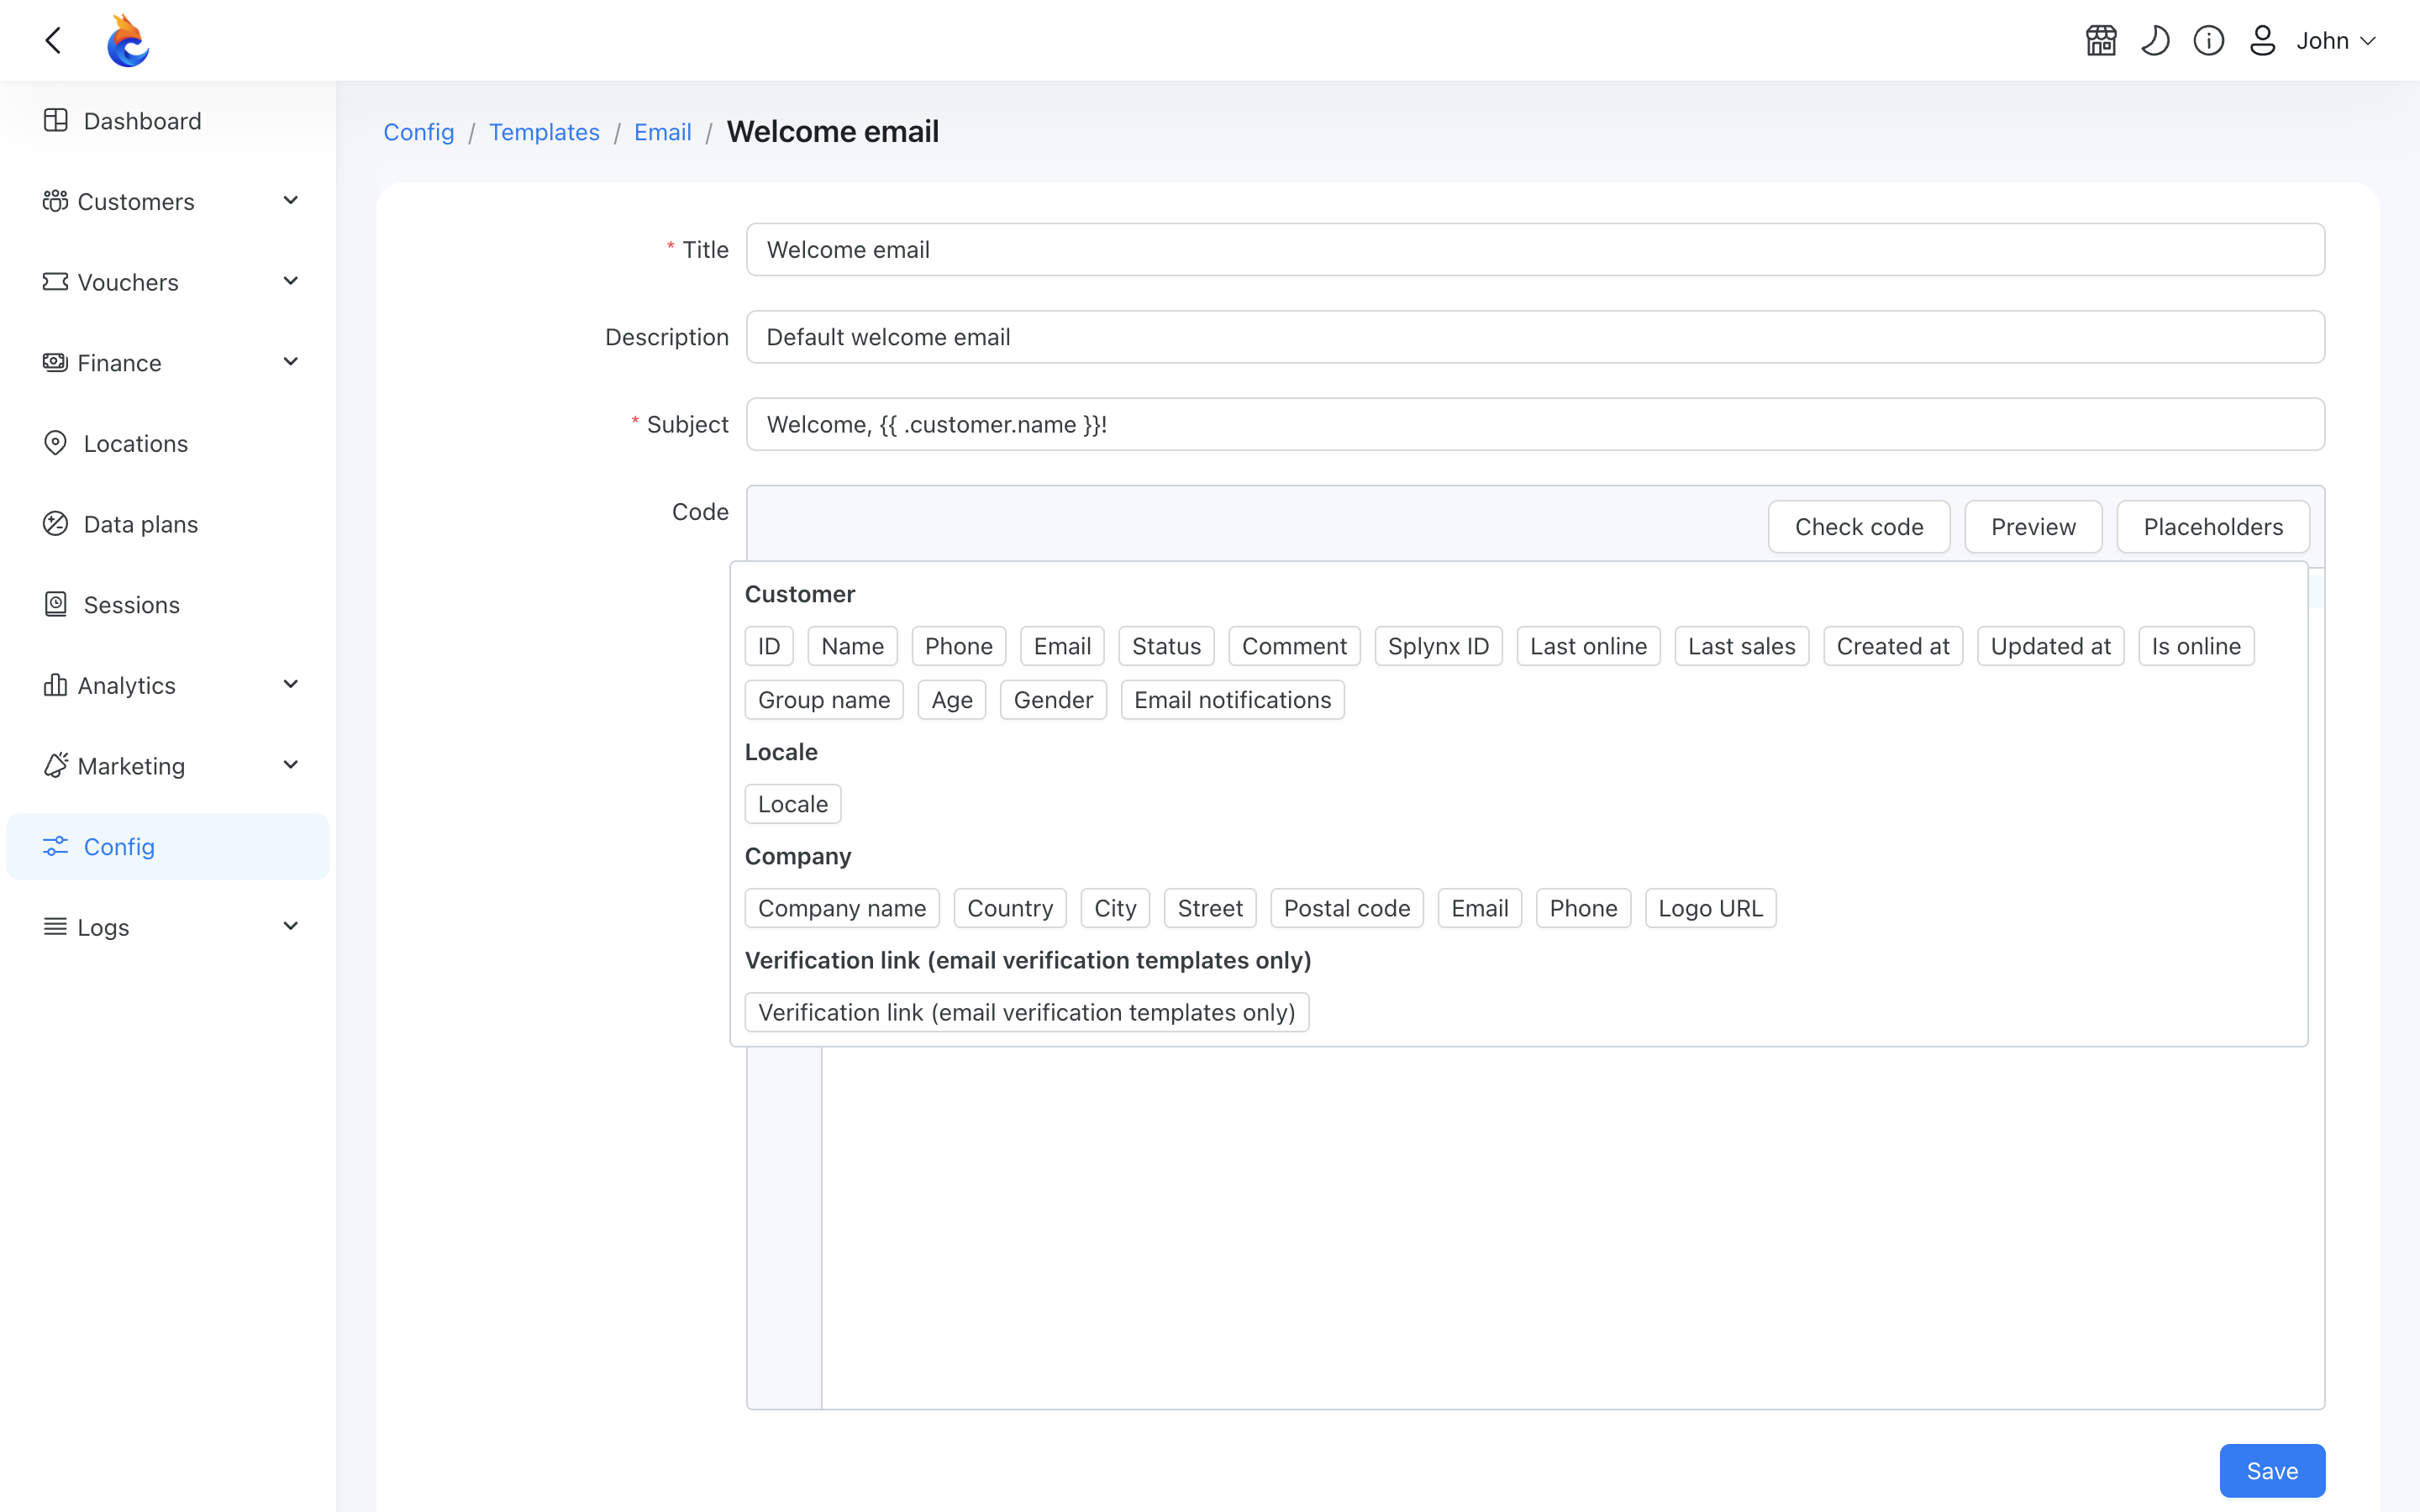
- Title — the template's name in the list.
- Subject — the email's subject line. Required for email templates.
- Code — the HTML body, in the same editor as voucher templates.
- Placeholders — insert customer details into the subject or body.
- Preview — shows the email rendered for a sample customer. Click Code to go back to editing.
Placeholders use this form:
{{ .customer.name }}— the customer's name{{ .customer.email }}— the customer's email address
The Placeholders dropdown lists every variable you can use. Placeholders work in the subject as well, so a subject like Welcome {{ .customer.name }} is personalised for every recipient.
Default templates can be edited but not deleted. To build your own template from one, use Duplicate on it and edit the copy — the Duplicate action is available on every template type.
When you write an email to a customer or a campaign message, pick a template under Load template to fill in the subject and body in one click.
Sending an email to a customer
Open a customer's card (see Customers) and switch to the Communication tab. Click Send and choose Send email.
- To — the customer's email address, filled in for you.
- Subject — required.
- Body — write the HTML body, or pick a template under Load template. Use Placeholders to insert customer details.
- Preview — shows how the email looks for this customer, with the placeholders filled in.
- Send — sends the email and adds it to the customer's communication history.
Send email is greyed out when no mail server is connected or when the customer has no email address — hover over it to see which.
Sent emails appear in the Communication history next to SMS messages. Use the All / SMS / Email filter above the list to show one channel; an email is listed by its subject. Click View to open the full email as it was sent.
Verifying customer email addresses
An email address raises two questions: can it receive mail at all, and does it really belong to this customer? Powerlynx can answer both, separately. Both are off by default.
Open Config → Communication → Email and switch to the Email verification tab.
Automatic verification
Turn on Enable automatic verification to check every customer email address as it is added or changed. Powerlynx checks that the address is well-formed and that its domain accepts mail, and marks it Verified (Automatic) or Invalid. The check runs in the background and only marks the address. It proves that the address can receive mail, not that it belongs to the customer.
Confirmation link
Turn on Enable email verification to send customers an email with a one-time link. When they click it, their address is marked Verified (Customer) — the highest level of trust. This option needs a connected mail server; until you have one, it is disabled with a link to the Transport tab.
- On customer email created — turn on Send on customer created to send a link when a new customer is created with an email address.
- On customer email updated — turn on Send on email updated to send a link when an existing customer's email address changes.
- Email template — for each trigger, the email template to send. Powerlynx ships a ready-made Email verification template. If you write your own, insert the link with
{{ .verification_link }}— without it, the email has nothing to click. - Link validity — how long a link stays valid after it was sent. Sending a new link invalidates the previous one.
The two triggers are separate, so you can confirm new sign-ups without emailing everyone whose address is later corrected.
When the customer clicks the link, they see a page that tells them plainly what happened: the address was confirmed, it was already confirmed, the link has expired, or the link is not valid (for example, because the address changed since it was sent).
Verification status on the customer
The status appears as a badge next to the email address on the customer's Information tab:
| Status | Meaning |
|---|---|
| Unverified | Nothing is known about the address yet. |
| Invalid | The address is malformed, or its domain doesn't accept mail. |
| Verified (Automatic) | The address can receive mail. |
| Verified (Customer) | The customer clicked a confirmation link sent to this address. |
Verified (Customer) always wins: a customer who clicked the link is verified whatever the automatic check said. Changing a customer's email address resets the status, and a new link is sent if On customer email updated is on.
While the address isn't confirmed yet, a Resend confirmation link next to the badge sends the customer a fresh link and invalidates the old one.
Email logs
Every email sent to a customer — one-to-one, from a campaign, or a confirmation link — is recorded under Logs/Email logs, so when a customer says "I never got it" you can check.
The list shows the Recipient, the Customer (linked to their card), the Subject, the Status — Pending, Sent or Failed — and the date and time of the attempt. Open Filters to narrow it by period (the current month by default), status or customer, or use the search box to find a recipient address or subject.
Open an email from the list to see it exactly as it was sent: subject, From, To, customer, both the time it was added and the time it was sent, and the full body. For a failed email, a Status message explains why in plain words — for example, "Failed to send email. Please check the SMTP configuration."
INFO
A Sent status means your mail server accepted the email. If the recipient's server bounces it later, that bounce goes to your mailbox and isn't shown in Powerlynx.