Access control
What is access control?
By default, everyone who completes registration on your splash page gets online. That's right for a café, but not for every venue. A corporate campus, a student residence or a gated community needs to know who is on the network — and an open hotspot sometimes needs to keep out a few people who register with throwaway phone numbers to get around voucher limits.
Access control lets you decide who gets in:
- Accept — admit customers automatically, as before.
- Verify — hold new customers until an administrator approves them.
- Reject — refuse customers outright.
You can set this for the whole system and override it per location, and you can write access rules that apply one of these actions only to specific phone numbers, devices or MAC addresses.
Everything lives under Customers → Access control, on two tabs: Settings, where you decide what happens, and Approvals, where you work through the customers waiting for a decision.
The Default rule
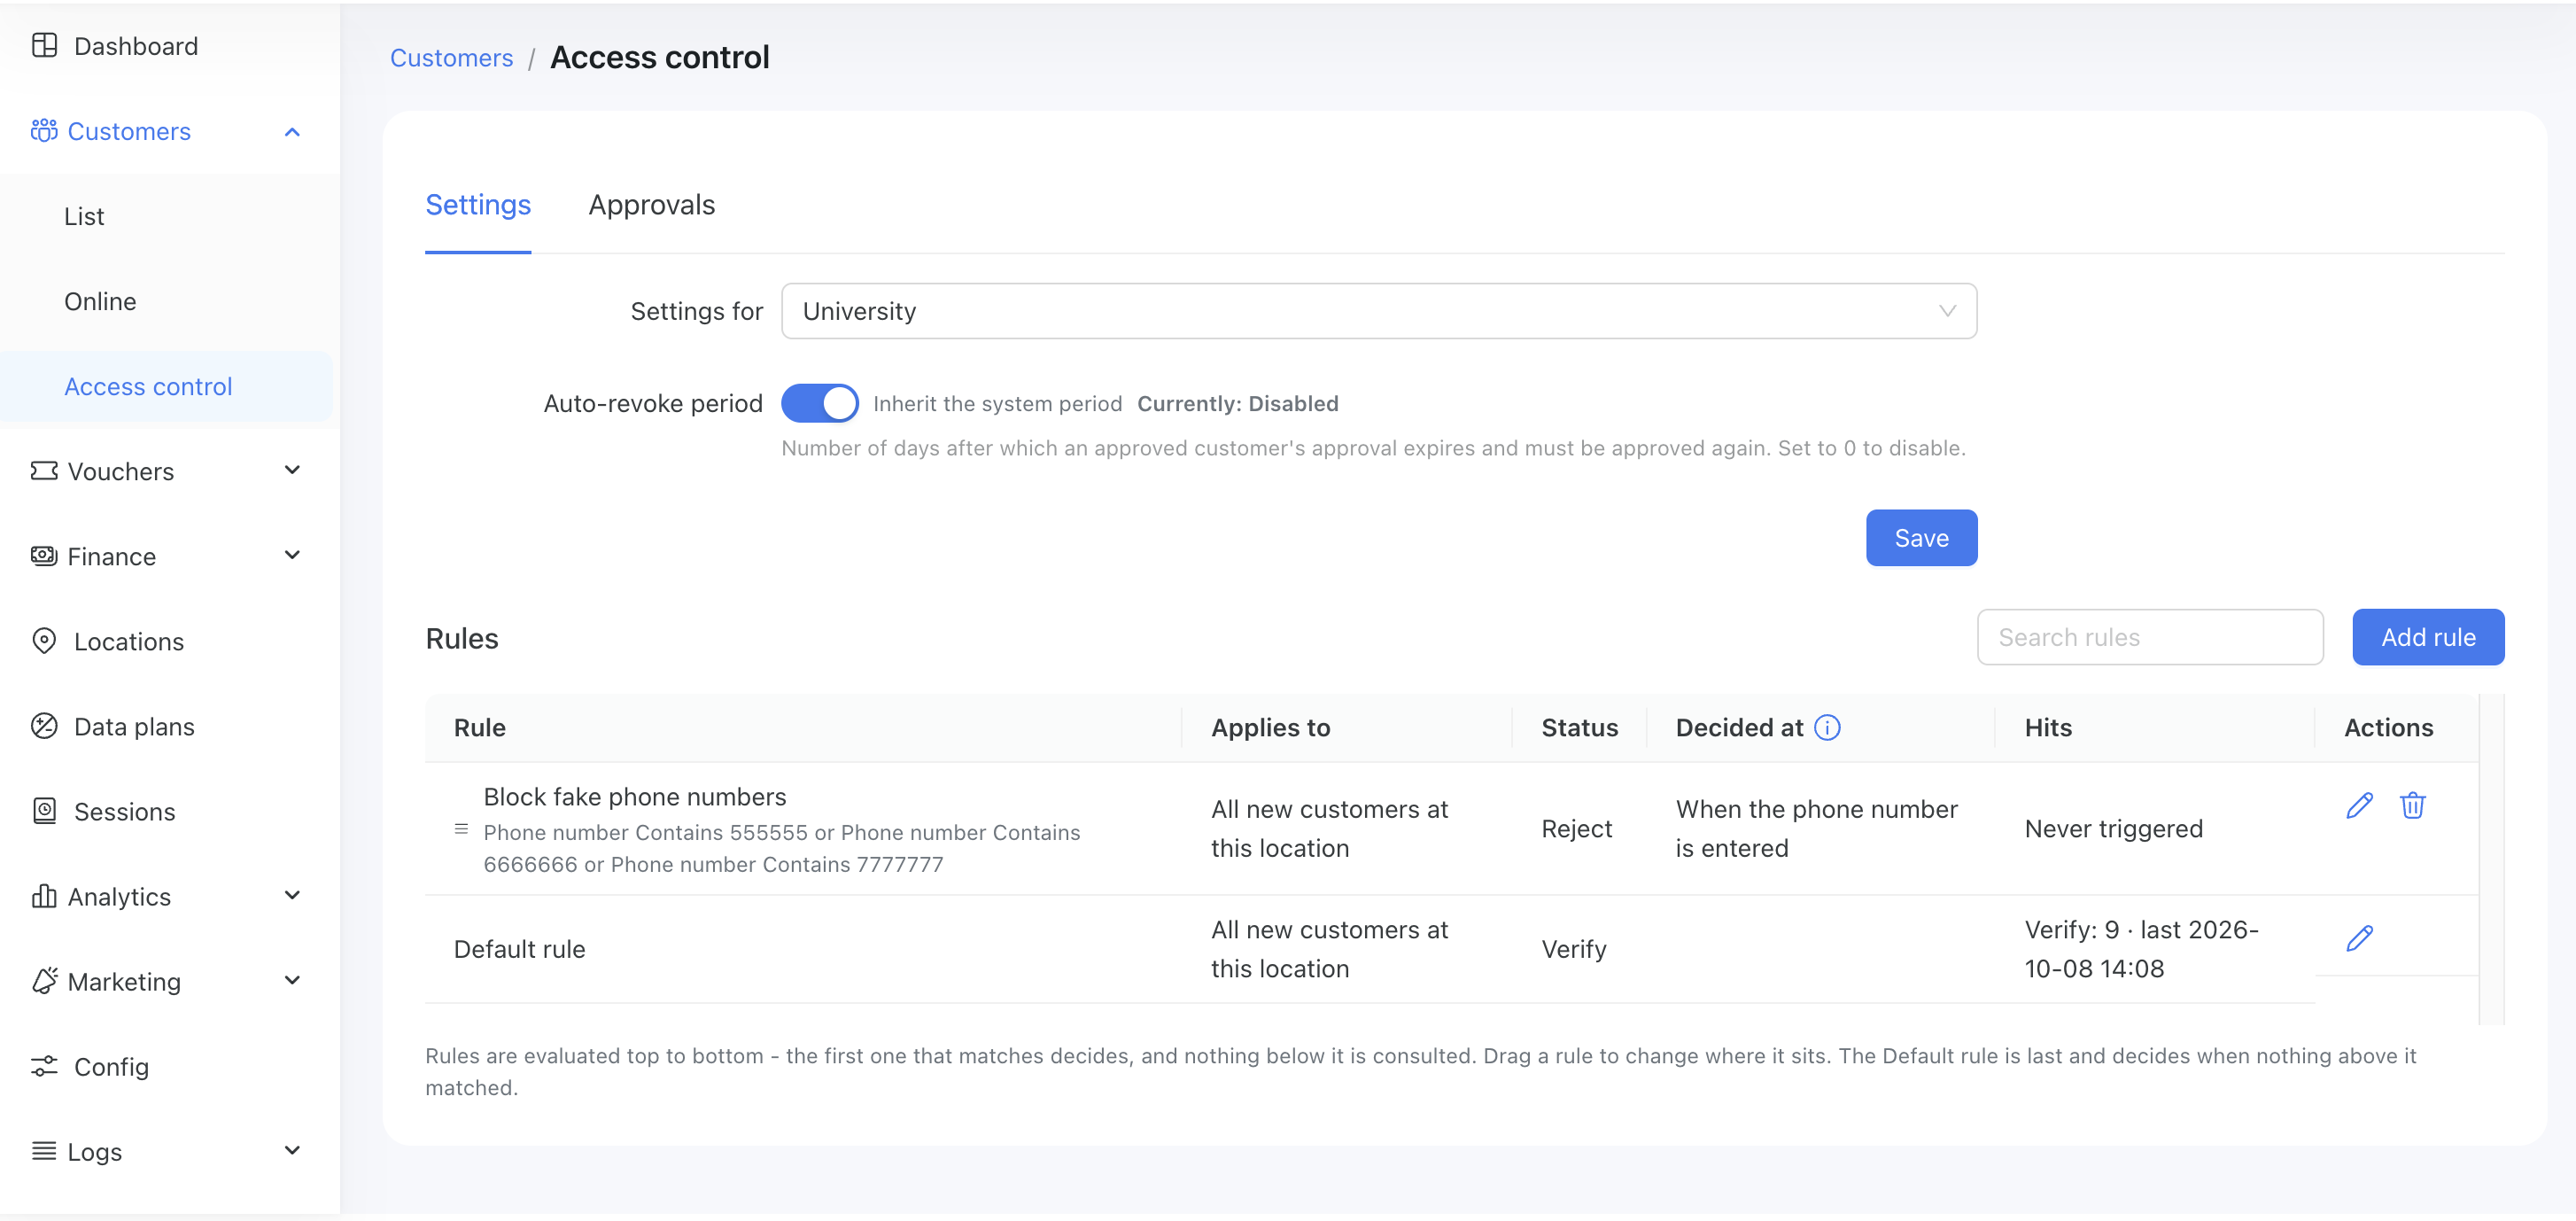
Open Customers → Access control and stay on the Settings tab. The Settings for selector at the top chooses what you are configuring — Default (system-wide) or one of your locations — and the rules table below belongs to that choice. Every table ends with a Default rule row that decides for everyone no access rule has matched.
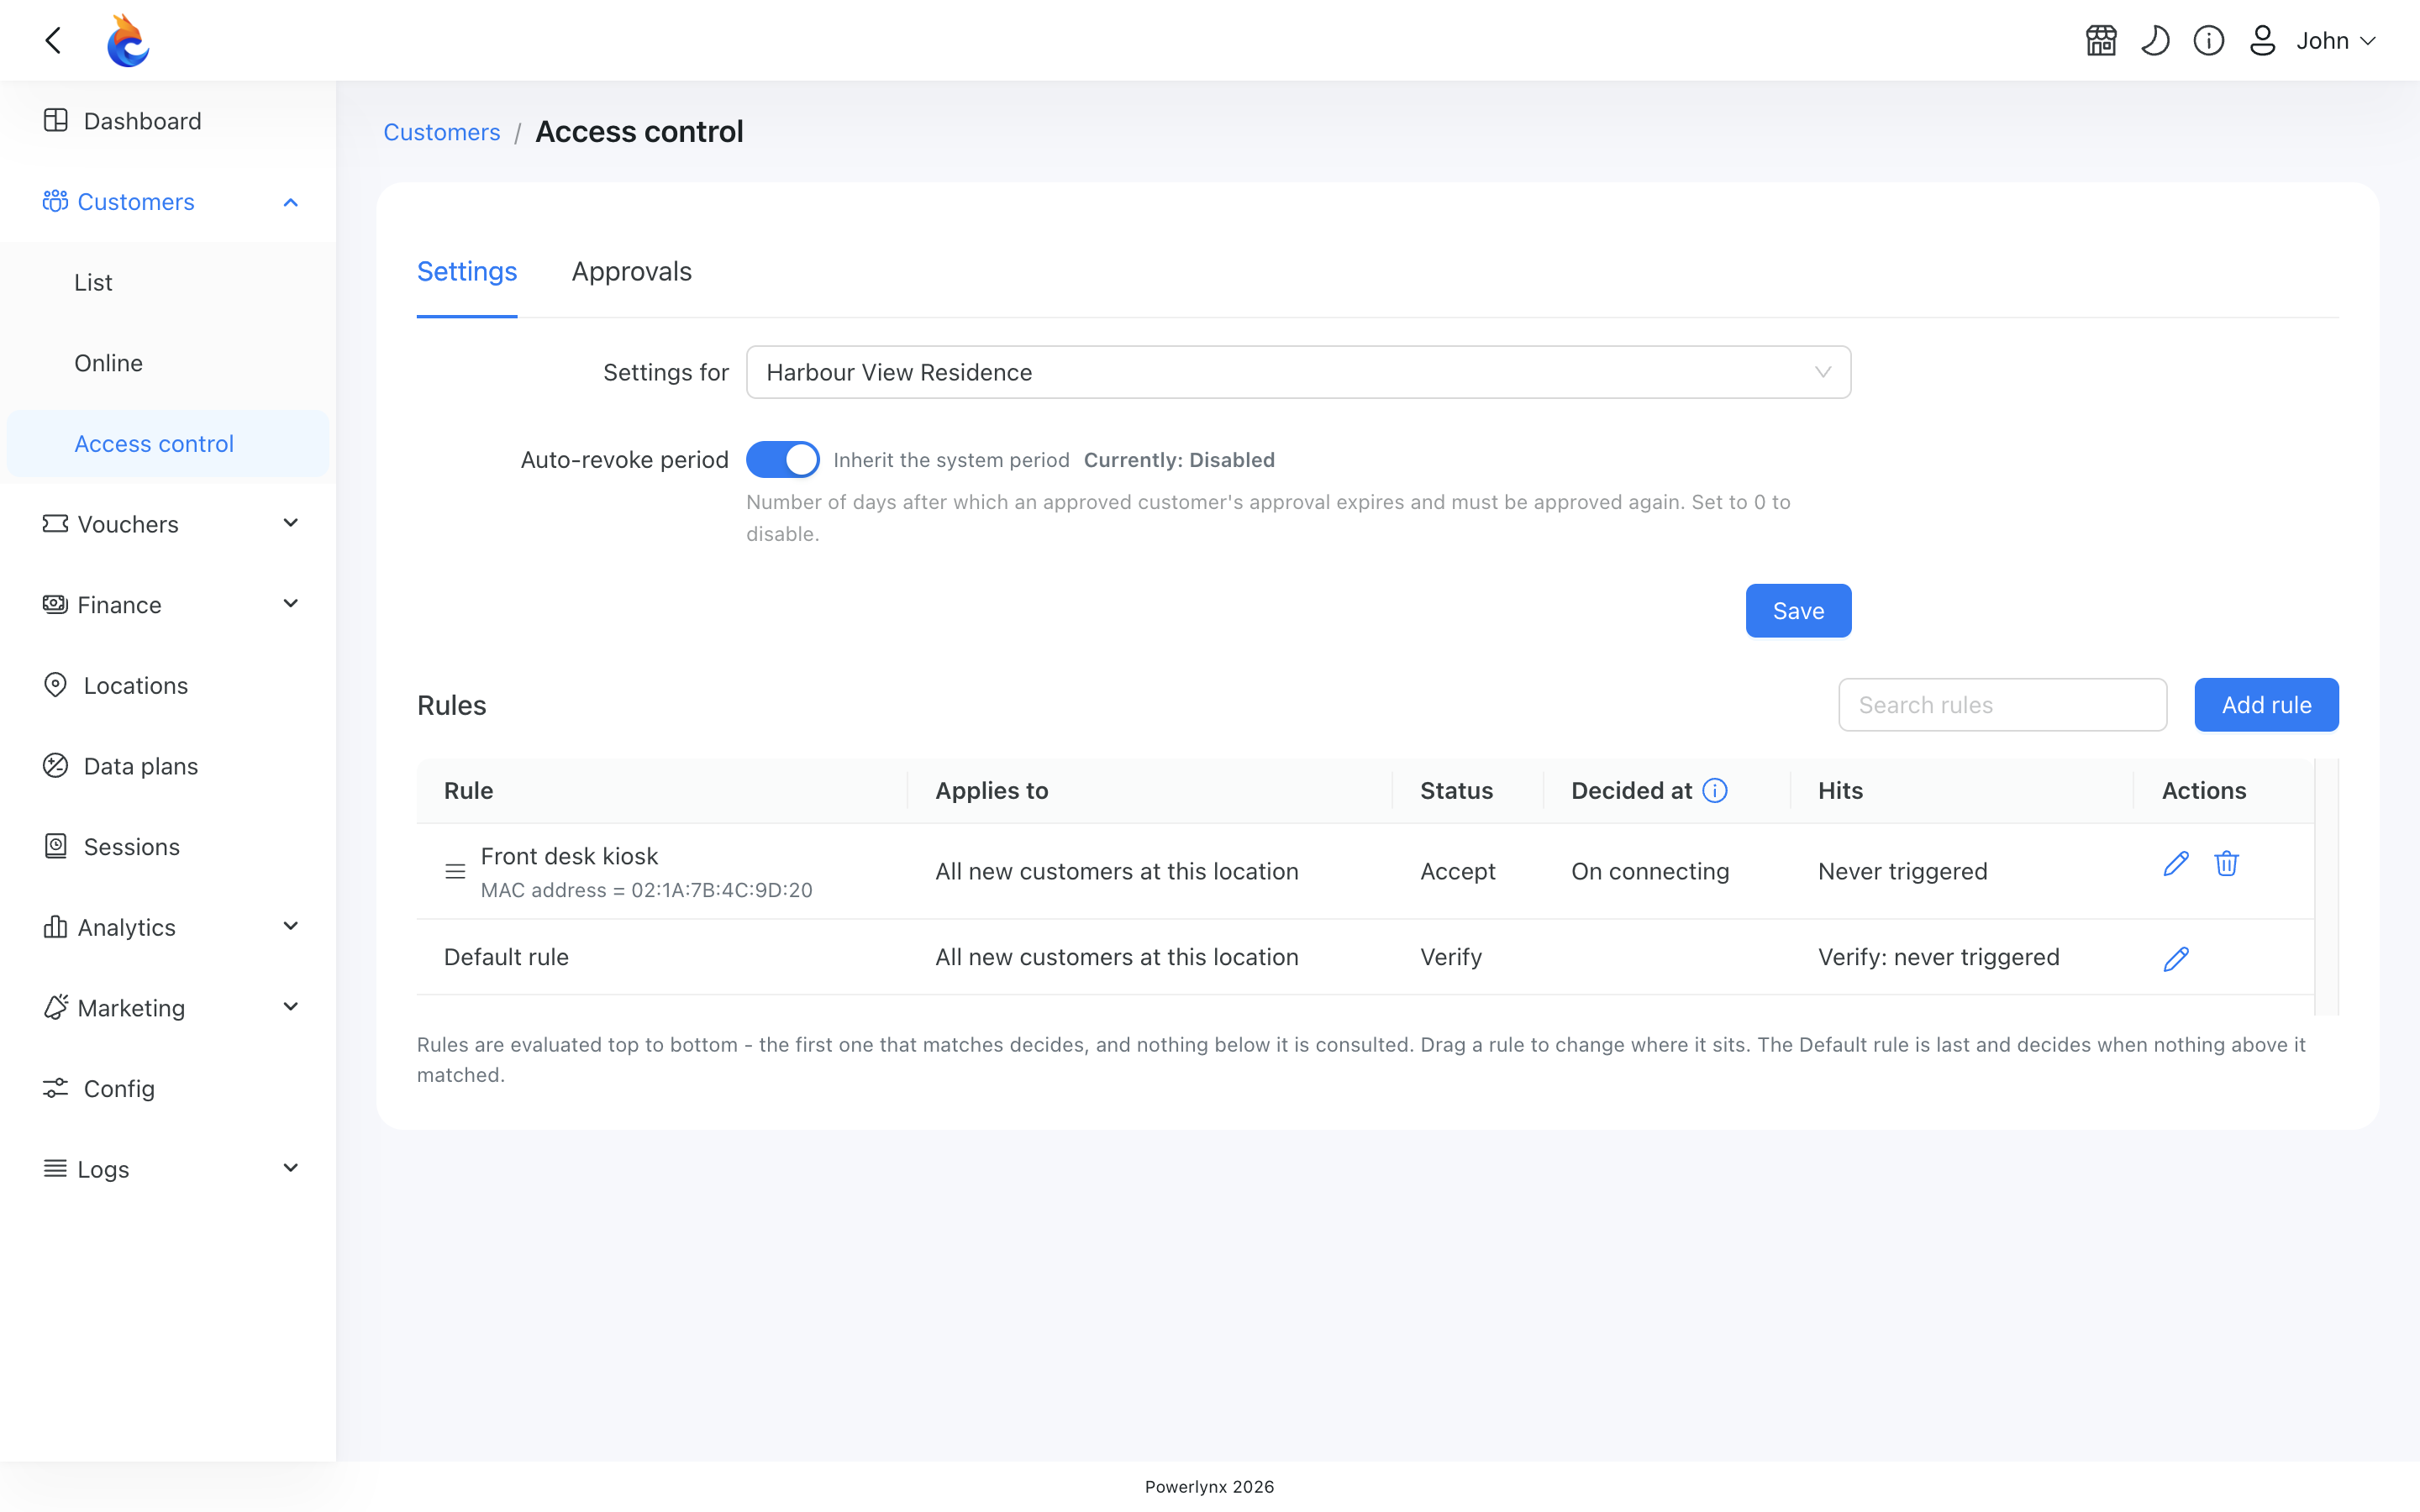
For Default (system-wide), the Default rule is Accept (the default), Verify or Reject.
For a location, there is a fourth choice, and each one overrides the system-wide setting at that location only:
- Inherit — follow the system-wide setting. The screen shows what is currently being inherited.
- Accept — admit everyone here, even if the system holds or refuses. Useful to exempt one busy branch from a global policy.
- Verify — require approval here, even if the system is open.
- Reject — refuse everyone here.
Auto-revoke period
Below the table, Auto-revoke period sets how many days an approval lasts. When it runs out, the customer has to be approved again — handy for re-checking students each term. Set it to 0 to disable expiry. A location can inherit the system period, set 0 to disable expiry there only, or use its own number of days.
Approvals only expire where approval is still required. If you have since switched a location back to Accept, nobody there is held again for no reason.
Hits
The Hits column shows how many times the Default rule actually decided a customer's outcome, for each action, and when it last happened — or Never triggered. A Reject leaves no other trace (nobody lands in the queue), so this is how you notice a refusal you didn't intend.
WARNING
Setting a Default rule to Reject refuses every customer who isn't caught by a rule above it — at the whole system, or at that location. Powerlynx asks you to confirm before saving.
Access rules
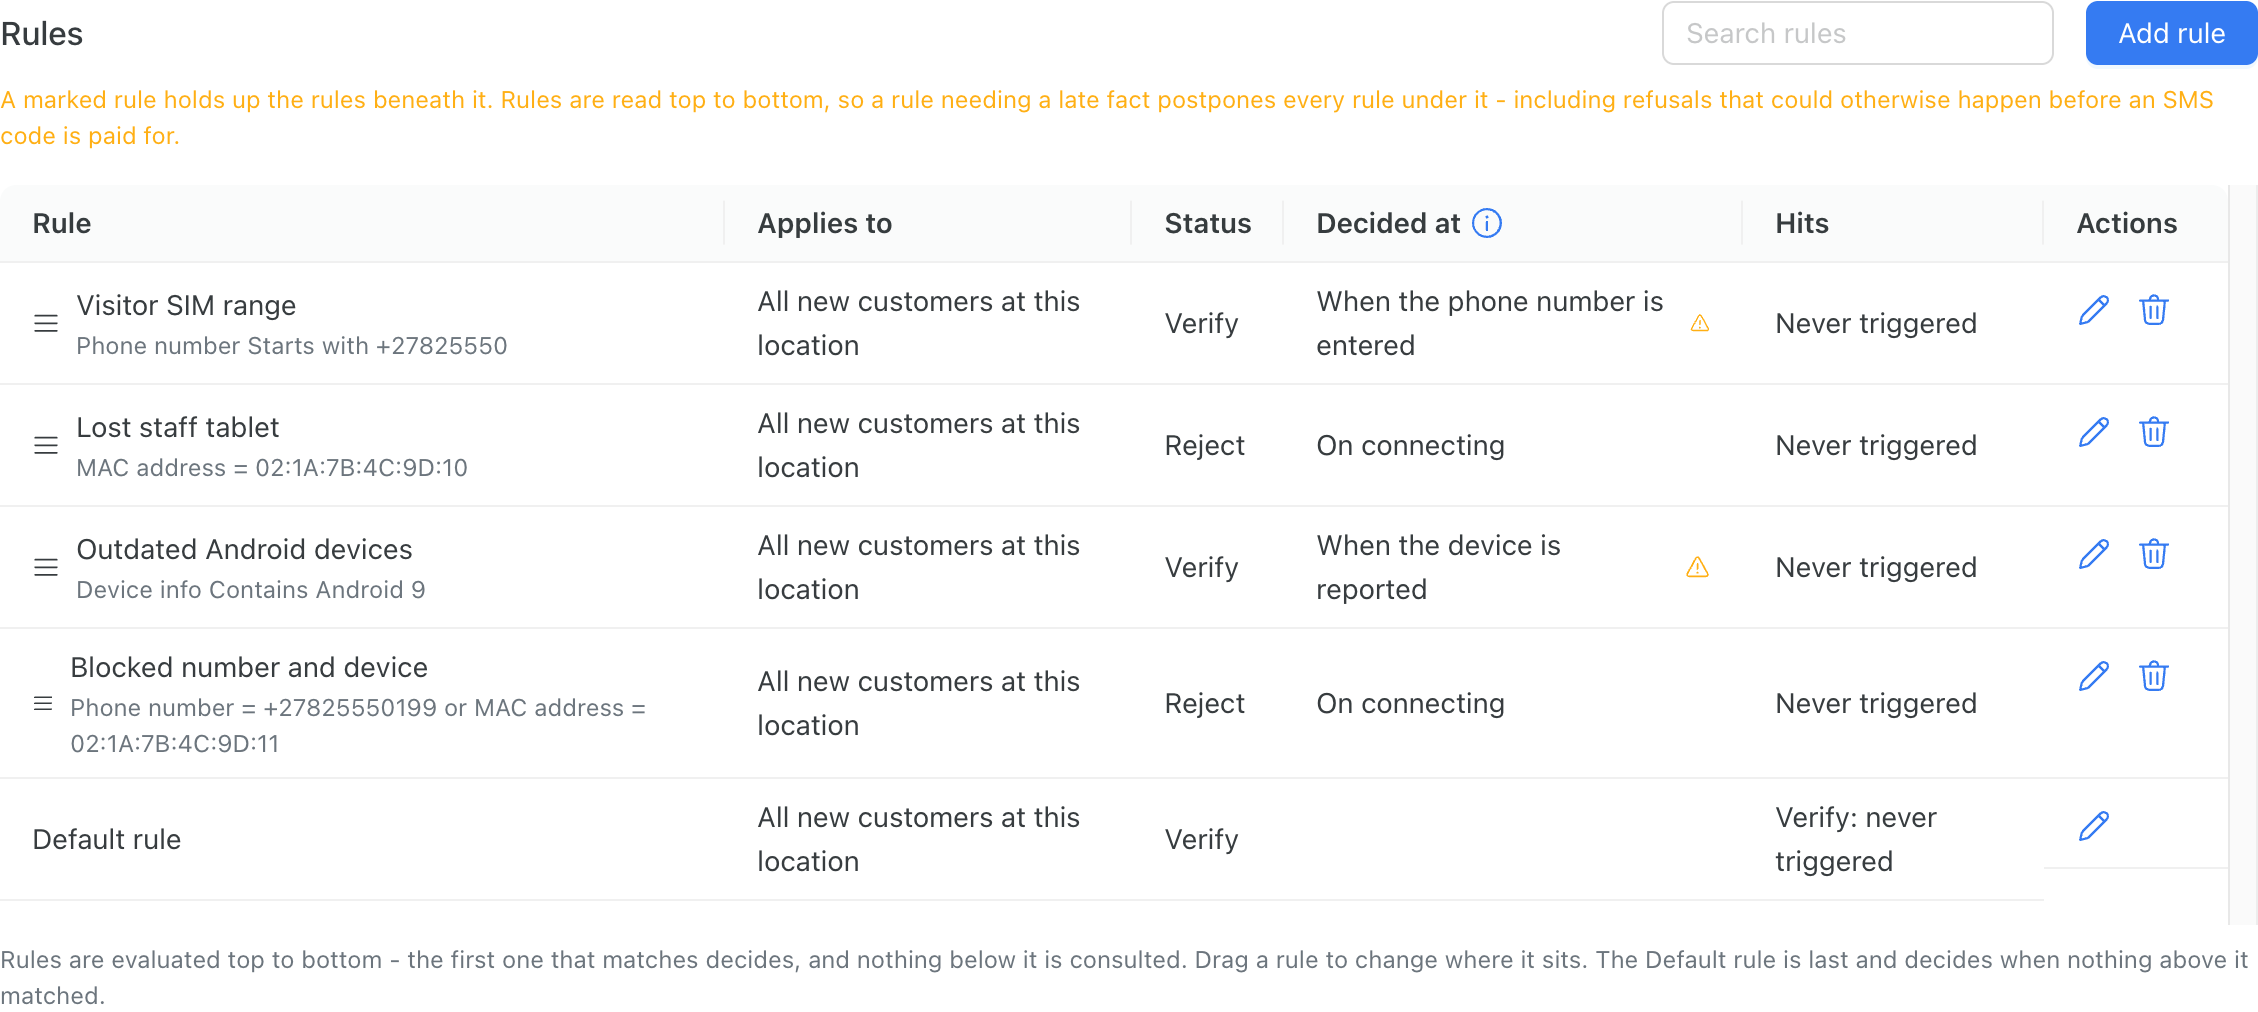
Access rules are the rows above the Default rule. Each one has a name, one or more conditions, and an action — Accept, Verify or Reject. Rules are read from the top: the first rule that matches decides, and nothing below it is checked. Drag a rule to change where it sits; the Default rule always stays last.
Creating a rule
Click Add rule and fill in the form:
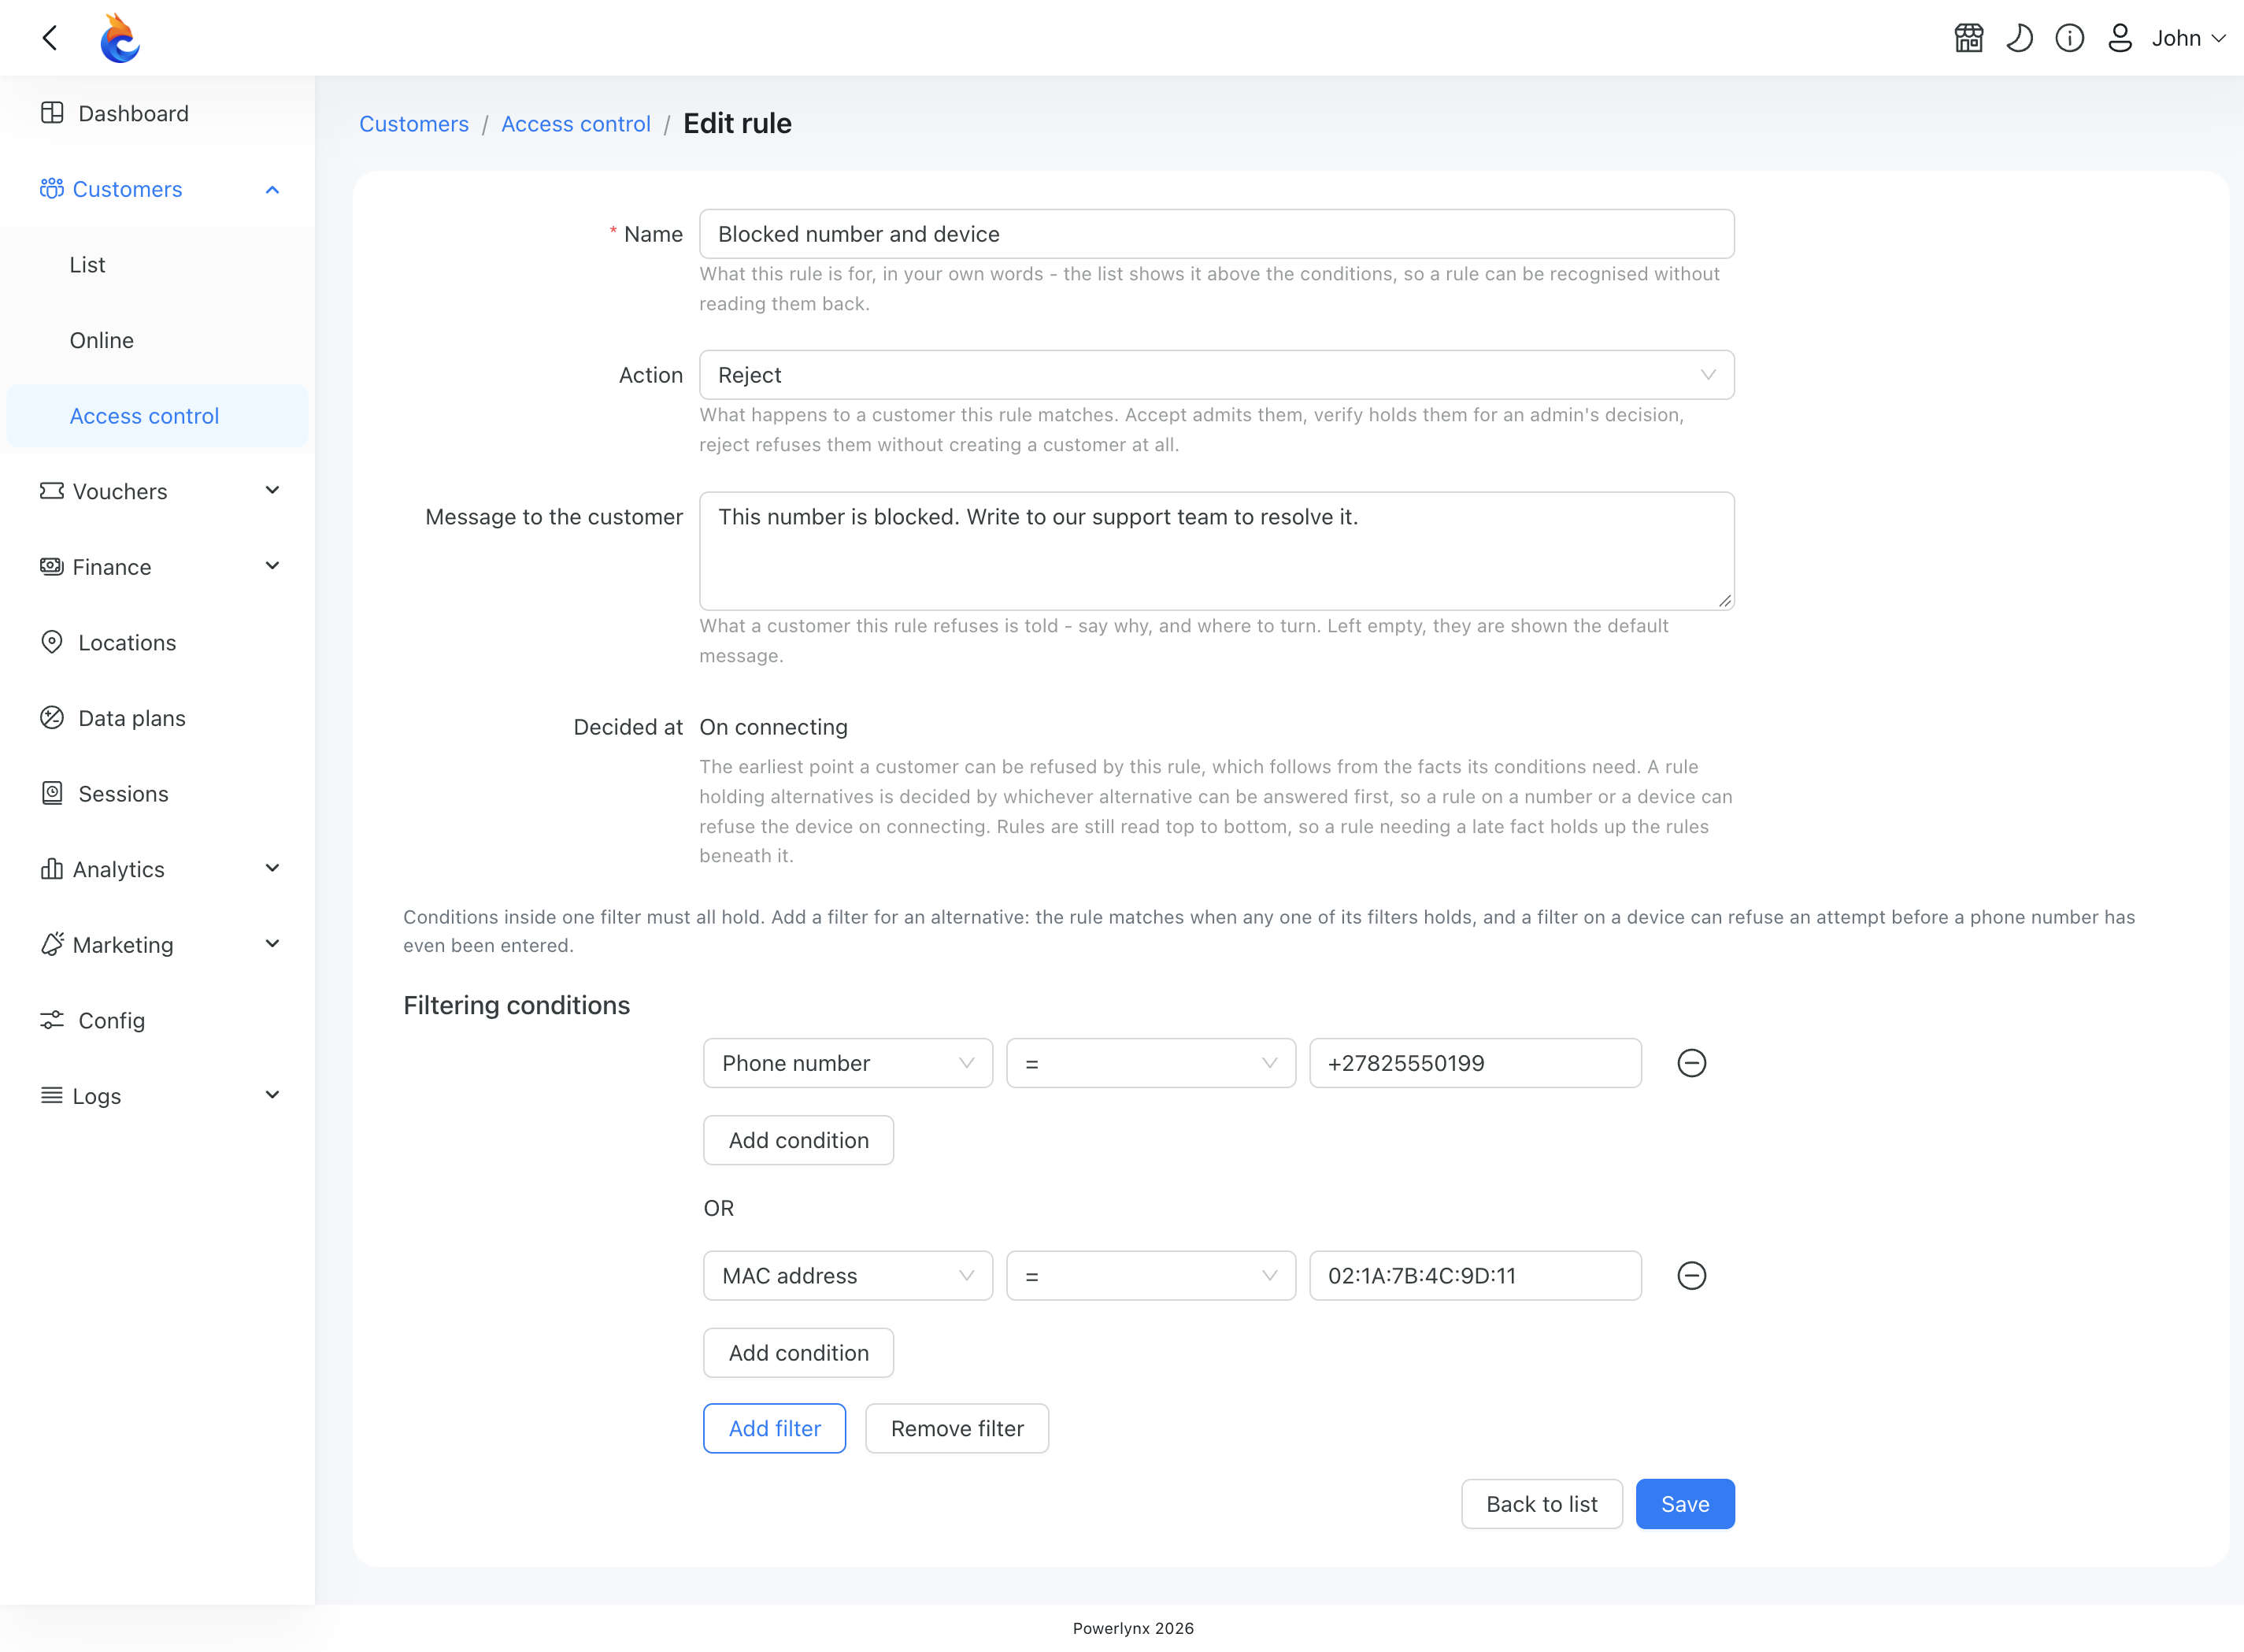
Name — what the rule is for, in your own words. The list shows it above the rule's conditions.
Conditions — what the rule matches. You can match on:
- the phone number the customer enters;
- the device fingerprint — a unique identifier of one device;
- the device info — how the device describes itself, such as
Apple iPhone iOS 18.1. Many devices share one description, so use text operators like "contains"; - the MAC address;
- the customer's own fields, labels and additional fields.
Conditions inside one filter must all hold. Add another filter for an alternative: the rule matches when any one of its filters holds.
Action — Accept, Verify or Reject.
Message to the customer (Reject only) — what a customer refused by this rule is told. Say why and where to turn, for example "This number is blocked. Write to our support team to resolve it." Leave it empty to show the default message.
TIP
You don't have to guess device values. The Associated devices table on a customer's card shows each device's MAC address, Device info and Device fingerprint, so you can copy them into a rule. See Customers.
A few details about conditions:
- MAC addresses can be written the way they're printed on the device — capitals and separators don't matter.
- Fingerprint conditions only work while fingerprint collection is on (Store fingerprints under
Config → Captive Portal). The rule form warns you if it's off. A device that reported its fingerprint only partly is treated as having no fingerprint. - A rule that can't be evaluated — for example, a broken pattern — never matches, rather than matching everybody.
When a rule is checked
A rule is checked as soon as the facts it needs are known, and the Decided at column shows when that is:
- On connecting — rules on the MAC address. A refused device never even sees the splash page.
- When the device is reported — rules on the device fingerprint or device info.
- When the phone number is entered — rules on the phone number. They are checked before a one-time code is sent, so you don't pay for an SMS to a number you're about to refuse.
- When the customer is identified — rules on the customer's own fields, labels and additional fields.
Because the first match decides, a rule that needs a late fact holds up every rule beneath it until it can be answered. The list marks such a rule. To refuse unwanted devices as early as possible, place MAC and device rules above rules that need the phone number or the customer's details.
What each action does
- Accept admits the customer.
- Verify holds the customer for approval — they land in the same queue as customers held by the Default rule.
- Reject refuses the attempt and saves nothing — no customer, no device. The next attempt is checked from scratch.
A customer refused by a rule, or by a Reject Default rule, sees the rule's Message to the customer, or otherwise the default: "Access to the system has been limited. Please contact our support team for assistance." The message is the same at every step, so it doesn't reveal which detail was matched.
Which decision wins
An administrator's own decision about a customer always comes first. After that, a location comes before the system:
- The customer's own approval or refusal at this location.
- This location's access rules, then its Default rule.
- The customer's own approval or refusal system-wide.
- The system-wide access rules, then the system-wide Default rule.
So you can ban someone at one location even though they're approved system-wide, and admit someone at one location even though they're refused system-wide.
WARNING
At a location whose Default rule is set to Verify or Reject (rather than Inherit), the location decides on its own — the system-wide access rules are never reached there. If a system-wide rule seems to be ignored at one location, check that location's Default rule.
WARNING
A system-wide Reject rule with no conditions refuses every customer at every location — including you, if you connect through the portal. Powerlynx asks you to confirm before saving one.
Approving customers
The Approvals tab
Customers → Access control → Approvals lists everyone waiting for a decision, newest request first.
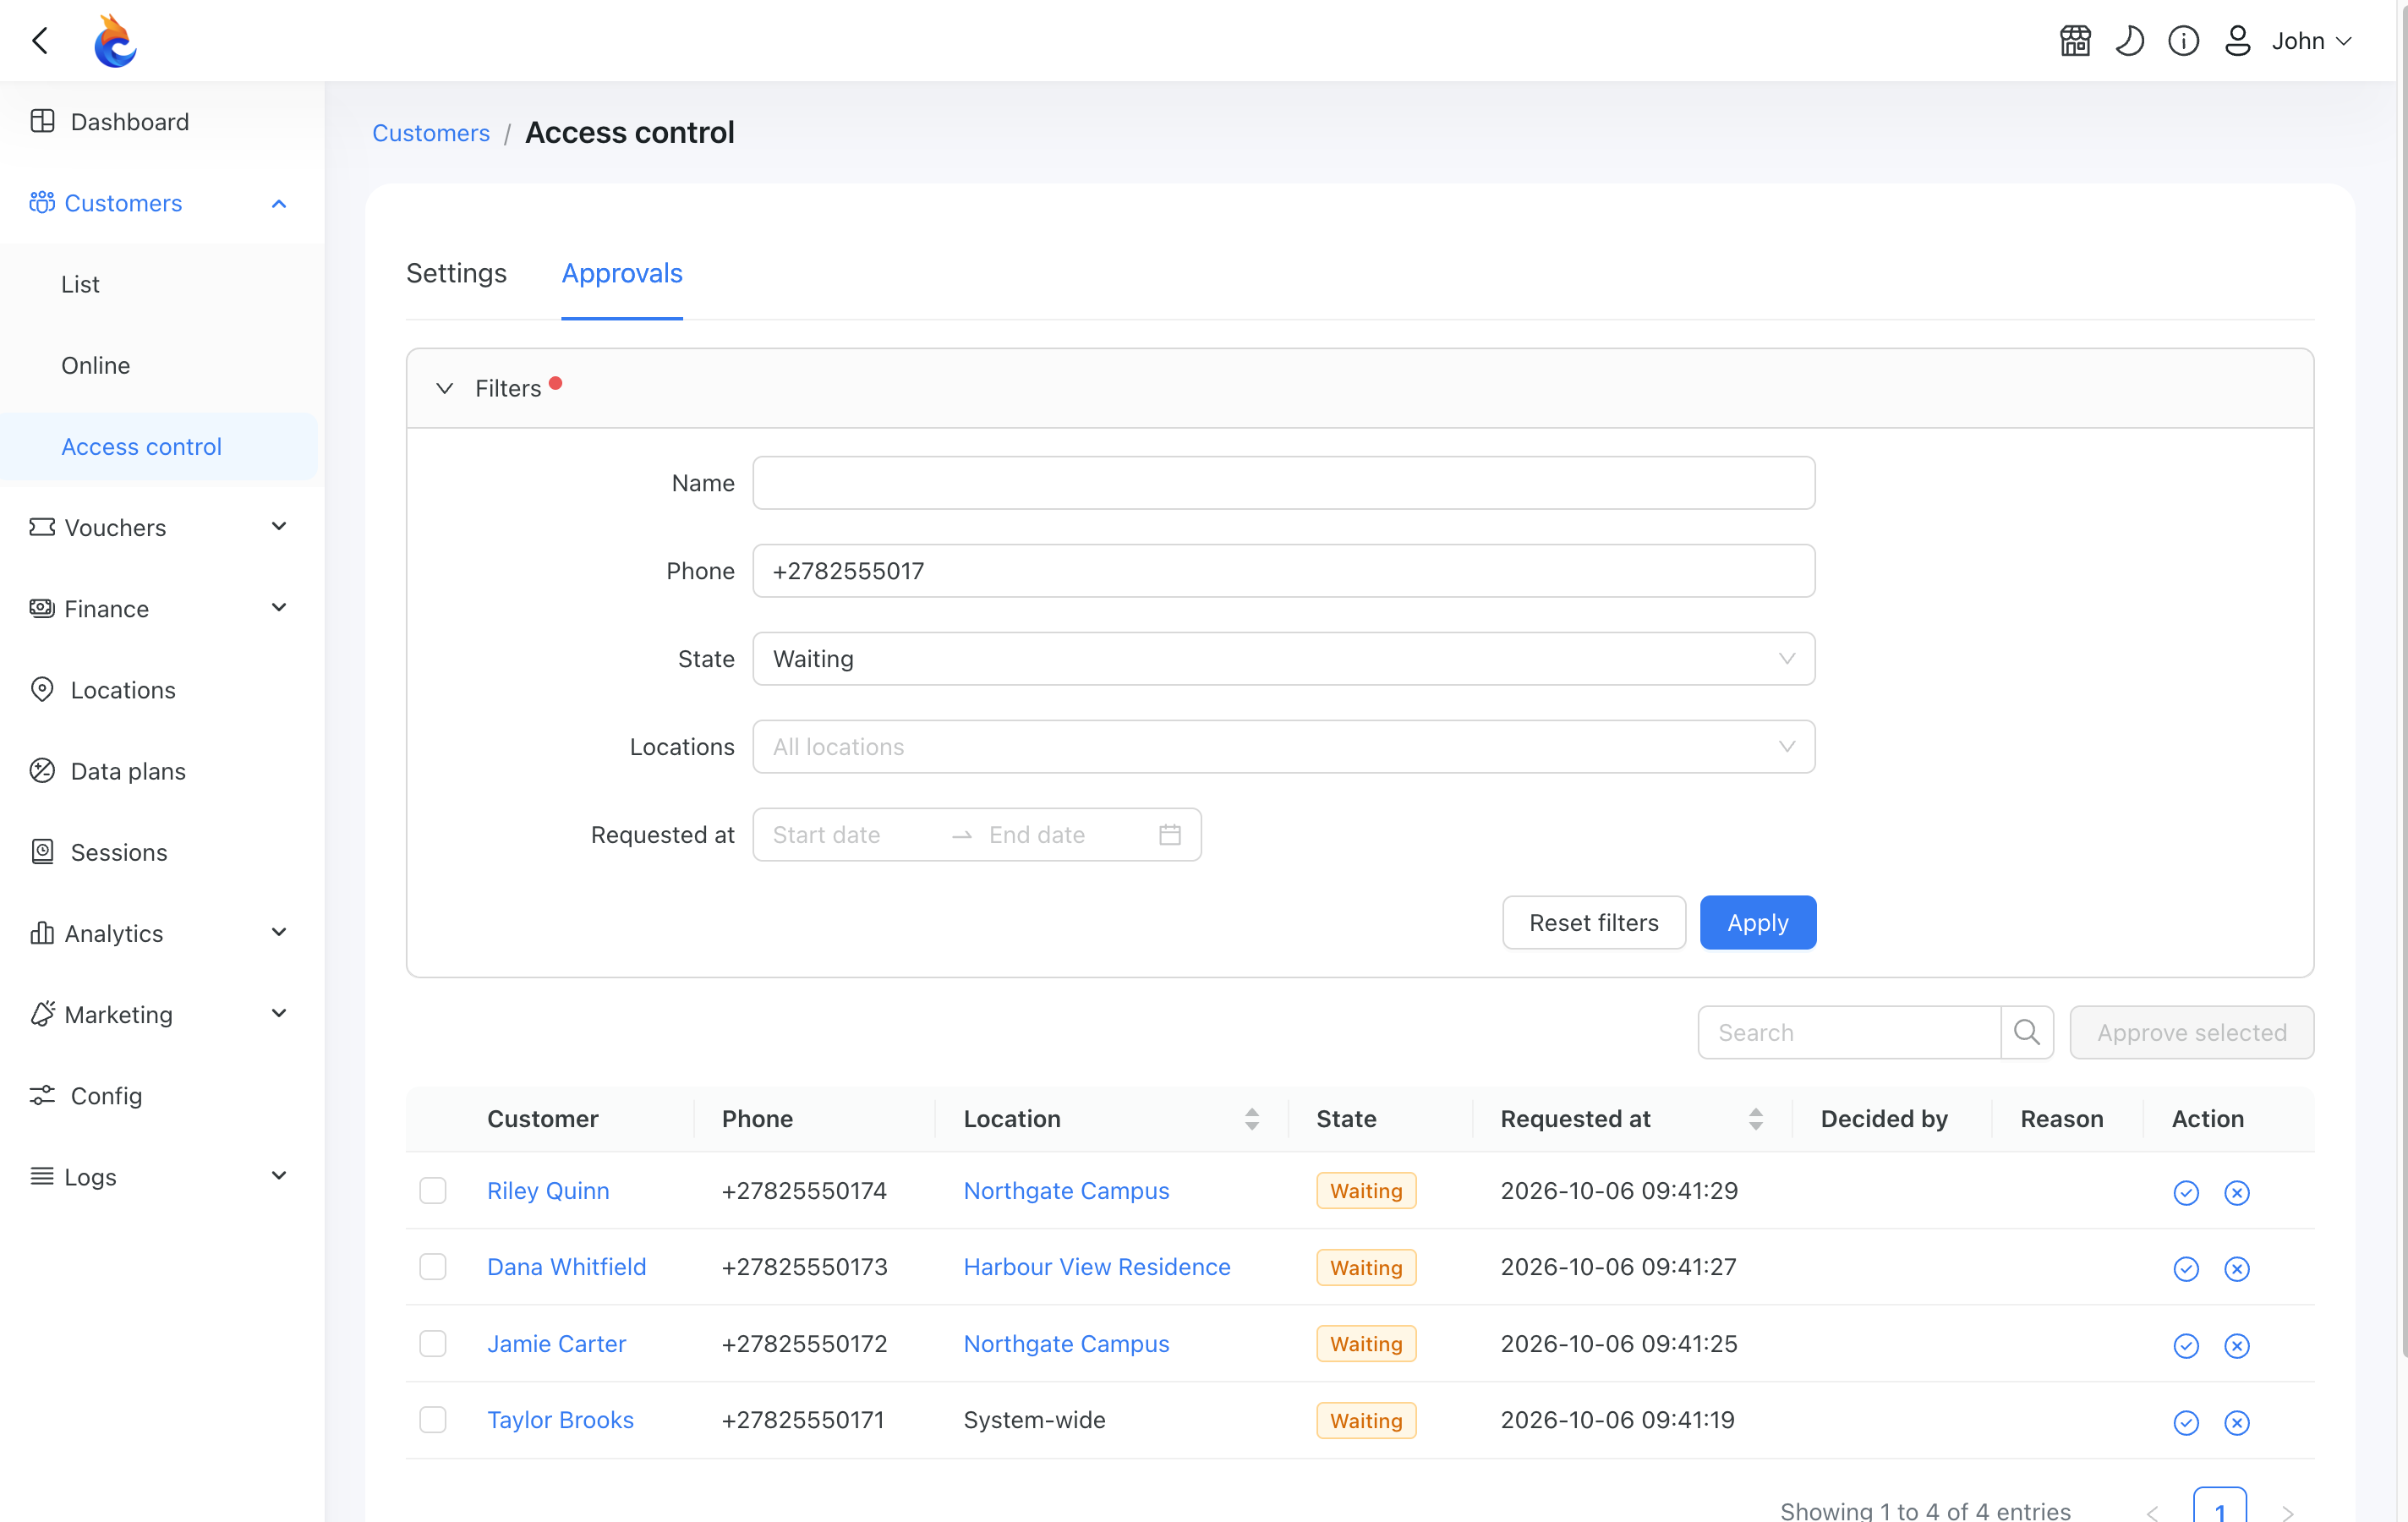
Each row is one customer at one scope — a location, or System-wide — so the same person can appear once for each location that holds them. The table shows the Customer, Phone, Location, State, when the hold was Requested at, and the actions.
Filter by State, Name, Phone, Locations and Requested at. State opens on Waiting; switch to Approved, Rejected or All to find a decision you want to take back. The Locations filter includes System-wide, for customers held by the system-wide setting.
- Approve asks for confirmation and admits the customer at that row's scope.
- Reject asks for a reason. The customer is shown that reason on their waiting page.
- Approve selected approves all ticked rows at once. If a colleague decided some of them first, or a customer was deleted in the meantime, the result tells you which were skipped.
Every decision applies to that row's scope only. Rejecting a customer at one branch says nothing about them anywhere else, and approving them system-wide doesn't overrule a branch that requires its own approval.
What the customer sees
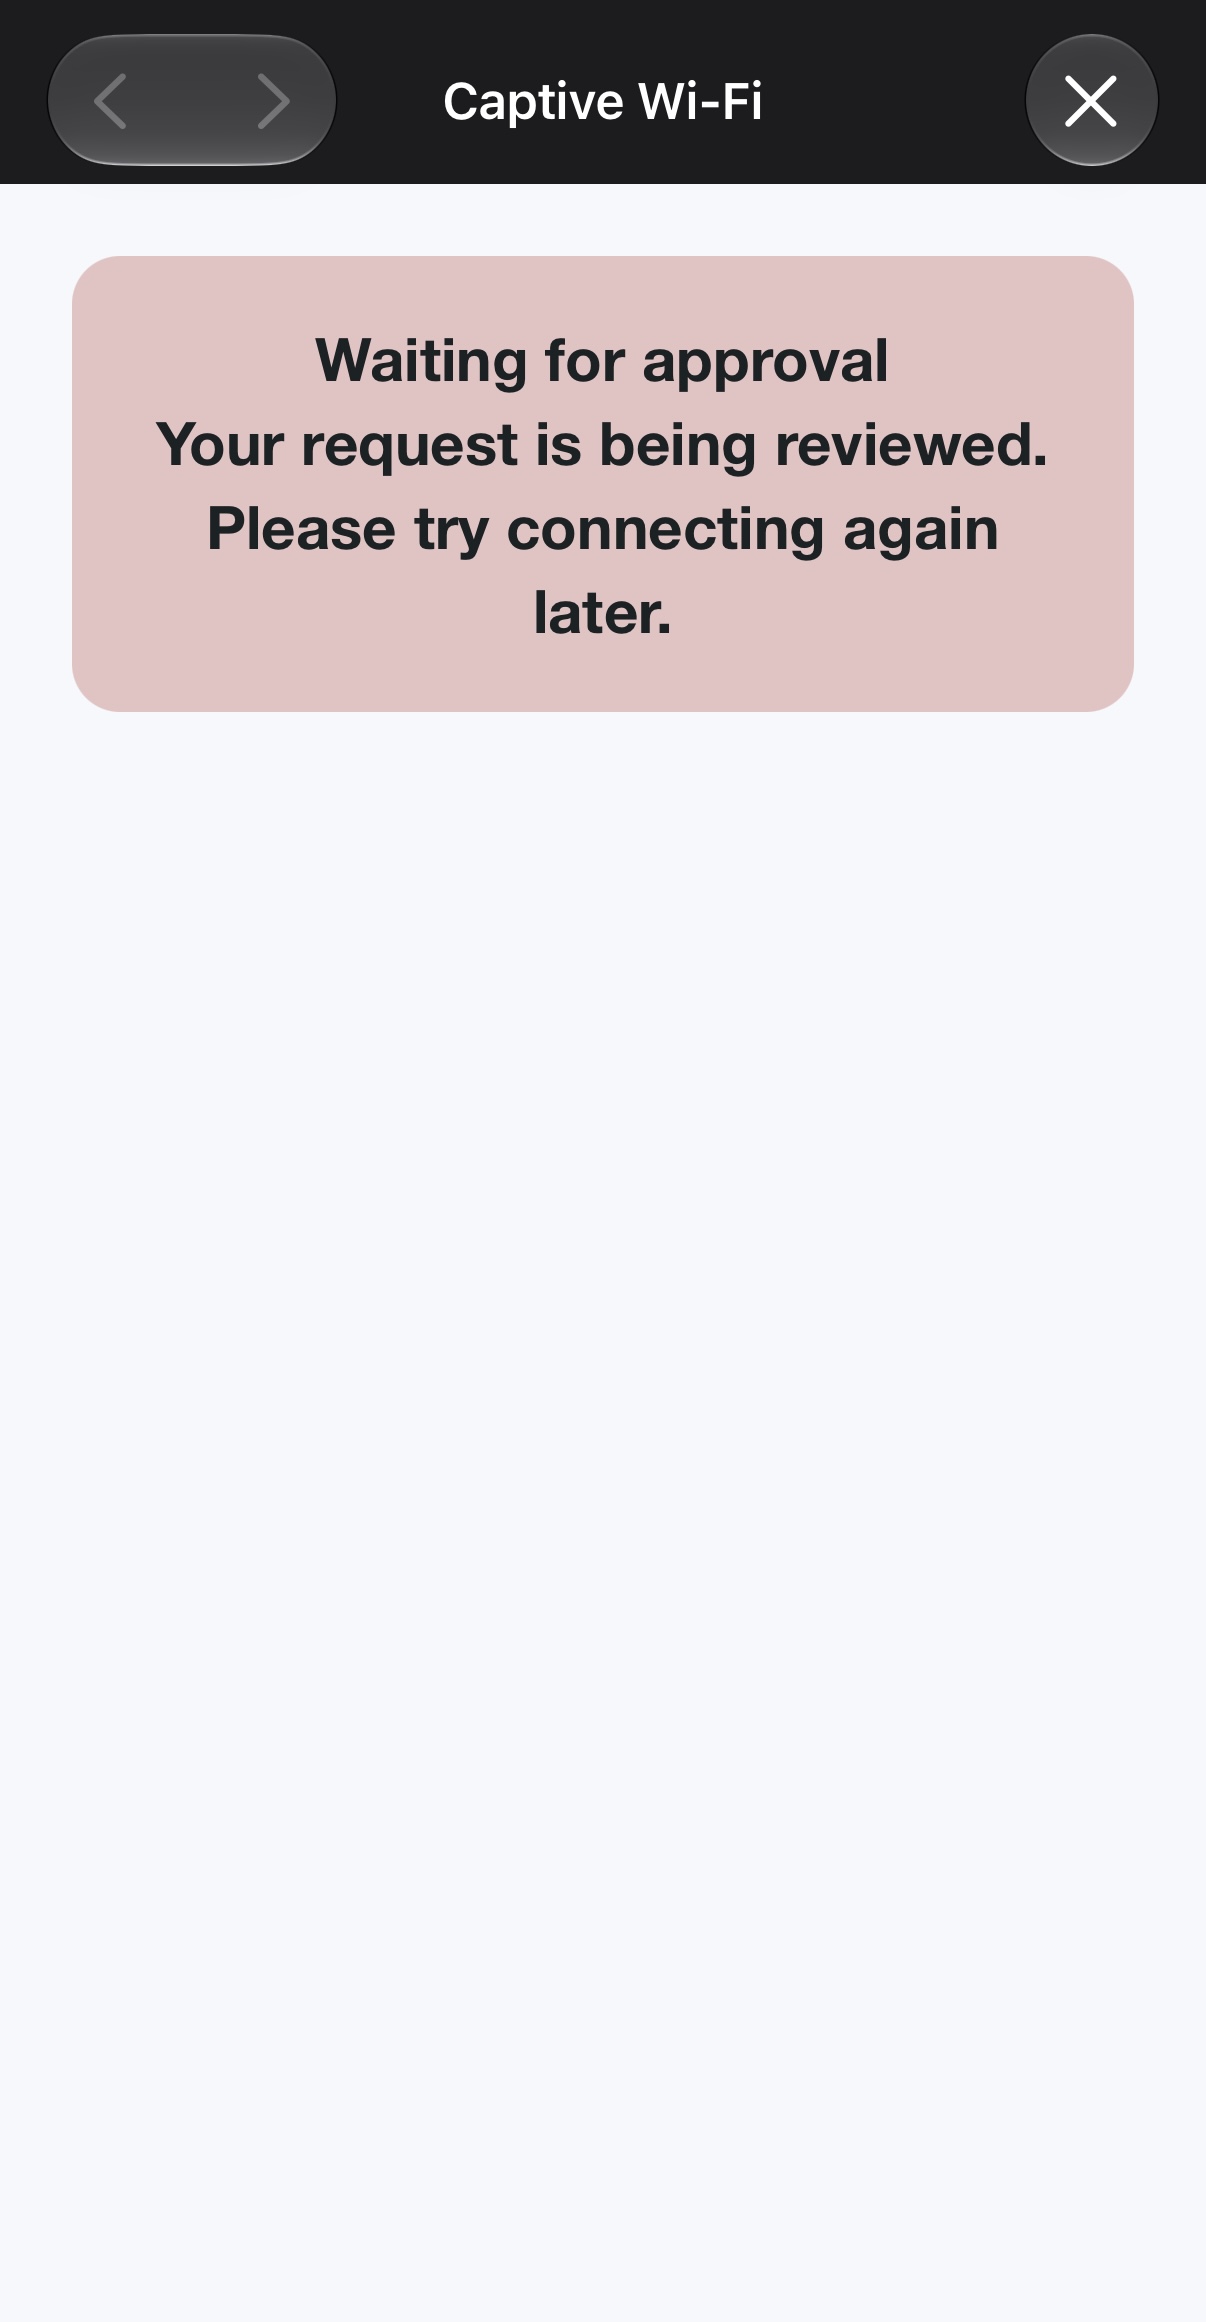
A held customer completes registration as usual and then sees the Waiting for approval page instead of the data plans. Until they are approved, they can't choose a plan, enter a voucher code or add a device. If you reject them, the same page shows your rejection message with the reason you gave. You write both messages yourself — see Waiting for approval page.
INFO
Customers who are already online when you turn on approval are not disconnected. The hold applies from their next login.
A customer's Access control tab
Open a customer and switch to their Access control tab to see where they stand everywhere at once. There is one row per scope they hold a record at, with its State, Decided at, Decided by and Reason.
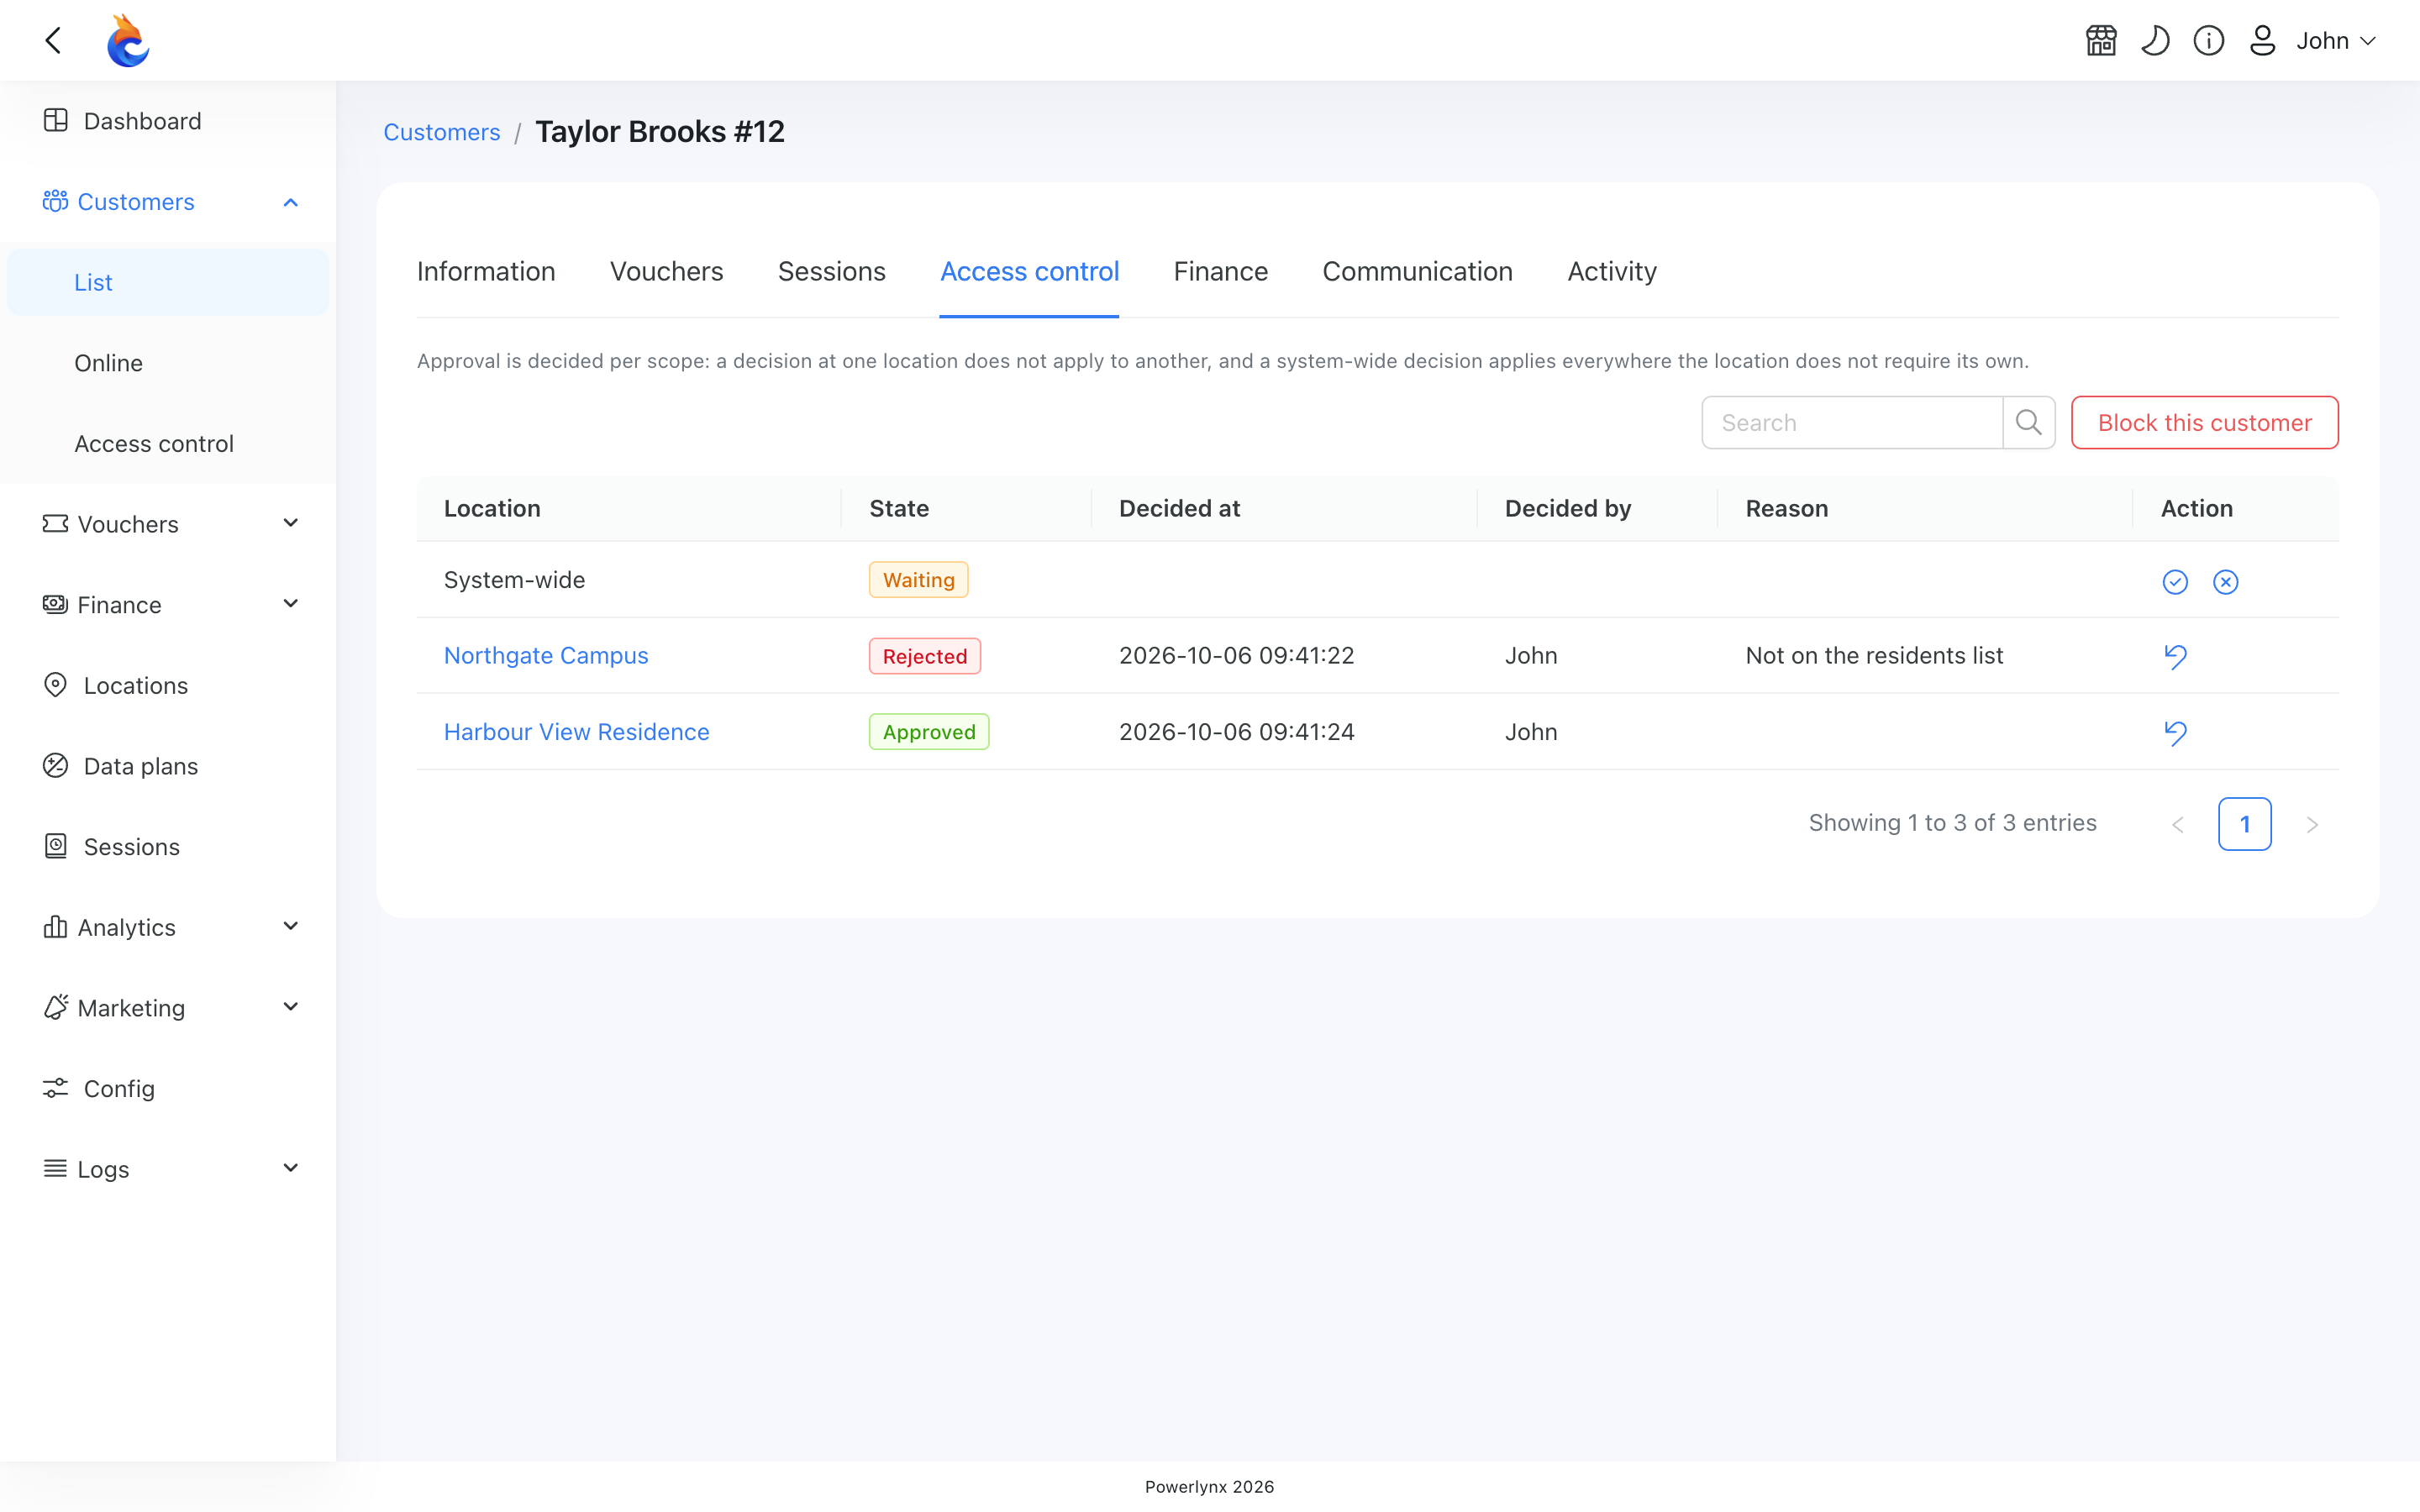
Every decision can be taken back. Each row offers the actions its state allows:
- Approve and Reject — on a waiting record.
- Revoke — on an approved record. The customer is held again the next time they connect at that scope; a session already running is not cut off.
- Return to waiting — on a rejected record. The refusal and its reason are cleared, so the customer is held again on their next visit — or admitted, if approval is no longer required there.
Blocking a customer
Block this customer, on the same tab, refuses one customer. In Block at, choose how far it reaches:
- Default (system-wide) — everywhere: the customer is refused at every location, and any approval given to them at a location is withdrawn.
- A location — the customer is refused at that location only and keeps their standing everywhere else.
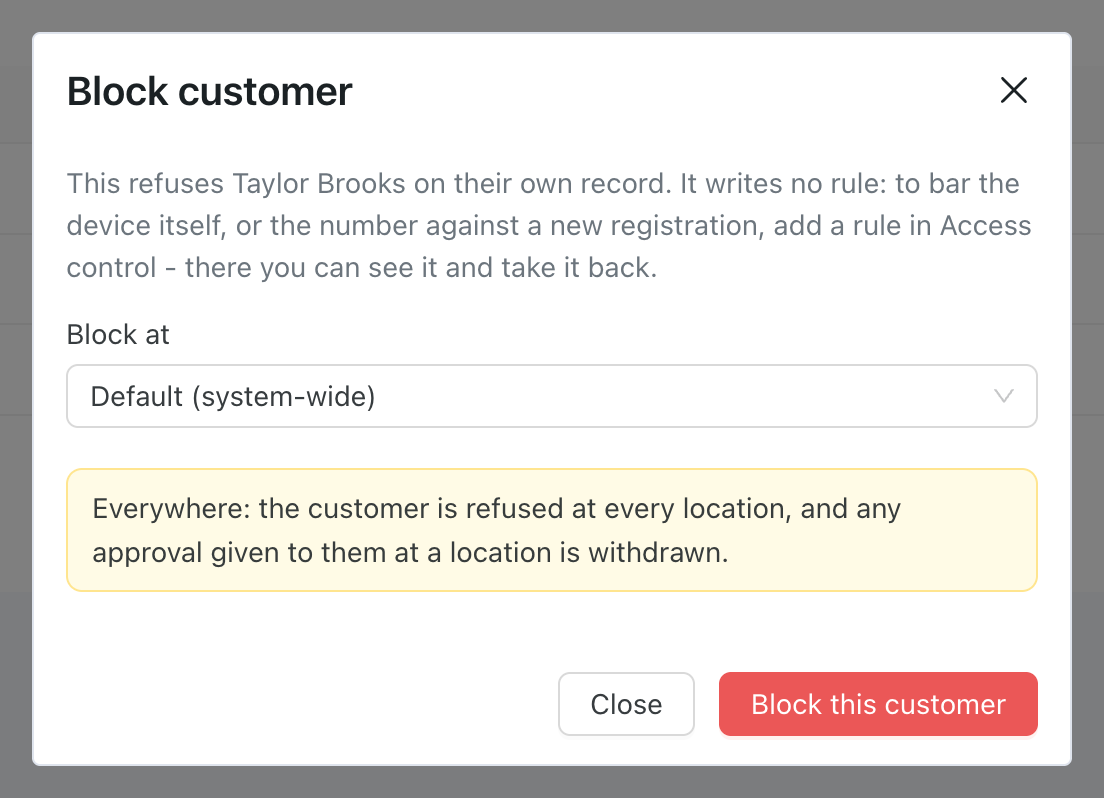
A block follows the customer onto their devices at that location. A device already linked to the blocked customer can't be used to register again with a different phone number, and a device someone uses to log in with the blocked customer's number is blocked along with them. If a device was caught by mistake — a borrowed phone, a shared family tablet — delete it from the customer's Associated devices table and the next login from it works again.
Blocking doesn't create an access rule. To bar a device or a number deliberately, add a rule on the Settings tab.
WARNING
A voucher that is still valid lets its holder in before access control is checked. So Block this customer, Reject and Revoke are refused while the customer holds a voucher that would still admit them at that scope, and the message lists those vouchers. Disable them on the Vouchers screen first, then repeat the action. Powerlynx never disables a paid-for voucher on its own.
Good to know
- Switching Verify off doesn't release the queue. Customers already waiting stay held until someone decides about them — approve them from the Approvals tab, one by one or with Approve selected.
- A location's Accept doesn't lift a system-wide ban. To admit a person refused system-wide at one location, approve them at that location.
- Approved once, everywhere. A customer held by an inherited system-wide Verify is approved once for all locations that inherit it, not once per location.
- Every login path is covered, including Splynx login.
- Handing out vouchers yourself still works. Assigning a voucher to a customer from the admin panel, or a payment that completes, isn't blocked by access control.
- Who can do what: changing the system-wide settings and rules requires permission to change system settings, and a location's settings require permission to edit that location. Approving and rejecting is a separate permission, so someone can work through the queue without being able to change who lands in it. An administrator who can only view the queue sees the states without the actions.
Examples
University Campus (Manual Approval)
In a university environment, you may want to prevent the general public from automatically joining your network, while still allowing students and staff to connect and register their details. Once registered, a network administrator can manually validate these details before granting access.
To set this up:
Go to Customers → Access control and stay on the Settings tab.
In the Settings for dropdown, select your university location (or Default (system-wide) if this applies to all locations).
Set the Default rule to Verify.
(Optional) Set an Auto-revoke period (e.g., 180 days or 365 days) so that approvals expire at the end of a semester or academic year, requiring students to be re-verified.
When a user attempts to connect, they will be able to complete the registration process (providing their phone number and any additional fields you require). However, they will be held in a queue and will not get online immediately.
An administrator can then go to the Approvals tab under Customers → Access control to review the waiting customers, validate their information, and manually Approve or Reject their connection.
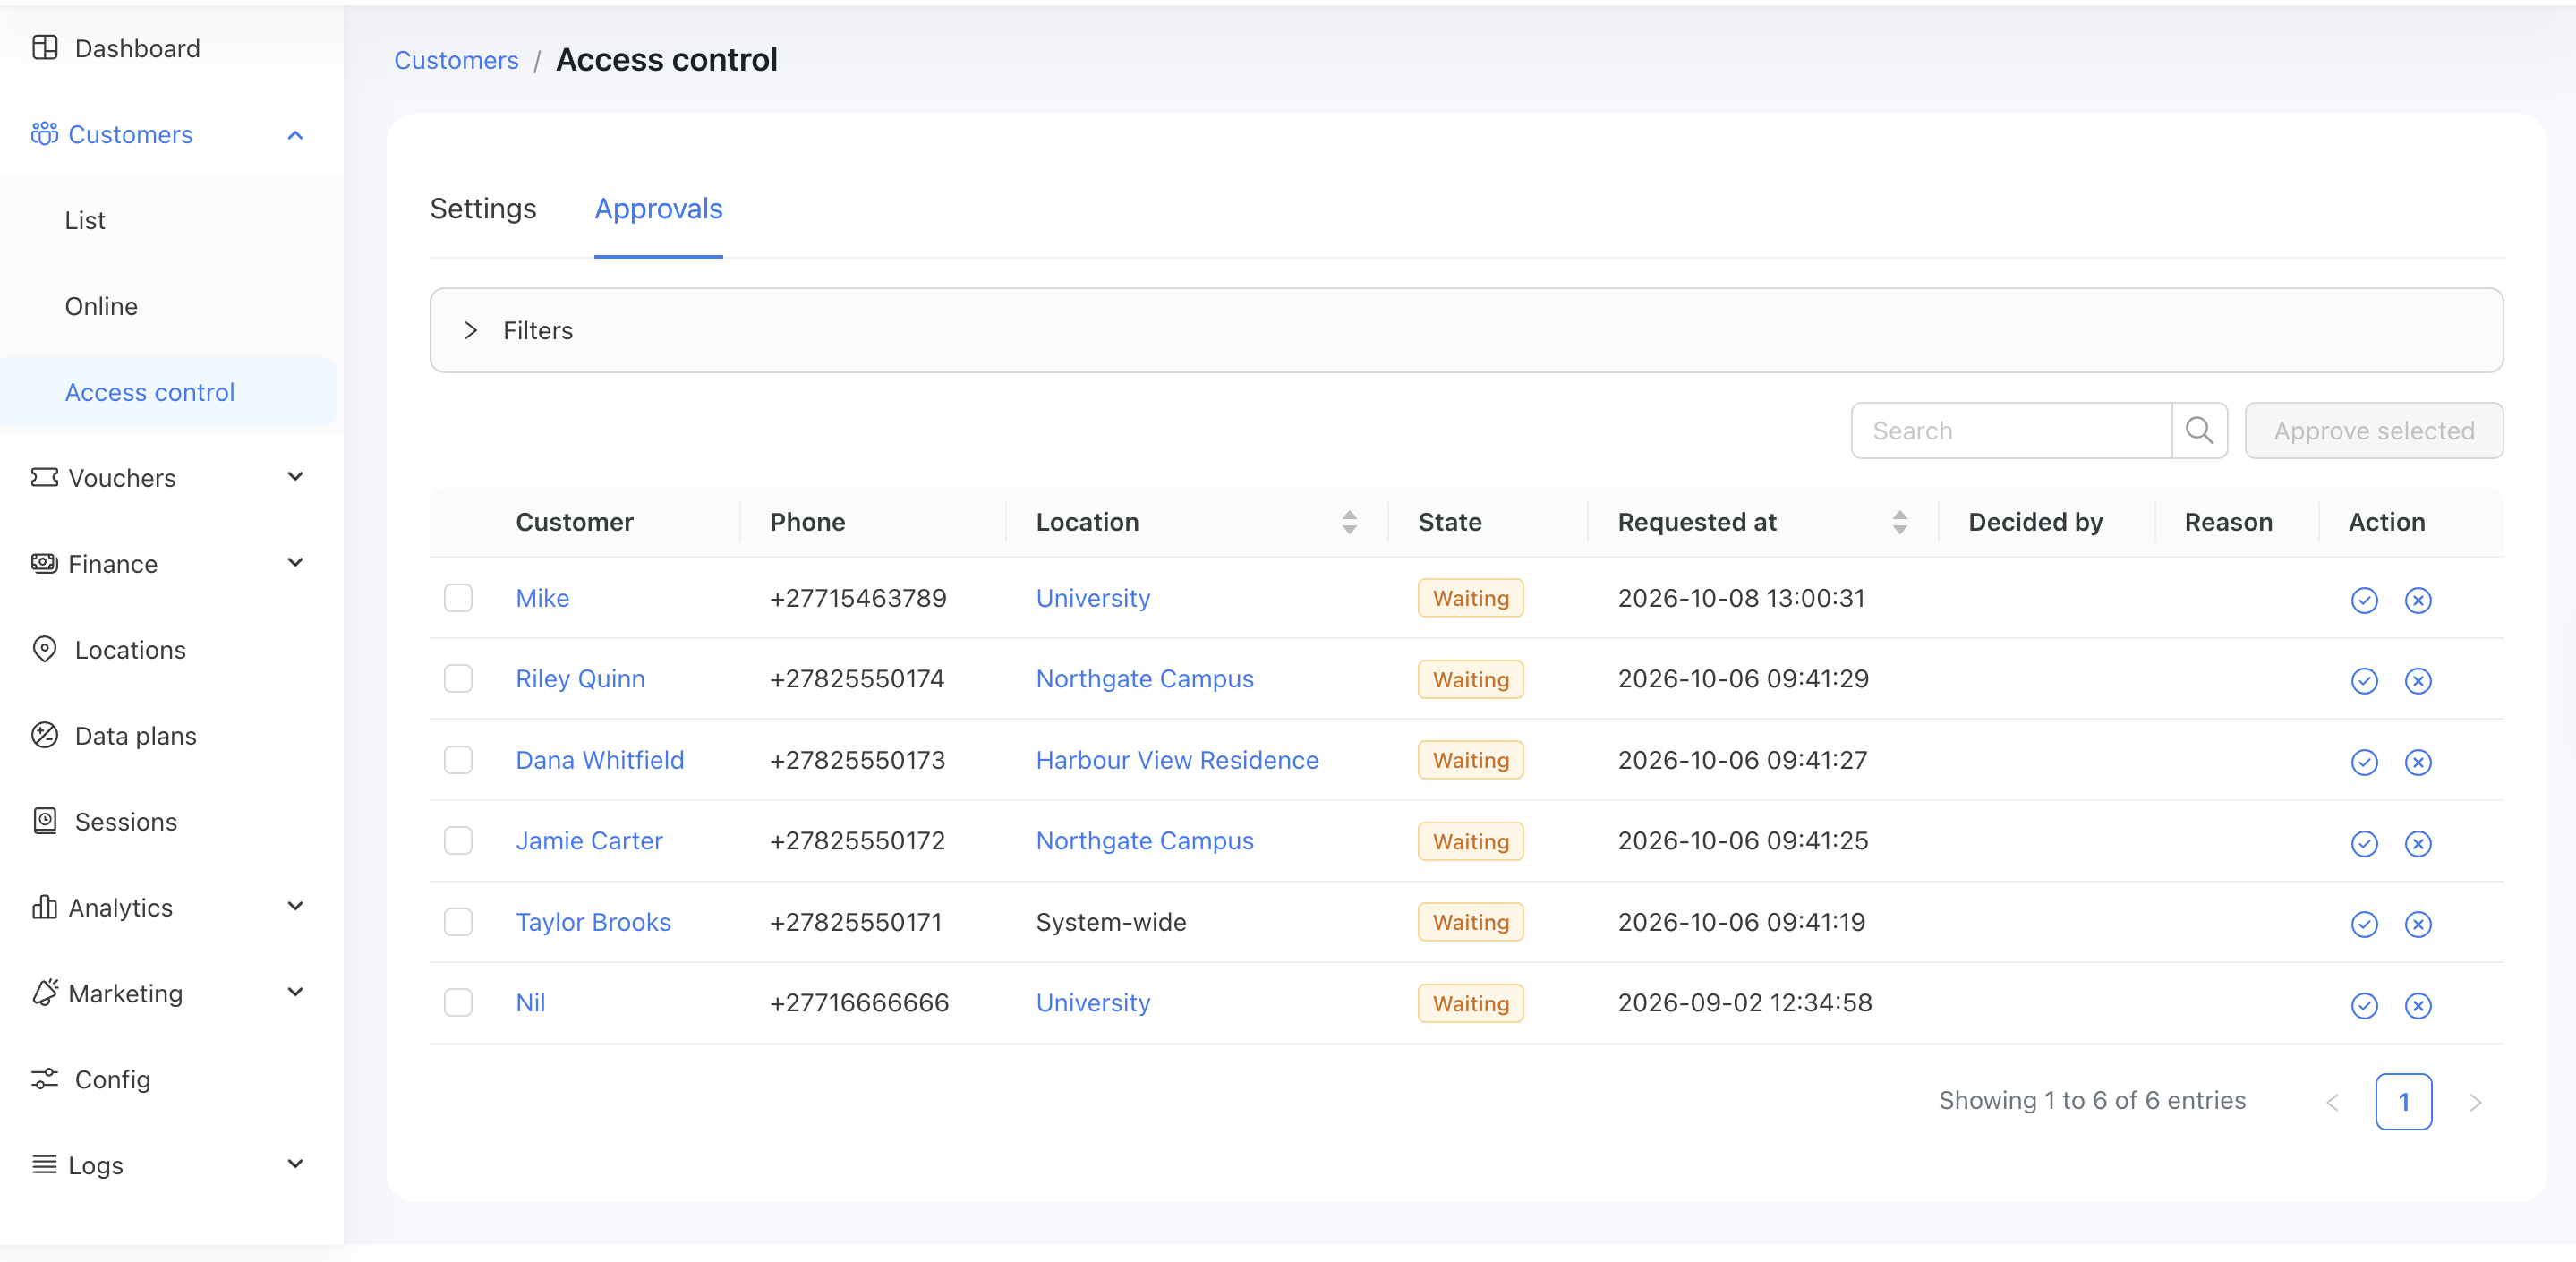
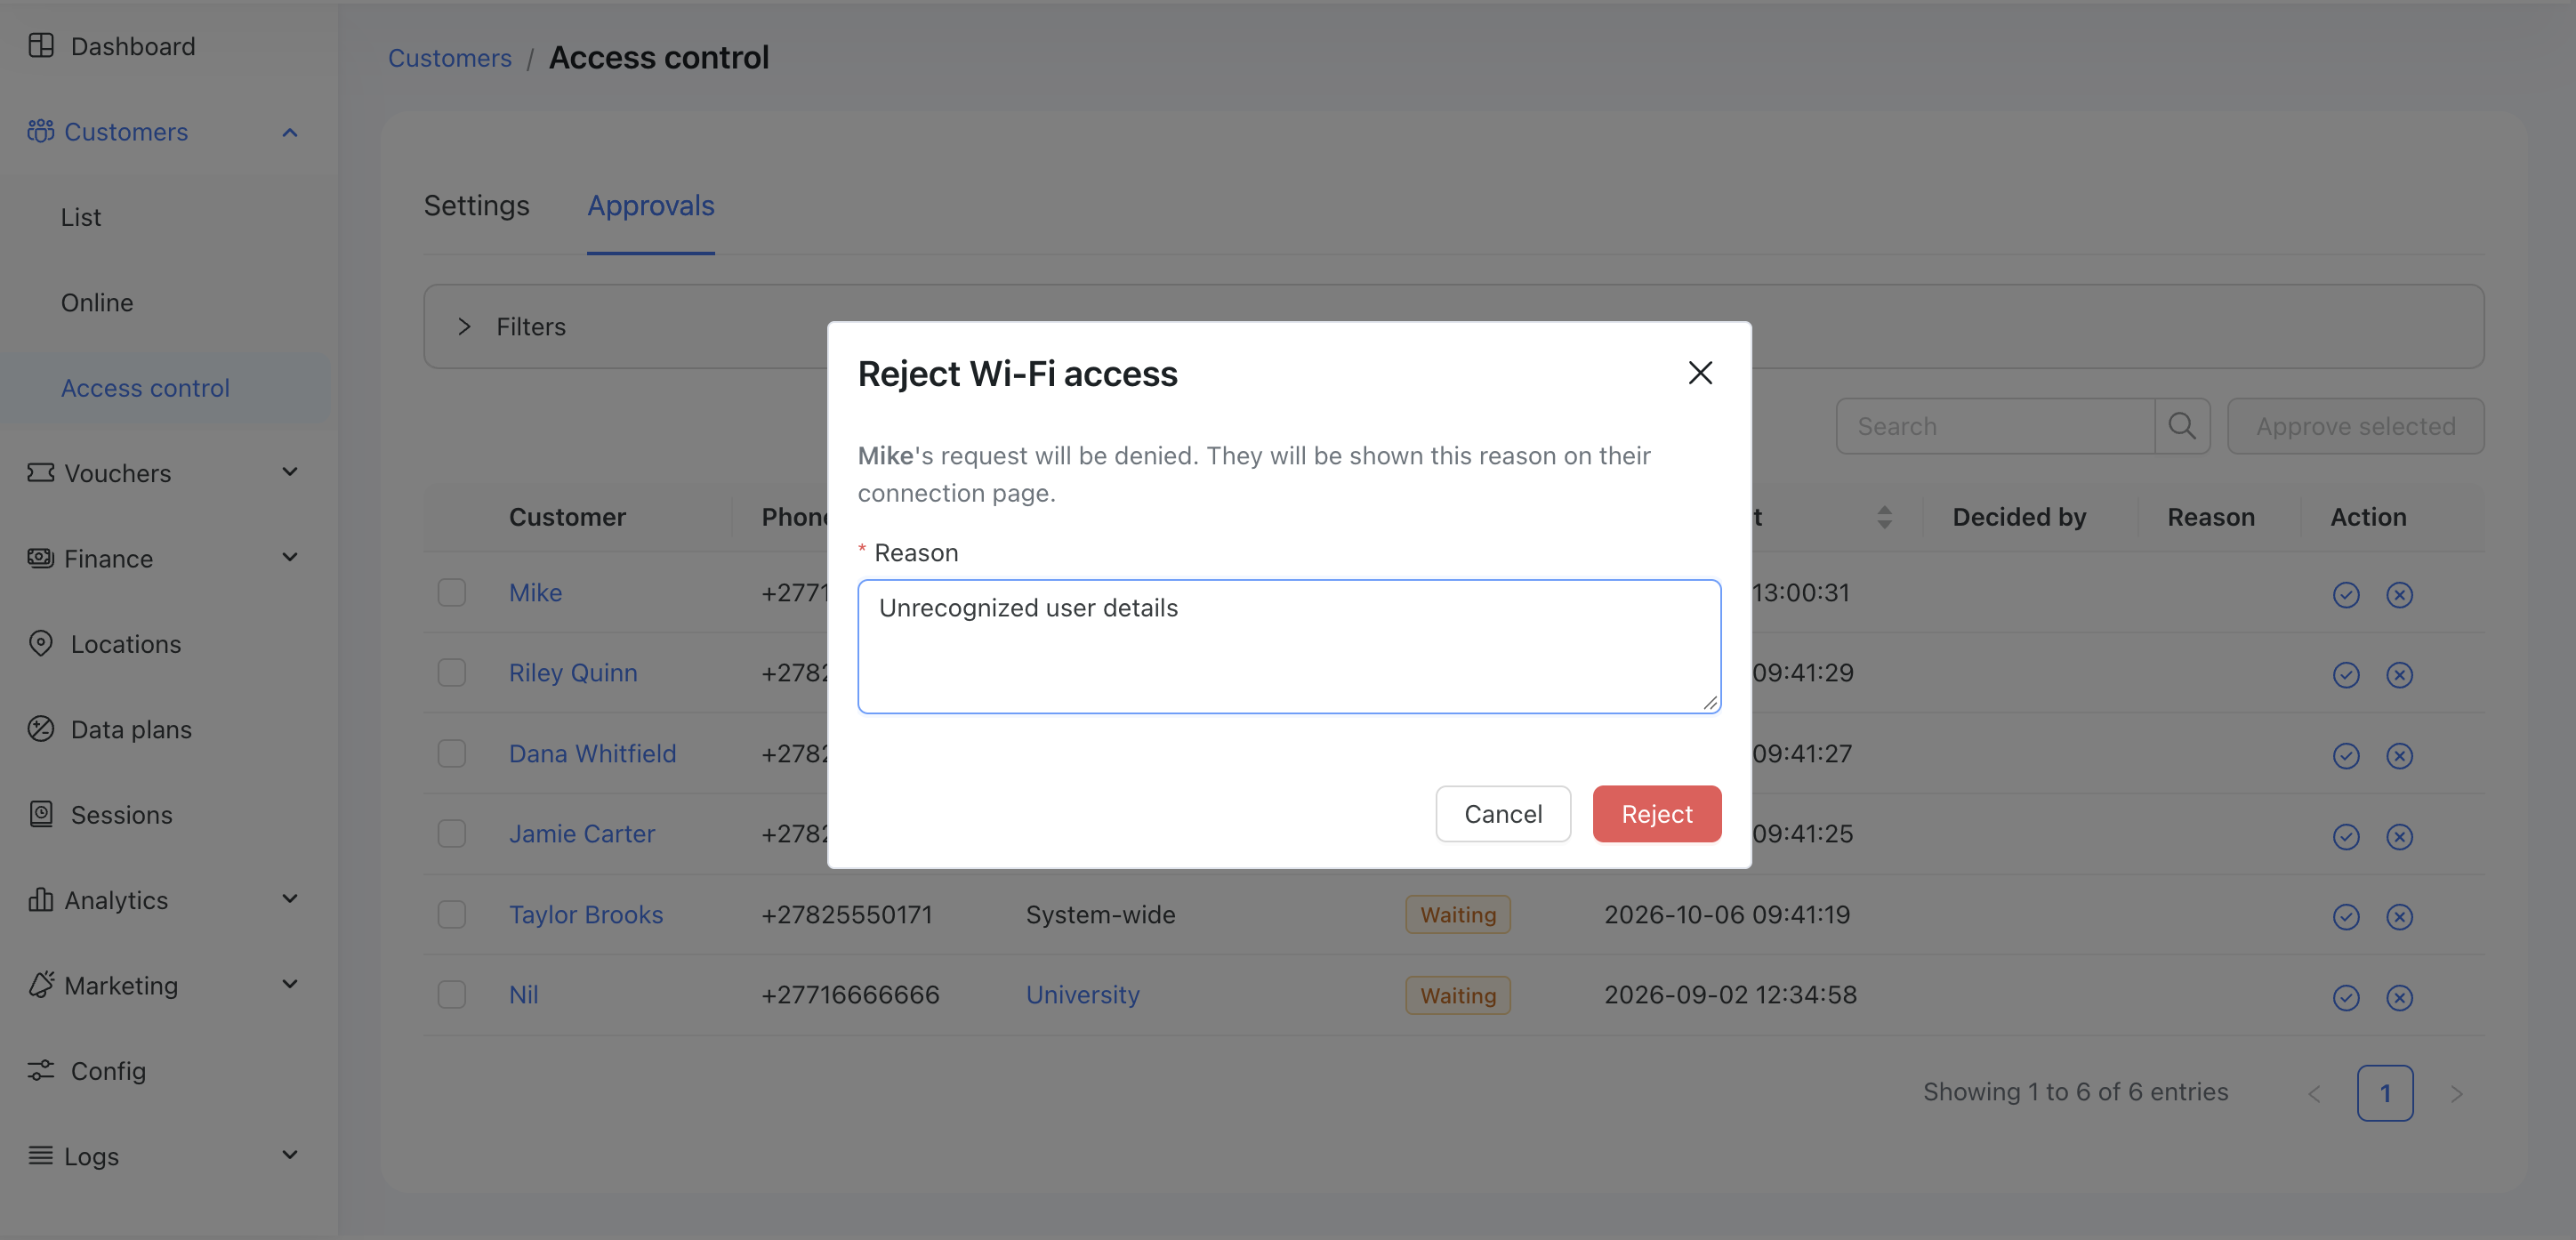
If rejected, the administrator can set a specific reason that will be visible to the customer:
When the customer reconnects later to check whether their request has been processed, they will see the rejection reason:
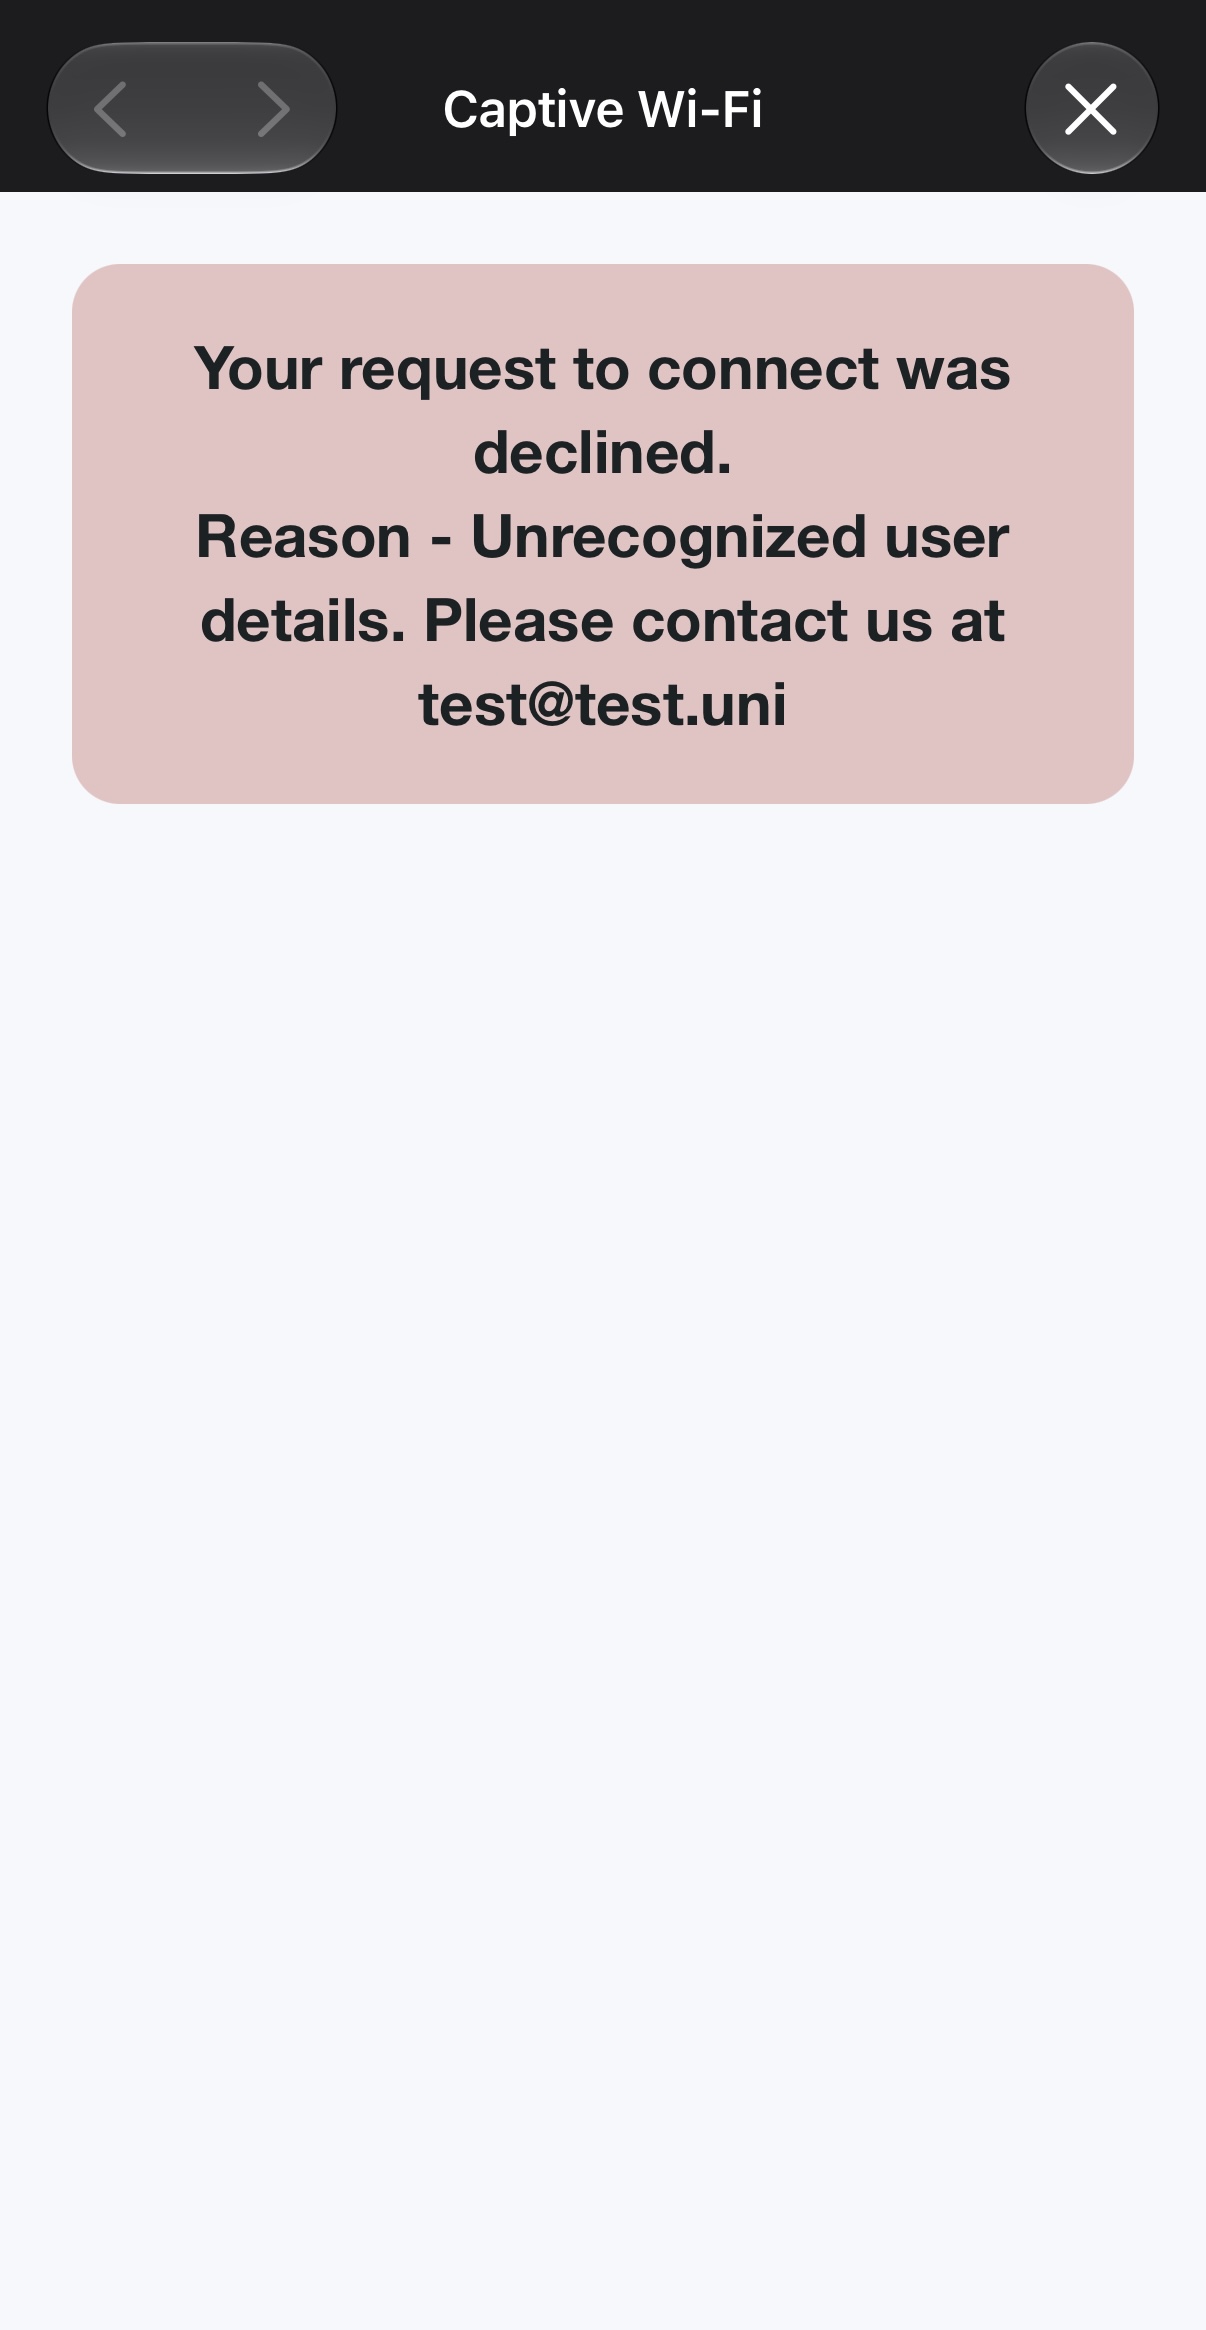
At this stage, the device hash and MAC address are captured, and the device will not be able to connect until an admin revokes the rejection.
Open Network (Preventing Fake Phone Numbers)
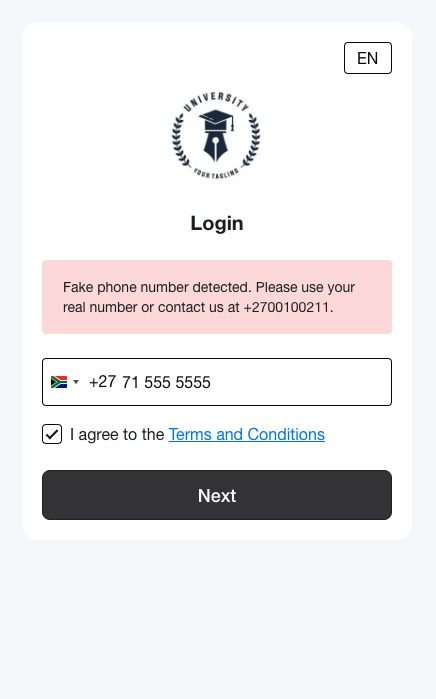
If your splash page allows open registration without OTP (SMS verification), some users might try to bypass data limits or voucher restrictions by registering multiple times with fake or predictable phone numbers (for example, numbers with repeating digits like +380995555555 or sequential patterns). You can set up access rules to catch and automatically reject these patterns.
To block predictable fake numbers:
Go to Customers → Access control and stay on the Settings tab.
Select your target location (or Default (system-wide)) in the Settings for dropdown.
Click Add rule to create a new access rule above the Default rule.
Name the rule (e.g., "Block Fake/Repeating Numbers").
Under Conditions, set up your filters. To block numbers with 5 or more identical digits in a row, select Phone number, choose the Matches regex operator (if available), and enter (\d)\1{5,} or (0{5,}|1{5,}|2{5,}|3{5,}|4{5,}|5{5,}|6{5,}|7{5,}|8{5,}|9{5,}).
Alternatively, you can use the Contains operator and add multiple OR filters for common fake sequences (e.g., contains 1234567, contains 000000, contains 555555).
Set the Action to Reject.
Under Message to the customer, enter a custom message explaining the rejection. For example: "The phone number provided is invalid. Please register with a real phone number to access the network."
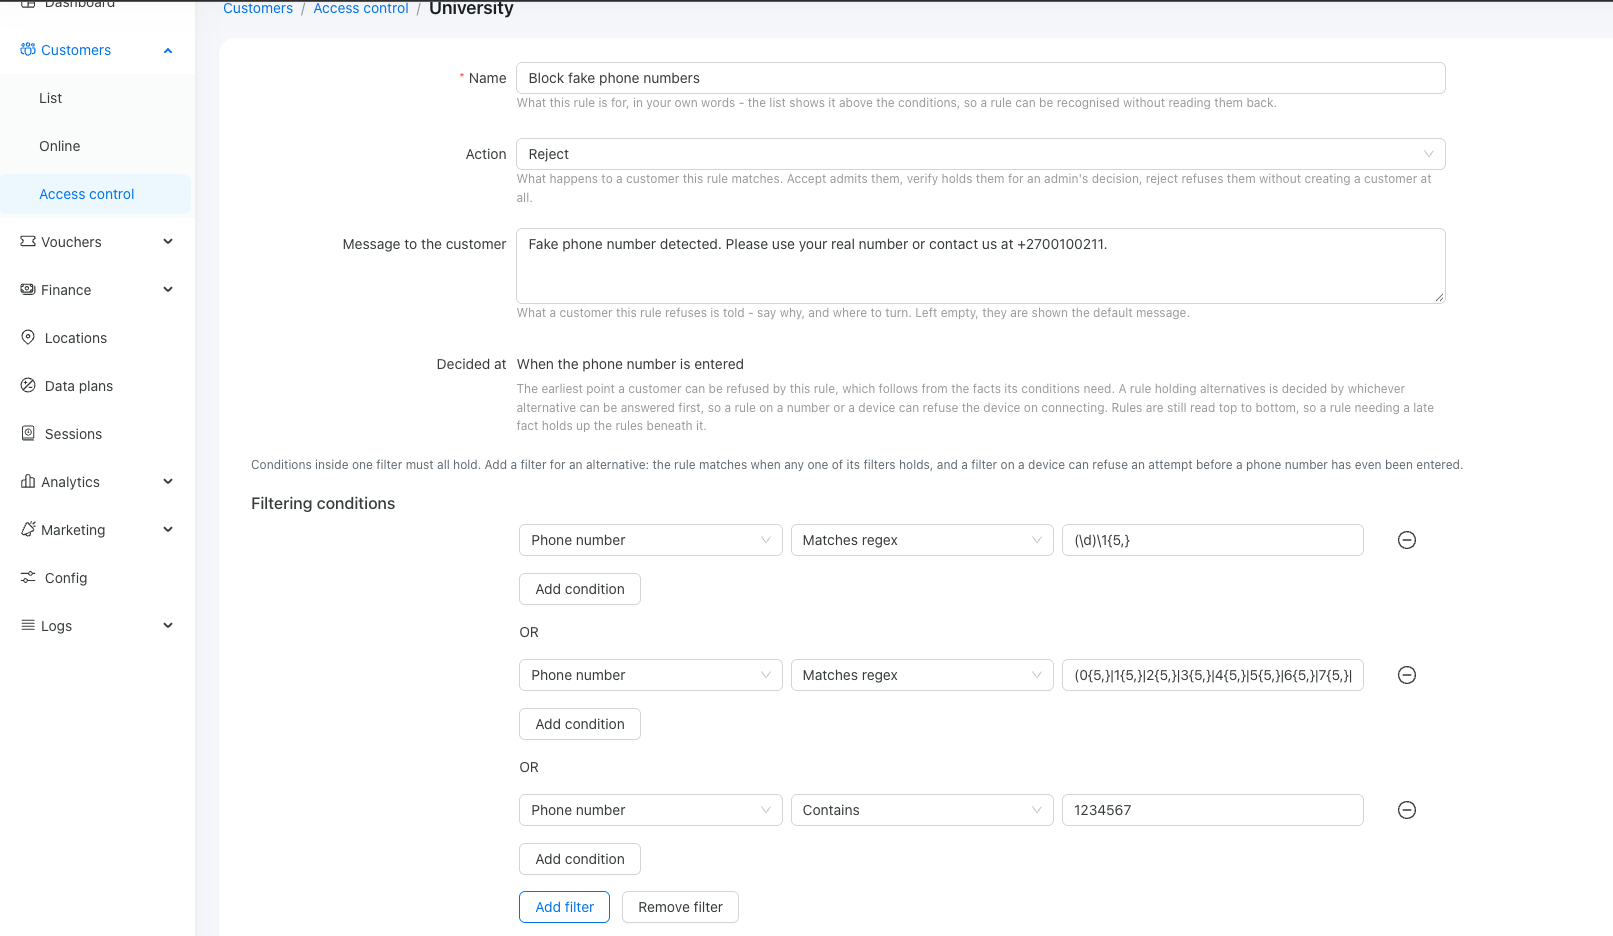
Click Save and ensure this rule sits above your Default rule (which is likely set to Accept) so it catches the fake numbers before the system lets them online:
Related pages
- Splash pages — the page held and refused customers see.
- Customers — the customer card and its Associated devices.
- Locations — setting up the locations you configure access for.